Showing posts with label Embroidery. Show all posts

Tuesday, November 6, 2018

a quick favor

I've needed to design a more all purpose favor than the one I made for the Husbeast, which was effectively insanity on silk, for a while. Aside from showing support for your own particular fighter: there's a growing movement to have adults sponsor youth fighters in the youth tournaments. I think that's really wonderful, and I've meant to get involved a couple times, but not had time to design and make something. I've also thought a small favor worked in miniature as say, a bookmark, might make a very nice "your work is REALLY incredible" token for arts. But, again, I just haven't gotten to it. But I ended up standing in as consort for a friend at crown tournament, which typically involves the consort giving the fighter representing them a favor, and it seemed like a good opportunity to design something that could be made reasonably quickly in a number of mediums. That way when opportunity to use it came up, I could just transfer it to fabric and work it up however I wanted: embellished applique, bayuex stitch, or even just outlined in stem stitch if I was in a particular hurry. I also wanted something I could use any materials that I had lying around or struck my fancy on. A basic, all purpose design, that would remain clearly representative of me.


 I started with my arms, which are a mouse salient on a green field, and  added my household arms to it. It made a super cute design!


I used my heat transfer marker to transfer it to a piece of green silk (I've got a BUNCH of odd scraps of this delightful green that I dyed for something or other a thousand years ago lurking about. So it keeps popping up.) I put it over handkerchief linen to give it enough body to withstand the tension in the frame, and outlined everything in black DMC cotton with stem stitch. I filled the shield with red and more black (this is all DMC cotton, I'm trying to use up my stash) and worked the cross in herringbone. The herringbone worked really well, but I didn't quite get the hang of keeping the points even till I was on the top (which was the last one I did.) It's a little more wodgy than I'd generally like. I'm not sure if I'll do it again or not. I really like the look of it but not so much the unevenness.

Then onto the body in more split stitch with ecru. I marked the directions that I would follow with the stitching to give the body shape with a pen before I started.

Then just keep stitching! This is 4 strands of DMC floss, which working in this small of a design felt quite like cheating! I tend to fall into the trap of working everything at super tiny scale, even when a larger scale would serve my purposes just as well. With 4 strands this worked up relatively quickly, and the overall effect is very nice.


With the body filled, I mounted it onto some heavy black linen for the backing and belt loop. The silk is pretty flimsy, it seemed silly to use it for the back as well as the front. Lots of pinning and some hand stitching later....

One finished favor! 
I'm really pleased with it. I think it's cute, recognizable, and versatile.

Monday, October 1, 2018

The Queen's Gift

This spring I was infected with a case of helium hand, and voluneered to make the queens gift for my embroider's guild. The queens gift is given by the keepers of Athena's Thimble to each queen around the time she steps down, as a tribute to her and her service. I had a glorious and terrible idea for something the at the time princess might like, and therefore, under the influence of caffeine and terrible ideas, raised my hand.

I've long been inspired by this lovely bog dress: the original was woven in a contiguous tube and fastened at the shoulder by brooches. it looks a lot like a roman chiton, which frequently had decorative bands at both the folded hem and the bottom hem. I had the thought of adding wide embroidered bands at the hems. The queen's favor is based on a pictish rune stone, so there was a ready source of designs. I decided I wanted to showcase the wide variety of pictish beasties on the rune stones in the pattern, a wide trim at the bottom hem, and a narrower band across the breast featuring the princess's two tailed mermaids at the center front and back, and some celtic knotwork roses symbolizing her status as a lady of the rose.

First I had to choose a fabric and techniques. The original gown is in wool, and I wanted to use wool for this one, but light enough that she could wear it in the summer. I also wanted to use purple, which was a color reserved for royalty in ancient Ireland (according to ye ancient irish bard of incredible helpfulness, Aife, who was my adviser in all matters ancient ireland for this entire project, and saved me innumerable hours of research and dead ends. ) I decided on a summer weight, almost sheer wool and that I could dye to get the correct color. Although Lichen dying has been a long time interest of mine, a little research showed it to be problematic. Aside from the fact that lichen dyes are notoriously difficult to get light fast, there is the problem with sustainability. It's generally recommended that lichen dying only be used for small projects or samples, because harvesting destroys the plant, which does not regenerate. I decided that I could use acid dyes to achieve the color I wanted. The fabric, a white wool crepe, was donated by a very generous patron.

I decided to use mounted bands of embroidery, worked in wool on lightweight linen, both to make working the embroidery more portable and convenient, and to hide the messy backside of the work. The additional benefit is that HRH can transfer the bands to another garment if she should so wish.

Rune stones of all sorts have been a long time fascination of mine, so it was fun to have an excuse to look at a lot of them. I spent a very enjoyable afternoon stalking museum collections and saving images, I came up with a large number of different wonderful patterns and beasts. In fact the most difficult part was deciding which ones to leave off.

I drew my chosen desings on a long strip of butchers paper, 7.5 inches wide, by 96 inches long. I centered a rose with a celtic knot detail at the four quarters, and bracketed it with sea serpents front and back. Then positioned a pair of animals in each space. Some of the animals had to be slightly altered to fit the space, particularly the gryphon: who was squashed into a long narrow border space, and the merhorses: which were entwined vertically, not horizontally. I then drew on the back of the paper with a heat transfer marker. This was my first time using this method of transfer, and I'm very pleased with it for this kind of work, although the line is fairly fat, so it's not a one size fits all solution. Working with it is a lot like working with the metallic paint pens, where you shake to mix the ink, then depress the tip to start the flow. I found it had the same weakness as those pens, after a while of use the tip starts to dry up, or the ink to separate again, so you have to occasionally shake the pen up and re-depress the tip to keep the ink flowing well. After i did the first transfer, I could tell where the pen had gotten a little dry because it didn't transfer as darkly. I ended up gong over the lighter areas with my fine tip sharpie to get clearer lines. The second transfer I worked I watched to be sure the ink was going on thickly enough, and shook/re inked the tip as necessary, and got very even dark transfer lines.


 I had ordered silver thread for the detail work, and appleton's crewel wool for the bodies. I've used appleton's before and it's my favorite. very fine, very uniform. I worked the outlines in stem stitch in charcoal, which i thought would give a slightly softer look than true black, then mounted the embroidery in a hoop and started the long process of the bayuex stitch filling.

I started with the roses which I did not do in bayuex totally. I worked the edges in stem, as seen in small areas on the bayeux tapestry. Then filled the petals interior with satin stitch, and held it down with the silver metallic couched down with silk thread. I'm really liking working with better metallic thread. it's still a giant pain, but it's considerably less painful than the cheap stuff. This from Kyoto Embroidery is reasonably priced, and comes from japan in a lot of weights and colors.


Then I did the bracketing sea serpents, working the bellies in bayeux, and then filling the backs with satin and couching it down with a lattice.


Then it was on to the rest of the animals. First filling in the accent or shading areas, very small or wiggly areas with stem stitch, and blocks with more bayux (antlers are stem. colored areas are bayeux. the shading on the legs/belly was achieved by alternating threads of black and brown before couching over it with brown.


Then filling in the background color


Then repeat with the next animal.....


I had lots of help from his royal puttyness, in a supervisory and thread warming role......

     
Finally finished! 

With the hem done, I scoured the white wool crepe with dharma textile detergent (a synthrapol alternative) and got out my patent pending dying rig for large batches: a large steel garbage can, that I put on my big outdoor propane burner. I have an old shovel handle that's a perfect stirring device. I got lucky with this dye job: I was rushing, trying to watch the kids and work, and had a head cold when I did this. I made a paste with the dye powder and water, stirred in more water slowly, but neglected to strain this mixture into the dye pot. Just, dumped it in then added presoaked fabric. When I stirred? little clumps of dye all over the fabric. It hadn't all dissolved. I spent the next half an hour elbow deep in the scalding water, scrubbing little spots of undisolved dye so they'd dissolve in the hot water. Between that, and the glauber's salt I added to keep it level, amazingly the dye job is perfectly even. However, not at ALL the color I was expecting out of "purple haze." thankfully, while it's not Lichen purple, it is (as pointed out to me by BestLaurel when I panic messaged her) shoo in for tyrean purple, and very pretty. I called it a happy accident and went with it.

thankfully the bog dress is just a tube, so it's a matter of sewing rectangles together with a reversible seam (in this case flat felled). I felt rather badly for mounting this much work on a machine sewn dress, but at this point I was rapidly approaching deadline and slightly panicked, so I swallowed my scruples and moved on to mounting the hem. FirstI pinned the SNOT out of it, and machine sewed it to the bottom edge of the dress. Because my slate frame was occupied I did this on a round frame, and it DID allow the fabric to pucker a little. Lesson learned, next time just suck it up and take the other project off the slate frame (or you know, buy a second slate frame??) You just don't get as even of tension on larger projects on the circular cross stitch frames, and they don't grip evenly if you're expecting them to grip over bumpy areas (like previously embroidered figures).

then flip it up, and more pinning! Crepe is stupidly stretchy, and doesn't want to stay put)

I worked over the edges with couched silver thread. This thread comes in skeins, and I've found that toilet paper rolls, or better yet, sections of stiffer paper towel tubes, work great to wind them onto. It's big enough in diameter that the thread doesn't get kinks, and you can make a slit in the end to catch the thread, because metallic is SUPER springing and will basically leap off the roll. then I bound the top edge with a strip of blue, and sewed the edge of that down with couched silver.  At this point I called it done enough, because I wasn't sure if I started the mermaid on the top, I would be able to finish it before the event.


Front, the mermaid will be centered on the fold down portion, with a pair of
crescent moon and V rods. 

Side

Back

I was really pleased to be able to do this for the guild and for the queen! She really liked it as it was, but I did end up bringing it home to finish putting the mermaid on the front. 
The deputy guildmistress and I present the gift in court. Photo Credit Cataline la Broderesse

The best thing is having something you made make someone else happy!  (Photo credit Cataline La Broderesse) 


Monday, March 12, 2018

Embroidered Viking Kaftan

I decided last fall that I wanted to finally make myself a kaftan, and not only that, but I wanted to make a nice Kaftan, not just, fling something together as quickly as possible so I have something to wear. I have a shawl, I have a square plaid cloak, I can keep warm adequately at most events, but a kaftan is another layer, and more convenient in a lot of ways than a folded shawl or cloak.

while men's jackets, wrapped and belted in the style found in Hedeby, or in the case of Birka, fastened with buttons, are extensively (for viking garments) documented, women's Kaftans, or long coats, are not even a little. There are instances at birka, where silk loops, of the kind used to fasten a garment, have been found in a brooch positioned below the breasts. There was a hemmed piece of wool found running over the edge of a tortoise brooch. That and worked silver bands around the wrist area, not obviously associated with a serk, and decorative bands possibly associated with a lower hem, are about the the sum total of the evidence. Figurines are, notoriously, difficult. Women are shown wearing large triangular wraps which obscure the upper half of the clothes, leaving which layers are which at the bottom, debatable at best. But, considering the existence of a similar men's garment, and the practicality of another layer in a cold climate, it's not a far leap.

The presence of the single closure under the bust, the partially covered tortoise brooch, along with the practical difficulties of closing a garment over bulky brooch and beads, and the impracticality of covering your knife, keys, needle case, etc with a garment, argue for a sort of scooped cut away neckline, going around the broochs. This allows for the continued display of beads, and makes it possible for the chatalaine items to fall over the outer garment, thus remaining accessible. Some argue a high neckline could have been allowed to fold open, and while this is certainly possible, the shaped neckline of the hedeby mens coat, and the fact that the one fragment found over a tortoise brooch was hemmed, not folded, argues some against this.

The general consensus then, is that this was a long sleeved, calf length at least garment, with a scooped neckline, possibly trimmed with silk, held closed beneath the breasts with probably a Trefoil brooch threaded through loops. I will fully admit that this is the shakiest of all the viking garments in terms of evidence for it, and that building a full fledged garment from the very miniscule facts we have is questionable at best. Some people decline to admit such a garment even existed! But, my previous arguments about practicality stand, and I decided to make one anyway.

Having set my hand to the plow, so to speak,  I looked through my woolens, determined to use one of the larger pieces. I had a large peice of very soft grey, in a very pretty color, that I've been using as a mantle since the beginning of my little viking adventure more than three years ago. It had been in my mind to upgrade it into a kaftan for some time. But grey is very boring for a viking. They weren't much for undyed wools, and from chemical evidence liked flash and bright colors. Besides, the grey would have made a kaftan of scanty length. I also happened to have a chunk of heavy orange in plausible madder, which I quite liked ,but was too heavy, and too small to do almost anything with. That and the bag of wool threads my mom had given me, in shades of orange and red (originally intended for a color wheel that she never completed), sparked an idea: I would embroider the grey, to give it some flash, and then border it with the orange.

Of course there is the usual difficulty about large scale embroideries on viking garments, which can be argued ad naseum. I decided that I didn't care if it wasn't the purest interpretation of a garment already based on slightly dodgy evidence, and went for it. Animal themes are common in what embroidery we have remaining from the viking era, as well as in their artwork. I looked a lot of images, and decided to render a pair of my favorite birds, ravens, on the shoulders of the garment. I took the shape of the raven from a carving showing Odin with one of his birds perched on his shoulder (9th century rune stone from the isle of Mann), embellishing it from several brooches in raven form.

I particularly loved this little brass piece. it was listed as a horse harness ornament, but I was unable to find a specific date, or location for it. I loved how all the feathers had different textures in the tail. I decided to use different textures in all of the tail and wing feathers of my ravens, and try to use stitches to imitate textures found of pieces of raven jewelry.

I cut the kaftan in a very basic style similar to the hedeby coat. Straight fronts and backs with a sloped shoulder, with a center back gore, and side gores to provide fullness in the skirts. Since it's desireable to have the over layer slightly open in the front to display any decorations on the smokkr below, and since the coat didn't need to wrap like the hedeby coat, I did not use a split front gore. The sleeve has a slightly shaped head, and a underarm gusset, Because of fabric shortages the sleeve is a bit wodgy. The gosset is long and tapered at one end to give me more upper arm room, because I could fit that on the fabric I had, but not a wider upper sleeve. Considering the extremely funky piecing we've seen on some extant pieces I am going to call this totally period. Then I turned all the edges under, and whip stitched them down to finish the edges, using modern cotton thread in a matching color of grey. on a nice thick wool, it's easy to pick up the threads on the inside without your stitches showing on the outside.

I traced half of the upper back into my big sketch book, and drew one of a pair of ravens. The very vertical pose of these ravens makes them ideal to use across the shoulders, because they fit very nicely. The scale worked out so their tails end right above the tip of the back gore. Since they're not attached to odin's shoulder, I interlaced the toes for a little extra detail. You will notice the feet are staggered as in perspective view, but the same size. That's a typical feature of this period of art. I originally was going to use the curled beak you see on so many of the brooches to echo the curled toes and the swirl on the wing, but decided, as period as it is, i just don't care for it that much, and went back to the simple beak from the isle of mann carving.

Transferring it onto wool was, as usual, a lot of fun. wool is a super huge pain. I ended up measuring and marking reference points, then drawing the ravens on free hand with a fine tipped sharpie marker.

I chose to use chain stitch for the outlines. I worked the ravens on the cut out back piece before putting it together both to ensure I had enough embroidery thread to do the outlines all in once color (since I was working in a limited supply) and because then I didn't have to wrangle the whole coat around  I did not use a hoop for any of this work.  Although a hoop can be an invaluable tool, I don't generally care for using one in the first place, and particularly dislike it when working on wool. There are some situations in which it's unavoidable, but the way I work a lot of my outlining stitches make it somewhat counterproductive.

With the ravens outlined, I started on putting the kaftan together. My original plan was to use a decorative stitch both to construct and embellish. I had used van dyke stitch to construct a hood for Kitten earlier in the year, and it had both gone quickly and looked pretty. Since I was using one of the cousins of that stitch for this I decided to work it the same way. I ran the first half of the center back gore, from the point down. The ends didn't line up. This was odd, but I decided I hadn't measured correctly, and started the other side, working from the point down as well. This time the OTHER edge was longer. This was clearly not an issue of mis measurement. I laid the piece out flat on the floor, and the issue was clear to behold: the stitching was pulling up one side of the work as I went. Since I had worked both sides tip down, one seam had pulled up the gore, the other side the back of the kaftan. it was terrible and rumply, and steaming wasn't going to solve it. At this point the whole thing went into bad project time out for a few months.

Once I was over sulking and wanting to kick things. I took out all the stitching I had done, carefully, so I could re-use the wool thread (remember limited thread and no way to get more!) and (grumpily) basted all the seams. Then I went back and worked all the seams in the decorative stitch. It was really hard to get this as even as I wanted it to be, and I'm still not entirely happy with the outcome. I love the look of the stitch but don't love how un tidily I ended up working it.
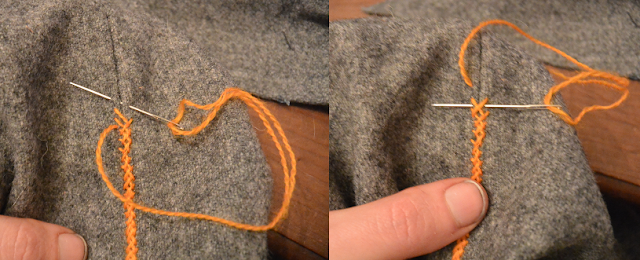
Working the decorative stitch is a two step process.
I finished all my tails by the simple expedient of working a few split stitches on the seam allowance then running the tail under a short ways.

In between running the seams I worked on the ravens, being sure that all of the colors of thread used in the seams were also represented in the embroidery on the back. I used a feather texture worked in cloister stitch, a couched lattice work, spiraling split stitch on the lower beak, and bayeux stitch on the upper beak. I needed one more texture. I decided to run a series of tall and short osberg loops down the last feather to recreate the stamped circles used on a number of the brooches.

The first step of osberg loop stitch: pin all those loops!
(so many pins)

The bodies of the ravens looked empty and sad without any fill, after I'd filled in the feathers, so I used spirals to loosely fill in some of the upper bodies and sort of flying wedges of couched thread in the spiral of the wings. Again, textures taken off pieces of raven jewelry, which had knotwork or circles worked to fill in the bodies or portions of the body.
Finished ravens! 
Once I had run all the seams on the body, I had to attach the trim to the bottom. I had cut wedges and rectangles that continued the shape of the pieces of the main coat, I sewed them together and felled the edges down with white wool handspun.
 I sewed the seams with the allowance to the outside, trimmed the grey down short, and turned the seam up over the body, where I basted it down. I covered the seam with a couched down whip cord braid.
Then I hemmed the coat with a herringbone stitch, which shows neatly on the outside as a parallel row of straight stitches. This is a documentable period technique. Actually it's the only documentable period use for herringbone, as much as we vikings love to use it over seams on the outside for the fancy.

Whip cord braiding in progress with my
improvised bobbins.
Then I edged the front opening with bands of orange, and the neck edge with orange cut on the bias, which used the last scraps of the orange. I had enough cord to cover the raw edge of the bias wool with couched cord, but whip stitched the front edges down with white wool. That made it "finished not done" and wearable in time for Edlvatten's Winter Thyng which seemed like a reasonable debut. I'm now making more whip cord braid to finish edging all of the orange, and maybe run another line around the bottom somewhere, maybe with some decorative doodles. I'd also like to embroider some rondelles around the bottom, but have to figure out the exact design for that, so this project is on the back burner for now!

Of course no images of me actually wearing the garment seem to exist, but I did get some nice ones of it in outside light to share with you. It is a lovely sweepy flowy thing, and I do enjoy wearing it. It's also VERY warm. With the addition of my mittens and hood I am warmer than in a mundane outside jacket wearing it! And of course, for a really cold day I could add a cloak on top of this, plus wool stockings under my gown and possibly nallbound socks over them and under my turnshoes for outside wear.


Monday, February 5, 2018

Purple Smokkr

About a year ago, I aquired a lovely piece of wool twill, in a color I like to refer to as "plausible purple," with the intention of making myself a second smokkr, of the un-pleated variety, to expand my somewhat scant wardrobe. My black pleated smokkr is, at this point, more than three years old, and has made the rounds of many, many events. It's beginning to show some wear, and to be frank, I do get a little tired of wearing the same thing all the time. With the massive rush to get us ready for camping events last year, I did little to expand my own wardrobe, aside from necessary new undergowns and fighting gear. But this winter  I wanted to add a couple nicer pieces to my wardrobe, made properly, not in haste and out of absolute panicked necessity. With a kaftan and a second smokkr, I would be set for any events for the next few years, until my old things started wearing out at least. It would be a relief to just not have to worry about my own garb, and be able to focus on keeping the gremlins in clothing that actually fits.

As far as historical reference, I could go on at great length, but that would be reinventing the wheel, instead I would like to direct your attention to these two fabulous articles by Hilde Thnumen, who has gathered all of the primary source material, translated as necessary, and discusses the conclusions that may be reached at length. I cannot do better.
Viking Apron dress: Smokkr
 haithabu smokkr interpretation

Silver-gilt Viking pendant, Oland, Sweden,
6th century
I am going to be basing my reconstruction on the Haithabu smokkr, which is closest geographically to my persona's residence in what is modern Scotland, and on this wonderful little figurine, usually interpreted as a Valkyrie. I love the surface detail of the braided decorative bands. although this figurine seems to be wearing a separate trained garment over the top of her smokkr (we assume it is a smokkr, although we cannot see the turtle brooches) the slightly trained silhouette seems to be a theme among the figurines, and, as I find it graceful personally, I have maintained it in my recreation.

I started out by pinning the wool around my bust, to a comfortable tightness. that gave me a measurement of 41 inches (without seam allowance) separating half to the front, and half to the back, and adding seam allowance, gave me two panels of 21" Measuring down from where the top of my smokkr sits now, to where I wanted it to start to flare, gave me a measurement of about 8"

Then it's a matter of fitting the pieces onto the available fabric in the most efficient way possible. there are a number of hypothosized layouts for the fitted style smokkr, and you can make one work for almost any size and shape piece of fabric. I made the first cut with the front and back, then unfolded the leftover square to make the side gores. I did not curve the bottoms of the side gores because I wanted a train effect, the longer, diagonal side will go towards the longer train side. This also keeps the front relatively flat while flaring the back out, which matches with the shape of existing figurines.

With the rough seams sewn, I popped it on. I had the usual problem in the back, and had to take a large pinch out. I have an extremely curved lower spine, and it makes for a funny fit for almost all the basic layouts. One of the advantages of the pleated front smokkr is it alleviates this issue. I will probably have some horizontal wrinkling on this dress almost no matter what  I do, although cutting the back top down some helps, as does not trying to fit it tightly through the waist, which would be unflattering on me at present anyhow. with it on inside out I placed pins for the darts at the front, and also for the loops to hang my brooches from.

although I did run the long seams by machine, it was easier to run the very narrow darts (no more than a quarter inch at the widest!) by hand. Although the original piece, the ridge appears to have been set to the outside, then covered by fine braid, I had an oopsie here, and went on autopilot and put them to the inside. This is incorrect, however I plan to cover them with braid, so it will not be obvious.

Then I overcast all the seams by hand with contrasting thread, which is a period approved method of seam finishing.  I used blue DMC floss, since my ball of blue linen has gone walkabout. I'm not... entirely thrilled with the results. it's not as tidy as I'd love it to be, although certainly it's just as tidy as the overcast stitching on the dart of the extant garment.
 A number of the smokkr fragments found have been lined, or faced, with linen. It's impossible to know whether they were fully lined or not, since no full length garments have been found. because I ended up cutting the back of my smokkr down quite fat to make up for my curved spine and prevent unsightly wrinkles, I had a long bias edge from brooch to back. I wanted to stabelize this and keep the weight of the gown and pulling it on and off, from distorting the edge, so I used a partial lining of a natural colored linen. I also used this linen for the bottom brooch loops. Linen is actually more common, particularly for the hidden lower loops, than wool on extant smockkrs, probably because it wore better. I sewed the long hidden seam by machine again, doubling seaming it along the armpit/back portion.  Then flipped it into the inside of the dress, hand top stitched with purple wool, and used threads pulled from the selvedge of the linen to whip stitch the loops, and hem the lining down to the shell of the smokkr.

Fragment from Sarnanger b 10722 showing corded hem
Then remained hemming. I had my imagination caught by a fragment of twill, edged with a cord overcast with woolen thread. this seemed tidy, and like it would give the hem a beautiful shape. According to the article about the find (Thnumen covers it in her paper about smokkrs) it's a braided cord, whip stitched over with a two ply thread. I extrapolated that the cord was probably wool, since it still remained, although it could have equally been linen. I had wool, so I braided a 3 strand cord. The easiest way was to baste it to the edge of the smokkr, which kept it even, then overcast it with 2 ply wool, as seen in the fragment. you can see that the stitches are close, but not crowded. I attempted to recreate that, as well as the scale of cord/fabric. Of course I ran out of thread with an small section left in the center front. I was left with a few options. I could use another color to do the front section of the hem. I could undo the braid for the darts and use that thread to finish the hem, then make different braid, or I could find a way of decorating the front that hid the block of missing hem. Number one would have been the most historically accurate, and in the end, the least time consuming. Of course I chose the less historically accurate, more difficult, and super fancy option, and decided to make the front block purple, and root an appliqued tree into it.

My original plan had been to tablet weave wide trim and apply it in horizontal bands like on the valkyrie figurine. That plan is completely authentic and documentable (by viking standards) The new plan was less historically proveable. We do know that the vikings did use applique, the Osberg ship find included a wool gown with blue animals applied to the hem. Valkyrie figures show bands of decoration on skirts, but there is not real evidence for large scale blocks of decoration of this type. Even so, I liked the idea so much I ran with it. the best tree image I could find, was this one from a church in sedestal (for people with so many trees in their mythology, they sure didn't use tree images that much. Or my google fu for viking stuff has gotten weak), it's 12 century, so later, but the art has the proper shapes. I loved the acanthus like tree leaves. Acanthus shaped embroideries were part of the Mamman find, which is 10th century, so I felt the use of acanthus shapes was not out of context for my persona.

Also at Mamman was a embroidery showing two beasts (perhaps leopards?) facing a tree in the center. This was a common motif in oriental textiles of the period, which we know the vikings had access to, particularly from the pskov find that Thnumen goes over in her articles. It is thought that this motif was a reproduction of that style of artwork. Working from this base, and digging through my wool stash, I decided to use an appliqued tree with two Eastern Tygers facing it. Making my dress both a reference to the extant embroidery finds, and a nod to the east kingdom.

I drew the tree onto some aqua wool, and pinned it onto the gown. and then I started basting. And basting. And MORE basting. Followed by stitching it all down. I used small whip stitches, spaced out slightly. I've seen this technique used on early surviving applique pieces, and it was the most apt for the material I had to work with. The wool was more loosely woven and less fulled than is ideal for applique, so the edges required more stabelization, and I needed to cover more of the edge to keep the applique from just tearing out of the stitches.

That done, I sketched a quick Easter Tyger, slightly simplified to be more in line with the style of the mammen embroideries, and the extent oriental textiles. The extreme detailing of the EK tyger is much more in line with later artistic styles, so I just dialed it back a bit while trying to keep it recognizeable.  I cut that out of a gold wool skirt that I had for upcycling (moth holes) and pinned/basted it down. and by baste I mean overcast the edges with very tiny whip stitches to keep the little points from flying apart when I tried to applique around them.


Then I couched blue cord around the Tygers. Technically the Eastern Kingdom Tyger is blue on a field of yellow, but this looked good, and was still a nice nod at the East.

With the embroidery done, and thoroughly steamed (Even being careful it gets a little lumpy while you're working it) all that remained was to baste the braided trim (six strand braid in two colors like
in the Haithabu fragment) over the darts, and make the shoulder straps. Although there are plenty of examples of Smokkrs with both the upper and lower loops out of linen, I decided that I preferred the look of the matching straps, and made the upper straps/loops out of a remaining scrap of purple wool.  these were whip stitched down to the lining with my newly found blue linen thread, and my new EK Smokkr was done! and in plenty of time to wear to Birka. Of course Birka then didn't go as planned due to car trouble, and I missed the fashion show and only got to wear my new getup for a little bit. I did however, get to wear it with all my other fancy for walking into court at a part of my friend's pelican procession this weekend at dancing fox. I had the privilege of being the person who got to put together all the bits of his regalia cloak (it was a group project which a lot of hands worked on), and they asked me to carry it into court, which was a surprise and an honor! so I was happy that I had my new fancy EK Smokkr to wear. Now I just have to get an eye bleeding gold Serk to wear under it!

Of course there are no actual pictures of me wearing it in which you can see the garb.
Edited 4/19/18 to Add: Someone took a picture of me in it!


A couple final notes: because it's more fitted through the body, it makes my serks shorter! ACK. So I will at least make my fancy court serk to wear with this longer. Also, this lay out doesn't lay as gracefully across my back as I would like, due to the previously noted curvature of my lower spine. I think I need to add a small center back gore to alleviate this problem and make the gown flow gracefully from top to hem. Possibly I could also flip the center back pieces so the angled edge is at the center back, and the straight edge at the side back and get a similar effect, although that would effect the side flare (which I like) some.  As it is cut, there's a little wrinkle lump in the small of the back now, and there's not much I can do about it. I'm going to take the gown to my mom's and put it on inside out and see if with another set of experienced hands I can somewhat sort the problem, but alas, the only real solution is to put at least a small gore into the center back seam. Again, the pleated front smokkr doesn't have this problem. it's actually much more modest in fabric use as well. It's interesting the things you discover about fit while doing this sort of reconstruction work. I wonder if one of the reasons for the pleated fronts was because it provided good fit with less fabric. We'll never know of course, but it sure is fun to speculate!