Showing posts with label Hats. Show all posts

Saturday, November 10, 2018

A Ridiculous Hat for Crown Tourney

The banker and his wife, detail
Marinus van Roejmerswealen
Keeping with the tradition I started last year, I decided that I needed a new silly hat for fall crown tourney this year. Something appropriately ridiculous, but that I might be able to re-wear more often than last year's effort. I had a portrait that had caught my eye months and months ago specifically because of the totally over the top headgear.I loved absolutely everything about this hat, especially that it appeared to be worn with a forehead cloth, which would cover my too short for accuracy hair. The fact that she is wearing it with a houpelande is even more perfect because it makes it a good combination with my houpelande and therefore perfect for my crown outfit, and more re-wearable as part of my dress uniform.

Related image
Anne of Cleves, 1539, Hans Holbein
The hat pictured in the Roejmerswealen painting appears to be brocade, with a black band (maybe velvet?) and a brown forehead cloth. I wasn't sure that forehead cloths were a THING for this era, but the portrait of anne of cleves, dated 1539, distinctly shows a forehead cloth. The Banker and his Wife is from between 1533 and 1545, in the same rough time period and geographical area fashion wise.

I started out by cutting butchers paper, pinning and taping it, and sticking it on my head, until I had a suitable shape. Although the whole hat has a rounded shape, it seemed like there was a distinct line at the top edge, where you could put a seam.  So I made it in two pieces, a curved front and a flat back.

A LOT of taping and pinning and cutting later, I had something I thought worked, so I pinned my veil over it to double check the shape with the veil on. (this was another project where I amused my sister with a succession of ridiculous pictures of me wearing paper hats.) I was having fits trying to get the shape of the horns right, when I realized that this probably would have been worn over a long braid coiled and taped at the back of the head. My hair is quite short right now and I was putting the back of the hat snug to my head. As soon as I allowed for the period hairstyle under the hat, the shape immediately went in the right direction.

Now it was time to make the hat form.  I traced my pattern onto the buckram with sharpie (I bought real actual buckram to use on this project, upgrading from my earlier use of heavy needlepoint canvas). I then cut it out with a very very scant seam allowance, and sewed the top seam. Which I then ironed to the back and steamed down over my sleeve board to force it to be a rounded slope rather than a sharp edge along the seam. I overlapped and whip stitched all the other seams, and added a small dart at the nape of the neck to get the bottom back to sit closer to my head.

I covered the whole thing with a layer of batting to soften out any edges and seams.

That done I had to decide what to cover it with.  I wanted something I could wear with my dress uniform, which meant either black, grey, or red and black. I decided on red and black squares, turned on their points, as a nod to the personal arms of the house brother I was acting as consort for. Therefore I cut 1 1/2 inch strips out of red and black silk (the red was a sari and had to be stabilized with tissue weight fusible interfacing) and began to sew.... Sew the strips together, cut them across into 1 1/2 inch strips, sew THOSE strips together... a lot of pinning and ironing and some considerable time later.... I had something that looked like I was trying to make a fabric checkers board...


With the fabric to cover the hat all made (and me praying I'd made enough) I started pinning it on. I wanted to mount it with the squares running diagonal as much as possible, so  I centered one set of diamonds on the center front, and straight down the back, and started smoothing and tucking from there.


And smoothing and tucking and pinning, and trimming off extra and sewing it on spots there wasn't enough, and STILL praying I had enough. I had enough, but only just, a tiny handful of scraps was all that was left over.


while I was doing this I was trying to think of how to make this hat just a LITTLE bit more ridiculous. because you know, covering it in 1" piecework squares just didn't seem like QUITE enough. I got lucky and found some teeny tiny stamped tin maltese crosses in a shop specializing in vintage millinery supplies on etsy. Each approximately a quarter inch square. I bought all of them that they had and hoped it'd be enough to cover the whole hat with some sort of pattern. I was able to cover the front side with every other black square, and had just four left. So I used them to pick out Joachim's arms on the back of the hat.


I did the last bits of this in the car on the way there, seven hours is a long drive and I like having handwork to keep me busy. However it also means that I'm further away from my tools and led me to a kind of funny oops. Getting the points tight was a bit of a struggle, involving lots of pins and muttering. I carefully pinned one corner, stitched it up, turned the hat over..... and realized I had sewn one of the pin heads into the corner! So there is the point of a pin sticking out of the fabric in the middle of the back. No way was I taking it out and redoing it! Now that I'm back home I plan on nipping that off with a pair of wire snips. (the pucker you see is the edge of a tuck easing the edge into the bottom curve.) (you can also see where I had to add a little piece onto the corner here and my square matching got a little wonky)

The last step was a black velvet band stitched down around the face edge. This hat actually doesn't have a wired edge at all, nor does it need it to keep its shape. the band is tight around the head and the friction of the velvet keeps the hat stuck to your coif/forehead cloth really efficiently.

Photo by Brenden Crane
I cut a largish forehead cloth out of brown linen (big enough to pin at the nape of my neck), close to the color of my hair and to the color of the painting. I actually dispensed with the coif for the day since I don't have enough hair to need to restrain it, and just pinned the forehead cloth around my head like a bandanna then put the hat on over it, and pinned the veil on. (I used my small rectangular silk organza veil with the beaded ends)  I can attest that this is light, comfortable, and WILL stay put through almost anything: including gale force winds.


Tuesday, October 17, 2017

15th century Heart shaped Hennin

In order to match my in progress houpelande, I needed some sort of period headwear. Now the 15th century is notable for many things, amoung them the sheer volume of truly EPIC headgear. From things that look like a lampshade inverted over the head, to the large number of different varieties of hennin, to some truly incredible pinned and shaped veils, the 15th century has the fabulous and faintly ridiculous to the modern eye headgear competition won. In fact, sifting through it to find something that I could wear and not feel totally ridiculous was difficult. The sheer size of many of the pieces is daunting, even allowing for artistic licence. My personal favorites are images from the beautiful fresco work of the nine worthies and the nine worthy women by Giacamo Jaquerio.


after a lot of looking at pictures, and sending pictures to friends and laughing over them. I decided that I had two options: I could go with matronly and demure, with a folded and pinned veil, something like this one from Van der Weyden. It would require some sort of basic supports, but I likely had all the moving parts for from my 14th century wimple/veil/false braids combo. This would be low key, which, as I'm going to be a companion for one of the consorts at the east kingdom crown tournament when I wear this ensemble for the first time, would be suitable. It's also appropriate for my age and also my sort of station in life. By medieval standards, I am a matron.


OR I could do something fun and ridiculous. I was drawn to this more moderate heart shaped hennin and folded veil, also from the fresco of the 9 worthies. I say more moderate as compared to the really obnoxious examples. like another from the same fresco. Now THAT is some hat!

While  have nothing against personifying myself as demure and retiring with my headwear (and in fact do go out properly wimpled and veiled whenever I do 14th century. which is rare but does happen) the chance to do something so (the adjective I keep coming back to is "ridiculous") completely over the top is rare. and it just looked like a good deal of fun, if I could get past people staring at me.

In the end I made my decision spontaneously on a day when I felt terrible, but still had to supervise the horde. I just needed something funny and cheerful to work on by hand while I sat propped upright at the table. And thus the heart shaped hennin was born.

Construction wise, I haven't heard of any surviving headdresses, so all we have are pictures and written accounts to go on. I've seen the heart shaped hennin reproduced a number of ways. A lot of them I find unlikely and some of them I think look wrong (personal opinion. not based on irrefutably concrete evidence or exhaustive research.) So I made it up as I went along, picking the method that seemed most likely to me, and extrapolated most from earlier headdresses: under the logical assumption that it's more likely that people would adapt a known form than create something brand new. (not that it never happens. but typically fashion proceeds one step at a time not in grand leaps.)
I started with a sort of elongated semi pointy caul shape to cover my ear and the side of my head. I first patterned it out of cardboard, and when the shape seemed reasonable, cut and sewed it out of heavy duty needlepoint foundation. Yes, the proper thing to do would be to use buckram. But I had this, and wanted to see if it would do in a pinch.
I made two of the caul pieces, and then set them aside to make essentailly a closely fitted coif of the same foundation material. first shaping it with a single center seam, and then tightening it in over the ears with a pair of darts.  With that solid, I attached the side pieces to it with pins. To be sure that the shape was right, I used a tea towel as a stunt double for the eventual padded roll adornment. So far so good. (I then proceeded to send pictures to all my friends that needed something to laugh about.)


With the shape set, it was time to start building the actual hat. First it all had to be padded with layers of batting to both finish out the shape, and to disguise sharp seam edges. I used the batting that I keep on the roll here, which is Quilters Dream angel. It was nice for this because it's dense and fairly firm rather than just super fluffy. It's also fairly easy to stretch to shape and tack down.

 I used multiple layers places where it need needed a softer, rounder shape: over the ears of the caul parts, and along the center ridge seam of the coif part.

 Then a single layer over everything. I paid particular attention to basting and butting the seams in the joins so that there wasn't any overlap. this kept the crease between wings and head shape and neat. I was also sure to pull the outside over the tip of the wings and baste it on the inside so that any lumps would be hidden by the padded roll.

 The last step on the base was to wire the edges. this ensures that the cap or hat or whatever millinery you are making maintains the shape of it's edges. In this case it's particularly important because it keeps the edges of the cauls tight to your face. Typically one would use Millinery or florist's wire. This is copper ground wire, because it's easy to shape, sturdy, and (this is a repetitive refrain of mine) I already had it lying about. I tacked the wire in place to be sure the bends were right, then used blanket stitch to attach it all the way around the edge. Usually I've whip stitched, but for this application i liked the way blanket stitch held the wire better: it made a sort of casing.

With the base done, I started covering everything in fabric by draping a long strip of bias cut black cloth (the same from my gown) over the coif portion of the hennin. Bias allowed me to pull it tight to shape along the top, only taking in a small dart at the center back. I basted it to the batting where it will go under the sides, and carefully basted it into the joins between the wings and coif. 
then the inside of the wings. I was originally going to cut the pattern piece out and then sew it like a slip cover, but because of the added padding, and because the draping on the center part went so well, I decided to just drape bias cut pieces of fabric over the wings as well. This portion got photographed and sent to all my friends as well, since it looked like I had a giant bat perched on my head..... I was everyone's comedic relief while I was working on this thing (including my own!)

 it looked a good deal less like an errant bat once I'd trimmed the fabric, gathered it, and whip stitched it down to the padding.

It was also at this point that I decided the tall points of the cauls were a bit less sturdy than they needed to be to hold up to decorating and padded rolls and whatnot. They tended to want to collapse in on themselves when I was stitching them, and I was afraid that they might get accidentally crushed and be hard to re form once the hat was lined. So I packed a little poly fill into the tops just to firm them up a little. That solved the problem and they held up beautifully to all the rest of the decorating.
with the major construction of the form done, it was time to finish off the inside of the cap with a lining. I made the lining like a coif, with a single curved back seam, then basted it into the inside. Because the foundation of the hennin has numerous shaping darts, I had to slightly gather the lining into it. For this reason I used a very thin cotton muslin, that wouldn't be awkardly bulky. I carefully turned and whip stitched the lining down to the brow portion of the cap, then bound off the rest of it with some matching linen bias tape I had lying around from another project. 
 Next project was covering the cauls. I had a plan for a scrap of burgundy or dark fuchsia (somewhere in the middle. very pretty) velvet I had. Unfortunately it had been in the bottom of a bin and was quite crushed. A good steaming and brushing with a stiff bristled brush sorted everything out though.
 I cut the cauls using the pattern from the foundation, plus a little extra to allow for padding. I decorated them with beads and gold ribbon and braid in a lattice pattern. Because by this point I had challenged myself to make the whole hat with nothing but what I had on hand, I ended up making different design choices than I usually would, but I think the final effect is very pleasing.
 With the cauls made, I mounted them on the side pieces. The grand plan is to make it so that I can switch the side pieces without completely deconstructing the whole hat. So the decoration was mounted to the velvet, then the velvet pinned in place and whip stitched down to the form. I covered the stitching with some gold braid, then trimmed the edge with trim I made by braiding gold cord with faux pearl strand.

 With the hat itself finished, I turned to the padded roll. I made the base by wrapping strips of batting around a bent wire (ground wire again, because it's easier to shape than coathanger wire). Instead of wrapping it around a straight wire and then bending it into the characteristic V shape, I butted the batting at the front and back, and then cut it at an appropriate angle and whip stitched the ends together. This eliminated some of the possibly bulk and wrinkling.


 After checking the roll for size, I proceeded to cover it with some grey acetate faux silk from my stash. First whip stitching the fabric to the bottom of the roll, then wrapping it, turning the edge under, pinning it, and using small stitches to sew it down. With both sides sewn down, I angled the ends and carefully sewed them. angling the ends was important because it avoided a big bunch of ugly wrinkles right in the V of the roll. With the roll done, the final step was to bend it to shape and carefully baste it to the side pieces of the hat.


 and done! I'm still deciding on how to pin the veil and how much decoration to put on the roll. The small dangly things (called bezants) are period but I'm not sure if I love them. it seems to depend on how I want to pin my veil. Since this is just a stunt veil made of a piece of bridal tulle (the organza for the veil proper is on order.) I've decided to wait till I have the final veil done to decide how I'm going to pin it and if I want the bezants or not. I like them with the veil pinned this way.
But I dislike them with it pinned this way, with the "butterfly" in the center. Both are period methods of veil arrangement taken from images. but I'm not sure which I'l like more.

The other thing to take notice of is how much further down my forehead the front of my headdress is than the period images. I took it as far up to my hairline as I could without having hair sticking out (and I have a moderately high forehead) but it's still lower than period images. During this time period a high forehead was considered a sign of beauty and intelligence, so women would pluck their foreheads much like we now pluck our eyebrows. Since I am not going to pluck my forehead, I am left with a slightly off representation of the period look.

Pictures of the full ensemble will be coming once I finish up my Houpelande and get the proper veil finished.


Friday, December 2, 2016

A Venetian hairpiece. (The Lady in White project)

First I'd like to apologize for my prolonged absence! I have still been sewing, a lot in fact, but with the start o the school year, etc etc etc, have fallen behind on writing up the things I'm making! But husband and I are going to a very fancy elizabethan event December 10th, and i'm so excited about the outfits I'm making us that I have to write them up.

I'm making a gown based of this beautiful titian portrait "A lady in white" See that barely visible coil of ribbon woven hair? Isn't it lovely? Isn't it unfortunate that the last four inches of my fashionably light hair is.... Blue..... This is a problem I run into any time I do historical costuming. My hair is blue. Or purple, or some other not period color. My normal solution is to just cover my head, but this wasn't terribly fashionable with venetian women from what I can tell. I was mulling it over when it occurred to me that what I really needed was a hairpiece that I could pin over my own coiled back hair to produce a fashionable hairstyle and disguise my hair color. Basically a small hat, with a coil of ribbon bound hair around the outside that could be pinned down to my own hair.

Luckily for me, I have a victorian sensibility and save all my hair cuttings and a good deal of my hair combings. Typically I use them for spinning, but I've also made a couple of false hairpieces to wear with historical pieces, notably a pair of side braids for my 14th C wimple and veil. Thus I happened to have  large hank of hair lurking about in my fiber bin. You can also go to a beauty supply store and purchase a hank of false hair that closely matches your own. It would be considerably easier to work with, and the ribbons and hairnet would disguise most of the "fake" look of the hair I think.

As a side note, this project could easily be done on a buckram base of your choice. In fact, it would save you time making the base, and make all the later sewing a little easier. However, if like me you don't have easy access to buckram, and don't want to pay a bunch of shipping, this method works surprisingly well with things you can get at any craft supply store, and may have lying around anyhow.

First assemble supplies or making your base: a sheet of the plastic craft grid used for making those yarn covered tissue box holders and things, a coathanger or other firm piece of wire, string or heavy thread, and some tape. You'll also need a heat gun and something as a mold for your hat. I used this small bowl.

The general idea is to cut a square of the craft plastic roughly the right size, heat it with the heat gun, and mold it over the bowl. There's a couple things I discovered about doing this. First, it's easy to melt the plastic. Second, the whole thing works way better with a pair of nesting bowls. Heat the plastic, and then mash the second bowl down and hold it very firmly for a couple minutes until it's cooled. Once I discovered using a second bowl, it only took me a few minutes to make a rough form. With the plastic shaped, I took a piece of coat hanger and shaped it around the bowl to make a circle the same size, overlapped the ends, and taped them down. Ideally for this you would use duct tape or electricians tape, but if you're out of those, your hello Kitty packing tape works just fine. 

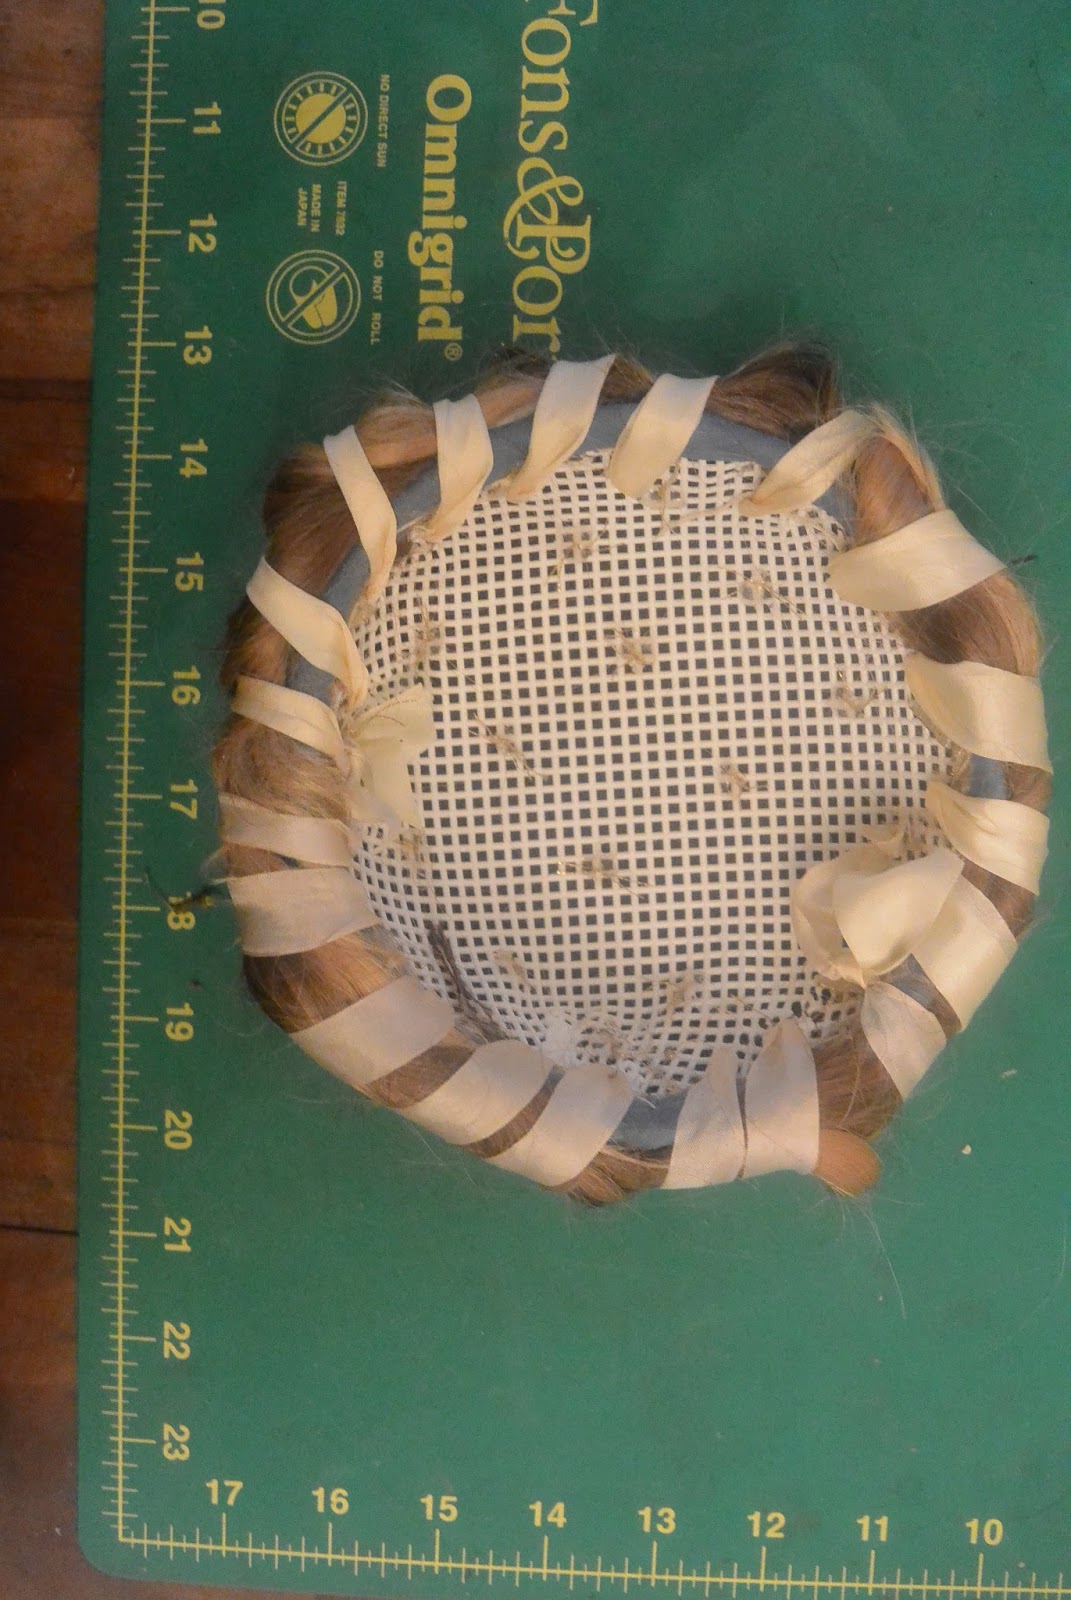
With the form done, now to make the base of the hairpiece. Using cotton string and a large needle, I first overcast stitched the wire circle to the plastic. Then I took a piece of fairly coarse brown linen, easy to drape, and not likely to be noticeable if it showed through the hair, and basted it down above the wire edge, easing it smooth as I went. With that done, I took some of my hair that I'd saved from brushing, combed it so it was all going in one direction rather than all wadded up, and spread it over the form. I found it worked to sew it down in several pieces to one side of the form, then spread it over, gather it into a small "tail" at the back, and then stitch that down. I then trimmed the extra hair off. At this stage it looks like a slightly creepy hair covered 40's hat, or possibly a sleeping tribble. 

Now I made a "hair net" over the hat base. I started by laying strips of gold ribbon over in a criss cross pattern, securing ends to the inside of the base with hot glue, and the crosses with pearl beads. I sewed the pearl beads on through the hat base, knotted the threads on the inside, and covered the knots with hot glue. I then worked a fine knotted net of gold thread through the ribbons, working silver glass beads onto the joins. Then I stitched a band of bias tape around the bottom edge of the hat base, covering up all the loose ends and stitching. 
Now if I had been using a hank of false hair this next step would have been easy. I would have made a braid or rope of the false hair, and sewed it on to the edge of the hat with ribbon. However the braid from last time I got annoyed with my real hair (which typically results in my hacking it all off.) was both shorter and slipperier than fake hair. So I ended up sewing locks firmly all around the edge, giving me this medusa look. Then I styled them into a coil, and using a yarn needle and silk ribbon, sewed them right through the mesh of the base, and over the edge. 
Here's the final product: Pinned on it will look as though it is my actual hair styled. If you didn't have the problem that I have with covering your oddly covered hair you could stop after bias binding the edge of the "hairnet" portion, omitting the coronet, pin it on, and make your own hair into a coronet around it to give yourself the look of long period hair. 
His Kittyness approves.

The inside


Held over my bun. pinned on I think it will be impossible to tell it's a hairpiece.