Tuesday, March 14, 2017

The start of my glove making journey, with some resources for aspiring glovers.

This is a project from last summer when Husbeast and Ladybug started fencing, and it was just easier and less expensive to learn to make gloves for them than it was to try and find them gloves that actually fit. Children's fencing gauntlets are scarce as hens teeth, and gloves that actually fit the husbeasts shovel shaped hands are a laugh. So I looked up some resources, looked at some period gloves, and said, I can do this. I didn't have time, or even think to write it up at the time, because it was a pretty utilitarian project, but I've kept going and am now starting on fancier gloving projects, so I thought I'd write up the beginning of the whole journey here, as well as gather some of the resources I used in one place so folks don't have to do the amount of googling I did. (scroll to the bottom for the resource list)

I started by practicing on a pair of very basic single piece gauntlets for Ladybug, starting with drafting a pattern and making mockups in felt. Lots of mockups in felt. I discovered that pattern drafting for gloves is not as intuitive as some other kinds of pattern drafting. Then I stretched a piece of gilded kidskin I had hanging about (bought in a scrap bin at a sale 10+ years ago.) traced and cut the gloves. And then found out that leather, even kidskin, is very, very different to work than fabric. On the plus, Ladybug loves them because they're shiny. An important lesson on this pair was how much easier it is if you use cardboard for your final patterns (from a file folder or cereal box), it's so much easier to trace around precisely than even stiff paper. Also, metallic sharpie marker shows up nicely on dark leathers (the back side of this leather is too dark for pencil or marker to show well.)

With one pair under my belt, I looked at as many pictures of italian gloves from the second half of the 16th century as I could find, and proceeded to draft a pattern for a two piece gauntlet for the husbeast, and make mockups. Lots of mockups. Good thing felt is cheap. The italian glove lacks the extended fingertips and exagerated fouchettes (the piece between the fingers) seen on English gloves of the same period, and typically features a cuff that is folded back over the hand. Since that's illegal for fencing, I kept the shape, but borrowed the gauntlet from a slightly later glove (also seen on earlier hawking gloves, so it was known) This pair is made from medium weight deerskin, and has a lovely feel. You can see the fouchettes are slightly pointed, and come onto the back of the hand more than modern gloves, but don't extend past the knuckles like many English examples.


I lined the cuff in linen, as seen on surviving gauntlets, and stitched the leather down over it, stitching partway through the outside of the glove to keep the edge from rolling out. the split side is the period style, but the split makes the glove illegal for fencing, so I added a small gusset of the lining material inside the opening to keep the look but still comply with regulations.


Sewing these gloves taught me the absolute importance of having the right needles. I needed to get them done, so started the task with a regular sharps needle. That required the use of a jury rigged leather palm pad, a thimble, and a pair of pliers to do the stitching. It was slow, and my fingers cramped after less than an hour of stitching. I switched to a glovers needle as soon as they came in the mail, and the difference was astounding. You still need a good quality thimble (I like this one) and it's not fast work, but my fingers didn't cramp. The sharp glovers needle also enabled me to do the stitching around the edge, which I never could have done with a standard needle.

For scale, my hand, spread out as far as possible, on the Husbeast's glove. Women's large gloves are about a half an inch too short in the fingers for me. He can't stop exclaiming over how wonderful it is to have gloves that actually fit him, and has started angling for a pair of work gloves for outside chores.
 This week I made a pair for Crash, who just turned 6 and started fencing. Here's a quick photo run down of the process, for really good detailed instructions I recommend the resources listed at the end of the post!
Pattern, and felt mockp There's a pin in the pinky showing me how much to shorten it.
After tracing and cutting everything but between the fingers, the first step is putting in the thumbs using an overcast stitch (seen on extant gloves in the collection of the  worshipful order of glovers.)
With the thumbs in I switch to the treadle machine for sewing the rest in the interest of speed.
Sew in the points on the back of the hand, then finish off each point with a few overcast stitches. All threads knotted off, dotted with fraycheck, and clipped short. You can see the nice finish the overcast gives on the inside of the thumb. 
I've folded the thumb partway inside out to keep it out of the way while I sew (don't ask how I know to do this....) then folded the glove in half and sewed the remaining seam. At the end I knot the threads and run the tail back up the seam, keeping them from dangling from the cuff of the glove.
One down, one to go! I have the fouchette patterns out so I can be sure to put them with the right fingers. 
Crash is very well pleased and would wear them everywhere if he could! He wore one to nap while I was finishing the second off! 
A good fit, excepting the slight twist on the middle finger of his left hand. I think this was caused by a little easing I did of the finger into the fouchette. I will be more careful about this next time. The seams will flatten down with wear.  
At the beginning of this post I said that I was going to start some more fancy gloving project. That is completely the fault of researching on the internet, because while I was looking up gloves for the Husbeast's fencing gauntlets, I saw these:

Pair of English or Dutch gloves, ca 1620, in the collection of the MET
And the seed of an idea was born..... 

Resources for gloving: 

  • How to make gloves: This is a vintage rather than historical find, but it walks you through the techniques and terms better than any other resource I've found. Good pictures too. 
  • Gloves from pattern to hand: A good walkthrough with lots of great pictures.
  • The Glove website: How to make gloves: Light on pictures, but a series of really useful articles, particularly on patterning. Do read the article linked on the first page "how to make elizabethan gloves. 
  • A Journey Into Italian Gloves: a comprehensive list of what seems like every picture of an 16th century italian glove in a portrait there is. Close up's with high enough resolution to see the stitching. an invaluable resource
  • The Worshipful Order of Glovers: They have one of the largest most beautiful collections of historical gloves in the world I think. And it's all beautifully cataloged. 
  • The Victoria and Albert museum: they also have a large collection of gloves, many with beautiful photographs. Also the MET has several nice pairs, although you've got to do a bit of digging to find them. 


Monday, March 6, 2017

A baby's Kirtle (Historical sew Monthly February)

So after a brief rest, during which time I caught up on my knitting and mending, I'm back to historical costuming! I'm going to TRY to make all 12 challenges for the Historical Sew Monthly this year. I squeaked January (Firsts and Lasts) in by finishing off my flag fan for the Lady in White project. This months challenge "re-make, re-use, re-fashion" has so many possibilities. at first I thought about something for myself, but most of the projects I could come up with are WWII era and therefore out of the scope of the HSM. What ended up happening in the end, was I at the last minute decided to take Kitten to an event with me, and then realized that she hadn't anything seasonally appropriate to wear. While perusing my stash, I noticed a stack of my dad's old shirts and was instantly inspired by the color combo off a wool plaid and a blue silk twill. But there wasn't enough for the typical tunic style baby dress, as I'd already used the sleeves off the shirt for a previous project. My immediate thought was some pictures I'd seen recently on the elizabethan costuming group of women in laced kirtles with pinned on sleeves.... and I was off and running.
 I was inspired by images like this one by Peter Aertsen in the Kunstheistorisches Museum, vienna, Austria. which show women of the middling sort wearing laced gowns with pinned contrasting sleeves, and various types of partlet over a smock. Although the Aertsen painting is dated the first part of the 16th century, this combination seems to have held for a period spanning the end of the tudor era right through the elizabethan period, and spanned several different nationalities.


This painting by Vicenzo Campi (Pinacoteca di Brera, Milan) is dated 1580, and shows a mother and her daughter wearing gowns in a similar style to the Aertsen painting, although the childs seems to be rear laced. There's either a high necked smock or a partlet of linen under the gown, visible at the neck. The girls gown seems to be back lacing, or possibly side lacing: we have examples of both in adult garments. While it would be ideal to work from an extant childs garment, you can extrapolate from existing adult models, as children's clothing were typically made much like their parent's in miniature during this time in history (indeed, we don't really see specific childrens garments until much well into the 18th century, 1)

\
I drafted a pattern for the bodice from the Girls Romantic Dress bodice, from sense and sensibility patterns, lengthening the waist, moving the side seam and re angling it to match period garments, and redrafting without the rear princess seam. I've made a bunch of dresses from this pattern, and knew  it would work, the armhole would fit, etc etc etc. I could also use the cap sleeve as a base point for the pinned sleeve and know it would be the right size proportionally to the armhole. I on purpose left the center back too long, long enough to overlap and button, so that I could tuck extra inside the dress, giving possible room for expansion later.

I first figured out what the most skirt I could get from the shirt was, maintaining plaid matching, and then fussed round to see if I could fit the bodice pieces on the leftovers. Behold I could, but there was no way to do it without a center front seam. At this point I decided to add some trim to the bodice , which turned out to be fortuitous since I was also unable to miss all the moth holes that caused this shirt to be retired from service in the first place. Attaching trim is always a slippery slope. I began with every intention of just sewing the trim on. Then, since I don't like visible machine topstitching, I decided to sew it on with silk buttonhole twist and a running stitch.... then  I decided it wouldn't be all that much work to just use a small decorative stitch.... and all the sudden I'm chain stitching all the trim down with silk buttonhole twist....

 I based the trim pattern on the geometric designs found in lot of existing paintings, and just angled it so as to cover up the moth holes. I had to do the last three pieces after I had lined and turned the piece, so I could accurately line them up with the neckline. I also ran out of blue and had to switch to green embroidery thread, but I think it turned out looking nice anyhow. I turned the back edges in, whipped them down, and worked eyelets down the lacing edge. I think I'm finally getting the hang of making the eyelets large enough to get an aiglet through. I use the awl to open the hole, then an lacquered chopstick to really enlarge it. I push the chopstick back and forth until it's fairly loose in the hole, then work a few large whipstitches in regular thread around the hole to hold the fibers back. After that it's fairly easy to work over it in buttonhole twist or embroidery thread and have it turn out a usable size.

I made up the skirt, hemmed it with a hem tape (which is fudging a little, but so practical) and cartridge pleated it onto the bodice, using 1/2 inch basting stitches. When doing small people gowns I always use carpet and upolstry thread (The heaviest I can find) and put an extra stitch in every few pleats. Little people invariably do things like trying to stand up with their foot on their hems etc etc etc and can rip out cartridge pleating amazingly easily. Probably a heavy waxed linen thread would be good for this purpose as well, but I tend to have the generic modern kind on hand. (silk buttonhole twist would be extremely strong, but you should never sew seams into wool with silk, it tends to wear the fibers out and then the seams tear. Which is disheartening.)

The pinned sleeves are just a standard long fitted sleeve with a little length and pointyness added to the top of the sleeve cap to give it room to overlap the shoulder strap without pulling the strap down. I finished the top of the cap with a scrap of bias tape turned in and stitched down. (visible top stitching, but I was running out of time!) and then hemmed the bottom with some extra growing room.


She wore the outfit over a small linen smock, cut like my husband's shirts, and worked out of scraps
of handkerchief linen left from making said shirts. The odd sized leftover bits turn out to be just the right size for tiny human smocks. I added a scrap of lace to the neck, and fastened the neckline with a hook and eye, since I dislike slobbered on chewed on neck ties.

The sleeves I fastened with elastic loops and small buttons. I'll replace the antique buttons I've got on now with either self fabric or thread buttons for a better look, but you can't see them at all under the sleeves for the moment. The elastic button loops are a small, invisible, modern practicality for wiggly busy little ones. You can get them much tighter around the buttons than thread loops, so little folks can't get them undone, and they're quicker and less fiddly to do up.


Finished! and ready for her to wear!


She's a moving target and hard to get pictures of, and by the time I got home from the event with her she was SO over tired that these are the best pictures of it on her I have!


 I still have a stack of shirts with moth holes and pants with the pockets worn out, so I was hoping to get a few more projects in this month, but everyone in the family got sick, so I was playing nurse mommy instead of sewing. I do plan to use those garments in upcoming children's outfits (everyone needs more clothes this year) so stay tuned.

1: History of children's costume, Elizabeth Ewing, Pg 25

Friday, December 30, 2016

The Accessories Make the Outfit! (The Lady in White project)

Sometimes it's easy to get so caught up in the garment, that i forget about the look. And nothing is more true (except perhaps that you won't look period without period undergarments) than that you can't have a good historical look without the little details, specifically accessories. No Viking is complete without her brooches, no 14th century lady without her wimple and veil, no cavalier without his plumed hat.

Titian, 1555, Lady in White
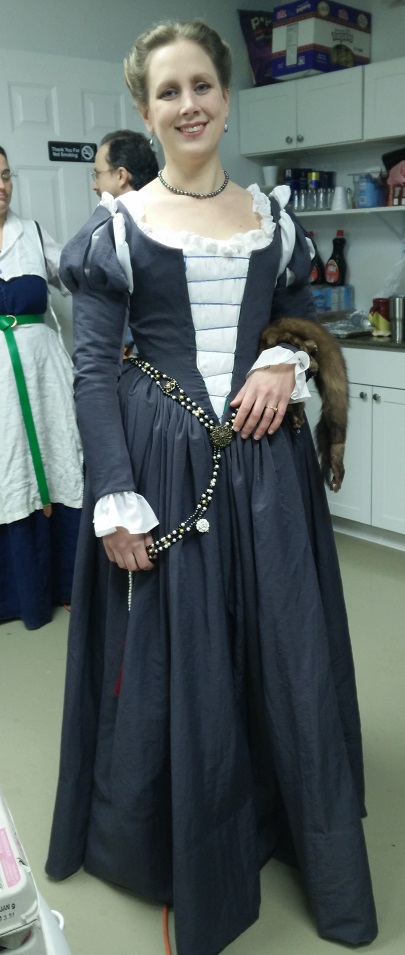
Returning to our lovely lady in white She has a pair of matched bracelets, gold clasps holding her sleeves and gown front, a set of pearl drops, with matching necklace, and an amazing flag fan. She also has a sheer partlet which appears to be rouched and possibly worked with gold thread.


In this slightly earlier portrait by my new favorite painter, Giovanni Battista Moroni, we see Isotti Brembatti, in her gown of fabulous gold and green brocade, wearing several beautiful necklaces (one held up by a brooch) paired bracelets, and a girdle of what appears to be worked gold beads, either enameled or perhaps set with jems. Attached to the trailing chain end of the girdle is a beautiful zibalino with a gold mask. She has a sheer partlet with a tall standing collar worked with scarlet (probably silk) embroidery in a manner reminiscent of smocking. She holds an ostrich feather fan with a gilded handle, and also wears earrings, sundry rings, and gold hair ornaments.

Of course these are only two of thousands of portraits available for perusal, but they show the main themes of the era and area very well I think. I had already determined to match my jewelry to the Lady in White (albeit with black not white pearls) and decided to attempt making something like her awesome flag fan. Although I covet the pairs of bracelets both women wear, which were frequently a lovers gift (Lu Emily Pearson "Elizabethans at Home" pg 334) or sometimes a betrothal present (Jeffery Forgeng, "Daily Life in Elizabethan England" pg 65),  They are beyond my skill as a jeweler and out of my reach as a purchase. instead I chose a girdle and a zibilino, also common accouterments of the well to do lady.

The Armada Portrait, Queen Elizabeth, 1588
Woburn Abbey
First I would like to defend my choice of black pearls, not white, with this portrait of that icon of fashion, Queen Elizabeth herself, pictured in front of the demise of the spanish armada, wearing ropes of both white and black pearls.


Mary Queen of Scots, ca 1559, after Francios Clouet
Victoria and Albert Museum.
 And here's Mary Queen of Scots, also a period fashionista, wearing a long strand of them knotted at her throat.  Supposedly they're the same strand of pearls, which Elizabeth absconded with after Mary's untimely demise. Scandalous.


Bianca ponzini anguissola, with a zibellino
by sofonisba Anguisola, 1557
Gemäldegalerie, Berlin
The zibellino is the most interesting of the remaining accessories. I've been fascinated by them since I first saw them mentioned in one of my costuming groups. I don't know why I'd never noticed them before, but now that I know what they are I see them everywhere. Funny how that is. I think the idea of anyone carrying a small dead animal around as an accessory is so odd to the modern mind, that I'd just always assumed that they were a fur stole draped over the arm, or an odd bit of fur trim. But no indeed, it was exceedingly popular in the 1500's especially in the Italian city states, to carry the pelt of some smallish weasel family member about with you, draped over your person, or hanging from your girdle. The style spread north and west fairly slowly, but they can be seen in some very late elizabethan period portraits. The style for carrying them seems to have died out in the beginning of the 17th century.


jeweled marten head in the collection
of the Walters art Museum.


Carved rock crystal Marten head
mounted as a snuffbox
Private collection
The Zibellino was typically the entire fur of some small animal, most typically a sable or marten (although sometimes other furs were used, most notably a lynx!) carried over the shoulder, or arm, or attached to the girdle. They could have jeweled collars and leg bands, pearl drops in their ears, gemstones for eyes, be mounted with jeweled muzzles, or have their heads and feet completely replaced with ornate gold "masks" or even carved semi precious stone. The most typical way of carrying them seems to have been via a chain attached to a ring in the mouth, especially on those that had full replacement heads mounted, however some portrait references do seem to indicate that they could be carried from a collar on the neck as well, although the clearest of these is dated 1522. (Portrait of Lucina Brembati, Lorenzo Lotto) .

The most popular theory currently (via wikipedia) is that persons carried these items  thinking the fleas would be attracted to the pelt instead of them, and secondarily as a status symbol, because of the cost of the fur, not to mention the embellishments. This theory was started in the 1800's by Wendelin Boeheim,  but has since been rejected by other researchers (Fleas, Furs, and FashionsKather Kerr of the Hermitage etc)  
Rock Crystal head with jeweled collar
and muzzle.
Thyssen Collection, zurich
Certainly they were a both a status symbol, and a method of displaying your personal fortune, nothing makes that more clear than the sumptuary laws written limiting their use and form (it seems to me, as a novice fashion historian, that nothing marks anything as fashionable or symbol of status and wealth so quickly as being regulated by sumptuary laws, or being blasted by the church. Bum rolls, farthingales, and boned corsets were all blasted by the church, and women who wore them were threatened with excommunication! [1] which clearly didn't stop people from wearing them any more than the sumptuary laws impeded people from carrying tricked out zibellini) It does seem to me (and a number of others) that the common conception of them as flea attractants may be flawed. The Walters art museum states in their blurb about the head in their collection:


 "The animal was associated with childbirth, and wearing its fur was believed to increase a woman's fertility and protect her during pregnancy. Since antiquity, the marten had been thought to conceive through its ear or mouth (and therefore chastely). "
And in The muff in 16th century dress:
Mart[e]n and sable Zibellini were connected to fecundity and were popular wedding gifts, and featured in dowries.  Lynx Zibellini were associated with chastity. Artist[s] of the time used the symbolism of the Zibellini in their work for patrons to convey messages.
Of course zibellini could have been popular as wedding gifts and dowries because of their opulent nature, and desirability as a symbol of status and wealth, but I think it unfair to rule out the symbolism of the item as part of its popularity. It is probably equally unfair, and perhaps a little egotistical to think that the elizabethans were so unobservant as to not notice fleas weren't attracted to lifeless furs. In the end we may never really understand the popularity of the zibellini, any more than future historians may be able to explain mullets, macrame jewelry, or jeggings. 

For my own personal zibellino, I followed the example of others, and acquired a vintage stole in good
conditions from the goodwill auction site. This was partially a cost consideration, and partially an ethical one. My costuming endeavors do not need to support the inhumane factory farming of fur! I took this apart carefully, and had THREE lovely little minks waiting be zibelenized. I used a broken vintage gold and pearl bracelet for the collar, and a piece of gold chain from the broken jewelry stash to attach it to my girdle. I got some small faux pearl charms at the craft store and put them through its ears for earrings.

I hope later to have time to replace his whole head with one crafted from paper mache paste and painted with gold leaf (since I am not a metalworker) 

In order to have something to suspend my zibellini from (and for more conspicuous display of wealth) I needed a girdle. Now this is a bit tricky. as costumers we see a LOT of beaded girdles with pearls and sparkly glass beads. This is the most accessible form for most of us to be sure, the materials are readily available at your local crafting supply store, and it doesn't require special tools or special skills to make. But I'm not sure that this kind of girdle is well historically supported. Most portraits I've looked at, and I will grant you it's not been an exhaustive study, seem to show three types: 

Type 1: Goldwork linked with clusters or strings of pearls, much in the style of the girdle seen here on a young Mary Tudor. 


Type 2: Chains, linked goldwork (including settings) or a combination of the two. The lady in green and gold at the beginning of this post has a girdle of this type. So does the lady in gold with the zibellini, and so does the Duchess of Norfolk, Margaret Audley, and Moroni's "Lady with a fan."


Type 3: single strands of beads, either in precious metals, or precious metals and pearls. Seen here on the Lady Mary Grey wearing pearls with a jeweled clasp, and Camilla Gonzaga de'Rossi, Countess of San Secondo with what look to be very large gold beads strung, not linked. 


Sometimes you do see a combination of the linked and beaded styles, where a linked belt of goldwork or goldwork set with jewels, has a beaded piece falling down the front of the skirt, as seen here on Mary Stuart, although hers is a double strand of beads


All this preview to say that I give my girdle about a 50% historical accuracy rating. Yes, it does have metallic elements linked with pearls, but the metallic elements aren't really a period shape. But darn it the enameled roses were so pretty, and (by themselves) they aren't historically inacurate! (Cheapside hoard). That is to say, I could have done better if I wasn't lured astray by the pretties in the bead aisle.

I held it shut in the front with a large worked metal brooch that is very much in a period style. Which is probably more accurate than the girdle....  However since the event my children have helpfully deconstructed said girdle (don't ask me how they managed that, but they did) so I may try to put it back together in a little bit more period way, Or I may just leave it as it is, because it's pretty, darn it!

I didn't get the fan finished before the event, although I have all the bits to make it, but I feel like the overall effect with the pearls, zibillini, and girdle was very good. You can't see the end of the girdle, it's hiding in my skirt, but it has a large scarlet tassel on it. I would like to eventually get a pomander for it, but that's a later upgrade.


A couple good reads on Zibellini:
http://www.sablegreyhound.com/ZibelliniPicsAndInfo.html
http://katerina.purplefiles.net/FlorenceFiles/FLAccessoriesZEBELLINI.html

1) Corsets and Crinolines, Norah Waugh, pg. 23

Venetian gown (The lady in white project)

This spring I started hearing rumors of an event to be held in our barony specifically for fancy late period dress. It was going to be a feast of St. Nicholas in Queen Elizabeth's court, and was scheduled for the day after our anniversary. We immediately decided that it sounded like an ideal destination for our annual anniversary outing. Originally I designed a pair of tudor outfits revolving round the gown in this portrait of Queen Elizabeth (which I've been obsessed with since I found it in my mother's history of costume books as a child)
However shortly after this my husband started fencing and decided that he wanted to honor his own heritage by taking up a later period italian area persona. So then I was stuck with a dilemma, match hubby, or go tudor in spite of him. I started looking around at later period Italian area gowns (I say Italian area because this was the city states era and united Italy as we know it didn't exist) That's when I stumbled on the 1555 Titian painting. "Lady in white" I was totally hooked. I loved everything about her, and, better and better, I had a huge piece of pewter fabric, bought more than ten years before that was going to be perfect for it. In additional good fortune, on an earlier anniversry my husband had given me a black pearl necklace and earrings that could be the twin of the pair in the portrait.

This gown is almost severe compared to contemporary gowns from England. The silhouette is much narrower, and there's just so much less. Evidently Venetian women preferred to display their wealth by highlighting lavish fabrics in their gowns, silk brocades, cut velvets, and other costly materials were popular. The open ladder laced front displaying the camica (the very full venetian shift) the low neckline, and the uncovered head seem almost scandalous! The Lady in white wears a dress of what appears to be heavy silk, ornamented only with small gold clasps holding the sleeves on and the front closed, and a small pointed lace trim below the puffed paned portion of the sleeve. She also wears a sheer partlet, possibly with some sort of rouching and gold work on it. As an interesting side note, in all my looking at pictures, I haven't seen a single picture of a Ventian woman with a non sheer partlet. That may of course have partially been a function of the climate. The heavier partlet that brought welcome warmth in chilly Engalnd would have been rather stifling in Venice. With the Lady in Whit'es gown in mind, and after spending some time looking at portraits and reading about other people's projects, and finally drew up this design. 

it features a large enough to be visible shoulder strap, a slightly rounded neckline, and  girdle, all slight deviations from the lady in white In the interest of time, I also dispensed with the sheer partlet. Although many ladies did wear them, looking through books of portraits, they were by no means universal. For the Venetian woman the partlet seems to have been a fashion accessory, like her pair of bracelets or fan, not a necessity for modesty. When worn they were frequently ornamented with gold work and pearls, which is time consuming and fussy. Clearly I need to make one, but this event wasn't the time for it. 

I started drafting the pattern from my bodies pattern, ensuring a good fit This meant that I ran into the dreaded fish eye space again. I'd solved that particularly problem in the bodies by adding a side front seam. Impossible in this design. I ended up walking the space out into the center front, ending with a curved front seam. Fish eye spaces are always a problem to work out. the only sure method of getting a good fit is to put a seam where the space is, or reasonably close, but walking it into a nearby seam can sometimes work. It's a bit of a crapshoot though. In this case, thankfully, it did work, and with a few alterations the bodice was a good fit. Thankfully there was a lovely person hosting sewing nights at their home leading up to the event, so I had experienced hands to help fit the back of the bodice. In a pinch I've drafted husband to help me fit the back of things, but for something as specific as a bodice, it's nice to have someone who understands where you're trying to get to from where you are. 

 I cut the bodice from the my pewter fabric and a heavy linen blend tablecloth at the same time, to ensure the pieces would be exactly the same size. I used a half inch seam allowance to make room for boning under the seam allowances. I sewed the seams, pressed them open, and whip stitched the seam allowance down to underlining, forming boning channels. I boned the side and back seams with cable ties cut to length, and then the ends melted and rounded. One one each side of the center back, but only one side of each of the side seams. I then dithered with whether to line the whole thing, or just face the neck and sleeve openings. After a consult with my mother I decided the least bulk option was to line the whole thing with tissue weight black silk (I buy it by the bolt from Dharma Trading specifically for lining things with. The chair of the fashion department when I was at school, Mrs. Hannan, indoctrinated us all to view acetate lining as the creation of a diseased mind) I sewed in the lining, clipped, graded, turned and pressed it.

 Then I turned the center fronts a half inch back over the lining, and stitched them down through the lining and the underlining forming the front boning channels. Before I did this though, I sewed a narrow piece of ribbon down, tacking it down to form little channels to run the lacing ribbon through, a method I had seen employed in other Venetian gown recreations (The Realm of Venus was an indispensible resource during the research process for this gown. under the showcase heading they have a lot of recreations to browse) . Lacing rings are probably more period, but I had the ribbon. The other advantage of the ribbon is that it rather grips the lacing for the front, allowing you to more easily lace up and tie off without everything springing back open on you while you adjust it. I boned the front with a cable tie, and sewed the shoulder straps together, but didn't finish the lining or trim them ,figuring they might need to be adjusted again after I added the skirt. (which they did, as it turned out)

For the skirt I had enough fabric to use 5 panels full 60 inch width of the fabric. That's a whopping
300 inches, or 25 feet of skirt! When we laid it out on the floor at my Mom's for basting, it took up the whole living room, folded in half. Not everyone wants or needs a skirt this full. For my height though, more fabric in the skirt gives a better look. On a more petite frame, 4 or even 3 panels could have given the same look. This fabric, although it has very much the look of a good silk, doesn't have the body of a good silk, so I underlined it completely. Ideally I would have used a cotton/poly broadcloth for this, because it's got a lot of bounce and crispness without a lot of weight but I was attempting to keep a bit of a budget on this project, so instead I used a pair of old poly blend sheets I had lying around. They were satisfactory if not quite as good. The sheets were cut to the same size panels as the skirt fabric and sewn into the seams. Once the skirt was assembled, the top edge was turned down a half inch and basted using a ruler at one inch intervals. Then I pinned it a quarter at a time to the bodice, drew up the gathering threads, spread the pleats evenly and stitched them to the bodice with super duty carpet thread. Cartridge pleating is probably one of the best things I ever discovered. it allows you to gather huge amounts of fabric into a waistband without adding any bulk to the waist, and it encourages the skirt to flare out dramatically from the waist.


In the portrait it's not super clear to me if the Lady in White's skirt is cartridge pleated or knife pleated. It's certainly not as heavily cartridge pleated as my skirt turned out to be, but
other portraits of the same time period show skirts more heavily pleated, like this venetian lady portrayed by a follower of titian, possibly Pellegrina Morosini Capello, which shows heavy cartridge pleating around the waist, amoung other interesting details. I did consider making knife pleats then attaching them as for cartridge pleats, but by the time I was attaching the skirt I was in such a time crunch, I didn't want to try anything new.

With the skirt attached, I put the whole deal on, and had my mom (bless her forever) pin the hem for me. At which point we discovered that the upper back was gapping terribly. This illustrates the problem with rushing to finish something, I'd only done one mockup of the bodice, then made the alterations and cut it. It really doesn't pay to skip steps.

Luckily, the gapping was solvable by cutting the back neck lower, which is completely period. Between that and the camica ruffle, it's not noticeable.  Because of the way the lining/boning is, the quickest least visible way to do this was to trim the gown back, cut the bones to the new length, then fold the exterior in over the lining and whip stitch it down. This doesn't give me the kind of beautiful interior finish I like to have in my projects, but it did work.


That debacle solved, the remaining chore was to put  a facing on the hem. Because of the slinky drapey nature of the fabric, I used a significant hem facing made of the stiffest icky polyester I could find in my stash.  I cut strips at 18 inches, sewed them together, folded them in half and ironed them, then sewed them to the hem. My husband, bless him, ironed the whole thing to the inside for me so I could stitch it down, while I desperately started working on the sleeves, the night before the event.


For the sleeves, I drafted a ladies doublet sleeve from Patterns of Fashion to my measurements, mocked it up and fit it. Then I folded down the cap portion of the sleeve and cut out only the bottom in both the grey fabric and a black cotton lining. The portrait shows fairly wide panes in the puffed section, so I cut 4" strips of the grey fabric, which I underlined with a strip of silk organza for bounce before sewing together and turning. Then I folded up the sleeve cap on the pattern, laid the cut bottom portion down on the pattern, and cut the panes to shape at the sleeve cap, and length at the bottom: they're the same length as the pattern under the arm, which holds the puff up some, then about two inches longer on the outside of the arm. The bottoms of the panes are pleated to fit the sleeve, and then the tops are sewn into a facing of white batiste to match my camica, which was cut from the sleeve cap pattern to give them the proper shape. This sleeve is another lesson in why you do more than one mockup (and don't finish making huge chunks of your gown the night before the event) even after altering, once I got it on with the camica (which does add bulk) the sleeve was too tight, which meant it kept trying to creep down my arm, pulling the shoulder strap with it. It was also too short, which I covered for by pulling more of my sleeve ruffle out, which sort of spoiled the look. Ideally I would have done a second mock up of the sleeve with the whole gown (or at least the camica!) on, but I just ran out of time.

All that remained was to sew on the pearl beads and make the thread loops that would hold the sleeves on. I finally finished this at 5 AM the day of the event, having stayed up all night to finish.

In a lot of ways, this is really a story of how NOT to make a gown. Don't get stuck doing the bulk of it in the last 4 days before your event. Be sure to do enough mockups, WITH the things you're wearing under. But in the end, it all really turned out fine. I'll have to do some remediation of the sleeve to be sure, but other than that the gown is a dream, sort of an instant princess dress. And for all that it weighs half a ton, it's remarkably comfortable as well.

I wore it over a camica made of cotton batiste, since this was a "use fabric you already have" sort of project. Hopefully I will replace that camica with one of handkerchief linen in the near future, which will be more comfortable and look better. I used the pattern from the really helpful italian ren clothing site  which worked out great. one small change, next time I will make the back of the camica longer, and set it higher than the front. I ended up having to twist the whole thing forward to get it evenly out of the top of my gown, and it wasn't the most comfortable way of wearing it. I also bought a pair of red knit stockings to wear with a basic pair of black flats that were at least not obnoxiously un period.  The stockings were amazing because they actually were long enough for me to wear up to my knee and stayed up without me resorting to garters, which I find uncomfortable if I tie them tight enough to do any good.

In keeping with the theme of being late, we were almost late to the event because we were running late and getting dressed took a long time, so I didn't get posed photos of us at my mom's house like I had hoped. But a good friend of mine working in the kitchen took a couple shots of the gown, and they had a photographer at the event that got some shots of me and hubby.