Tuesday, June 6, 2017

Ladybug's Aumoniere (Or the stupid embroidered bag)

When I made the boys their viking pouches, I wanted to make something for Ladybug as well, Since she's doing the 14th century princess deal, it seemed like an ideal time to make a stab at one of the delightful little embroidered pouches common to that century, and have a try at opus anglicanum at the same time.

I started my project with a beautiful extant bag, a little research, and a lot of talking to people who'd done recreations. I'll list some sources for good information on these delightful bags at the bottom, other people have done the research far better and more organizedly than I have!

These little bags feature as a group: a foreground worked in split stitch, with a limited color palette, that is, only two shades in each field with which to work the shading. Details are frequently worked in some sort of running or back stitch, and outlines worked in stem stitch. The backgrounds are worked in couching or laid work with metallic threads. The drawstring area typically is couched, and then has eyelets worked over the couching. The bags could be decorated with beads along the edges, bobbles, bells, or tassels. Most commonly these bags depict "scenes of courtly love" or romantic stories. Tristian and Isolde for instance, or patient Griselda.

For Ladybugs bag, I chose to not use a scene of love, but to draw inspiration from the styles of the
bags, and other period artwork, and draw a scene with a princess, which included her badge, the magpie. I drew the tree direct from the romance of alexander, than drew a scene around it trying to stay true to the period artistic feel, which included a unique scaling that enlarges items to make detail visible or give them more importance. I transferred the design with ink to the linen, then put it on my rolling slate frame. This was my first time using a slate frame, and I really loved it, although next time I will take more care with dressing it. I didn't hem the edges of my fabric, and I feel that as a result, the tension across was not as even as I would have liked.

With everything prepared I began to work. Using two colors of DMC cotton floss for each field (yes, cotton. Ladybug is 7. I'm not using silk.), I first outlined with stem stitch, then filled with split, I found that it was helpful to use a colored pencill to  lightly work the shading before I started embroidering an area, that gave me an easily followed guide, but I didn't risk smudging the work by shading it all at once. it was a time consuming process. The stitches are very VERY small, and the back of the work gets quite built up as you go. Each leaf on the tree took more than an hour to work.

When I first started I had some trouble getting the threads started without making an even bigger lump. I found that if I made a couple stitches on the surface, it would temporarily secure the end. after I'd worked a row over it, I could come back and cut it off. When I finished a thread,I just ran it through a little of the backside of the work, then clipped it off short. I discovered in short order that it was really important to have no loose threads on the back of the work, because they cause knots, and knots make the work really difficult. There's enough bulk in the back of the stitch as is without any knots. if I had a little end hanging out for some reason (maybe the thread knotted and I didn't notice, etc) I found I could hold it out of the way with a straight pin until I 'd worked over it, then cut it short.

The face was really difficult to do well. I'm still not 100% happy with the outcome. I had some trouble with the shading in such a small area. it did turn out acceptable,but I think that it would have been better had I used a slightly higher contrast in my flesh tone threads. I used a tight backstitch to make the small details, and to differentiate between fingers, and help the hand stand out from the flesh of the neck. I think if I'd picked a better contrast in the flesh tones I may not have had to do so much of this. This technique does appear in period examples though, so I don't feel too badly about it.

With the face done it was on to the underside couched background. I used Krenik #5 braid for this project. It was a stab in the dark picking thread, because I have no frame of reference for it. Doing the couching was easy enough, although getting the turns nice was very fiddly. But the thread I chose wasn't ideal. Even though I spaced the thread very closely, the springyness of it, along with the relatively small size, meant that I just didn't get good coverage. it's ok. but it's not great. it would work fine for standard front side couching. but it wasn't a good choice for this application. I'm keeping some of it on a card for reference. As I continue to use gold threads I will keep building a little library of these cards, and hopefully in future have a small library to help me make better thread choices.

I worked over the top of the gold with standard couching in purple, then worked eyelets over that to make the drawstring area. Then I applied a silk backing and made it into a pouch, which was somewhat fiddly. it was hard to decide the best way to do it. Original pouches were embroidered on both sides, and then put together with a narrow woven band at the sides, but I decided to embroider only one side of Ladybugs pouch, because the back side would just get destroyed rubbing against her dress. I ended up wrapping the back of the pouch around the front, and hand stitching it down right along the edge of the embroidery. Fiddly but it didn't risk getting the embroidery caught in the bag proper.
I don't know why it won't let me put these pictures right side up.
You can see the failure in coverage for the goldwork here though. 


It was really hard to get photos of this project, the gold was so sparkly it seemed to throw the focus off on my camera.

I did enter this in our local Arts and Sciences competition at a recent event, Wars of the Roses. I didn't win the championship, but I did win the populace vote. I was too busy to get good pictures myself, but the lovely Catherine de la Broderesse took these.


Over all this was a great experience. I'm not 100% happy with the outcome, and I'm sad I didn't win the championship, but Ladybug is over the moon about it, and I learned a lot, so I'm going to call it a win.

Resources:
http://cottesimple.com/articles/aumonieres/
http://thomasguild.blogspot.com/2013/11/aumonieres-and-purses-from-germany.html
http://rosaliegilbert.com/purses.html
http://cottesimple.com/articles/aumoniere-reconstruction/
https://opusanglicanum.wordpress.com/2015/05/06/lovers-purse/

Monday, May 22, 2017

A pair of viking pouches, and some other children's accessories

This year we are doing a much larger number of SCA events, partially because the children are older, and partially because my husband and I are both involved in fighting now, so a lot of events that I never had any reason to go to are now of interest to us. We have planned a summer slate that includes several weekend camping events, which is pretty exciting but means everyone needs a wardrobe instead of an outfit. With their chosen wardrobe (two small vikings, on 14th century princess, 1 tiny human) I decided that everyone this year should have a few small key accessories to go with their outfit. Particularly a pouch to carry small treasures, a favor that doubles as an ID tag (kid tag is what they call them around here) and a belt. The boys already had tablet woven belts, and I decided to purchase one for ladybug that she would get a lot of years out of.

Pouch from Birka
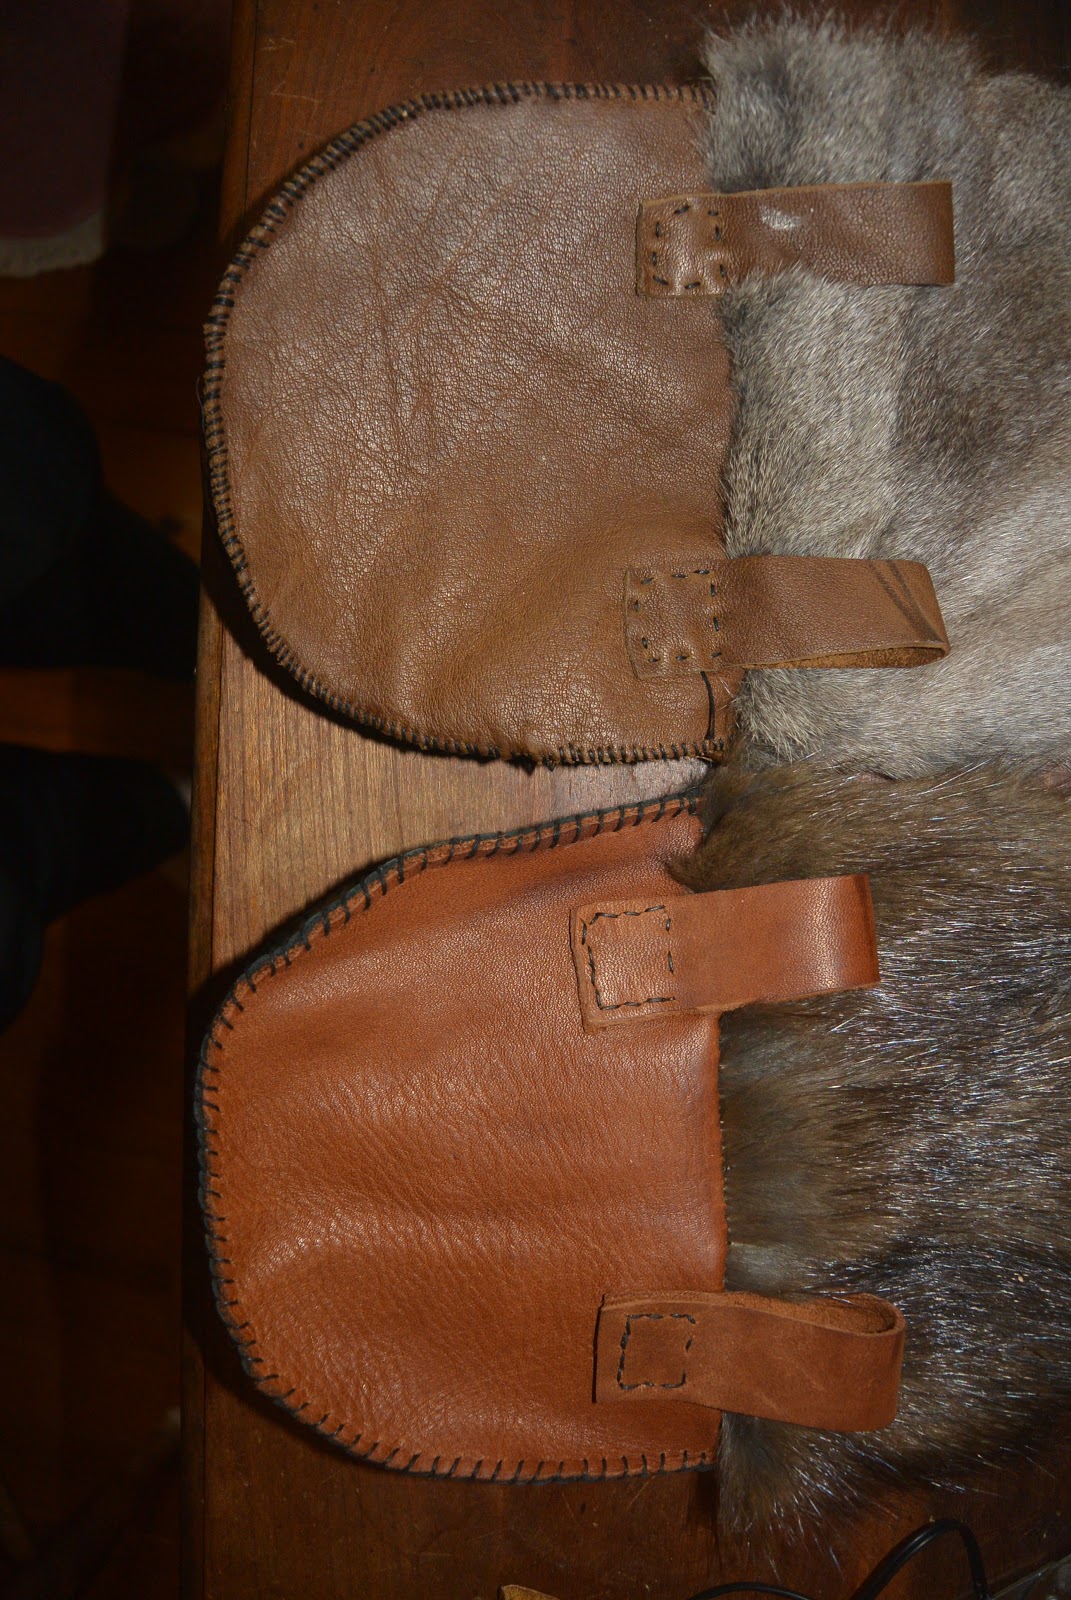
Since the boys are small vikings, I made them basic kidney shaped belt pouches with a flap closure, There have been a number of pouch and pouch hardware grave finds, a beautiful little lyre shaped fur coin purse at Birka, a box shaped strap closed pouch in Ireland (grave L/P 9) and a number of the basic round bottomed shape with strap closure, both at Birka, and in other places. I had seen at some point in my internet wanderings the most adorable small pouches with fur flaps and toggle closures rather than the more historically accurate strap and hardware closure. I thought the boys would really enjoy those, and they looked something I already had most of the supplies for, and simple enough for even a novice leatherworker like myself to be successful  in making, so I gave it a whirl.


I made a pattern out of cereal box, and taped it together for proof of concept. Basically you just cut a shape the size that you want the pouch to be, and a slightly smaller shape for the flap. I traced the bottom of my front and back shape to make a flap that would echo the curve properly. The only slightly tricky bit is getting the side of the pouch. it looks best if it's tapered a bit at both ends, but the edge has to be the same length as the edge of the pouch piece. Taping it all together with some masking tape is an easy way to be sure all the pieces of the puzzle fit properly.

With the pattern done, I traced it onto some of my scrap leather. I had enough for one of all one color/type of leather, and a second of mixed colors.

Although the original pouches seemed to all have one central loop to go over the belt, I decided for little folks that it'd be easier, more balanced, and sturdier to have two belt loops. This is a loosely "viking style" pouch not a recreation of a historical item.


I have a big bag off fur off cuts that I purchased as a lot from a furrier some years back for small projects like this. I scouted through and let the boys pick from the more likely options. Both pieces were a little too small, but that's the beautiful thing about fur, you can seam it in all kinds of funny ways on the back, and as long as the fur is lying in the same direction you can't tell from the front. Most off the off cuts I got in my bag were already seamed. Sometimes you may have to dampen and stretch the piece after applying a patch, but I didn't have to here, just carefully brush the fur over the seam. (I have a wonderful book about working with leather and fur that details how to stretch, seam, and patch furs.) You can use a sharps needle on most fur, but a glovers needle will make it go far faster and easier.

I haven't done much fur work, I've trimmed a couple garments with strips though, and I've found the easiest way to cut it is very carefully, from the back, with a very sharp razor blade. I find it easiest to make a number of shallower cuts to get through the skin rather than press hard and possibly cut the fur strands on the other side. With the seams on the back, I decided to line the flaps in linen. This required some problem solving, since you don't want to use a big seam allowance on fur but if you use a teeny seam allowance on linen that you've cut on the bias around a corner it's just going to come out of the seam. Fray check was the answer for me. I fray checked the linen pieces before I sewed them on, then over the stitches after I sewed them. I'm fairly certain they will now hold up to most any little boy abuses my sons can think of! The trickiest bit of the operation was keeping all the furry bits out of the seam!

I sewed the pouches together with an whip stitch over the edges. The first one I just did by eye, but the second one I got clever and used my stitching punches for (even though the leather was thin enough to just use the glovers needle.) This made the end result neater and quicker.

I applied the pouch cover with a very tight over cast stitch through both the linen and the fur into the leather. then I basically drenched the whole seam in fray check. (Hey, I know how crash and bang are, bless their hearts.)  Once the fray check had dried I slightly dampened the pouch side of the seam with a spray bottle, and then used a second piece of scrap leather as a pad, and hammered the seam into place. This was a technique I hadn't used before, from my leather sewing book, and it really improved both the look and function of the flap.

Then I dampened the leather with a spray bottle and wet blocked them onto my ironing board, pinning the seams down and pressing them open with my fingers from the inside so the bags had a nice square shape at the bottom. This is also a new step for me, and it made an immense difference in the final product.

The original pouches I had seen (I don't remember where or I'd credit them for the idea) had either wooden or antler toggle style buttons with a little loop of cord. I rally liked this idea, so I looked for antler toggle buttons. They're really expensive. Instead I bought a whole bag of antler tips for a fraction of the cost, Husbeast sanded the rough edges where they'd been sawed, and drilled holes in them.He did this outside and I wore a dust mask because the dust isn't good for you. With a couple thread loops, the project was a wrap!

The kids all received queens tokens at a recent event, of which they are understandably proud. Bang opted to have his mounted on the flap of his purse, while Crash requested his be made into a necklace that he could wear.


At a large event there is always the possibility that your child could be somehow lost or injured, and it's really good for them to have non visible but easily accessible ID on them just in case. Last year I saw someone with a very clever idea: her daughter had a belt favor embroidered with a lovely little squirrel, and on the back, safe from prying eyes, her full name, and all the pertinent emergency information I thought this was really clever. The little girl was so proud of her favor, and it kept the information secure and with her. I took that idea, and made each of my children a favor with the arms of the group we camp with on it, and an animal. Ladybug with her love of all things shiny got a magpie, Crash, for obvious reasons, a Bear, and Bang picked a hedgehog in a narrow contest against a badger: which is oddly appropriate. I did each of the favors in a slightly different style on different materials: Ladybugs is cotton  on linen canvas, done in petit point. Crash's is wool on wool and linen in split and chain stitch. Stephen's is cotton on linen and silk, in split and chain, and Kittens is wool on linen in split and stem stitch. Everyone picked their backing materials from my scrap stash. Kittens is the only one that is different: hers is armed with a pair of safety pins sewn very firmly in place, and can be pinned direct to the back of her gown where she can't reach it.

On the back of each favor is a standard military dog tag with the child's name, our name, and all the pertinent contact and allergy information. We've also had a few discussions with the horde reinforcing the obvious safety concerns, but also teaching them that in case they SHOULD somehow get lost or separated (it's never happened yet, but better safe than sorry) they should find the nearest person wearing a coronet or driving a golf cart and present them (politely) with their kid tag.

I'm still working on a pouch for Ladybug, my 14th century princess, in the style of a aumoniere, and her belt hasn't come yet, but hopefully I'll have those sorted for her by our second summer event.


Monday, May 15, 2017

In search of Armor: Undergarments

Because I wanted to build my armor from the skin out to ensure optimum fit, I had to start at the very beginning, with the foundation garments that go under it all. I had decided at the beginning in the design phase to try and make a supportive linen undergarment to replace my modern sports bra. This was for a few reasons. One reason was comfort. The wicking power of linen is insane, it's the coolest most comfortable fabric out there, even more than many of the "high tech" sports fabrics. Another reason was that I kind of doubted women would have worn neon green sports bras if they went off to war (I equally do NOT buy that women didn't wear any underwear before we developed the modern bra. Whoever came up with that idea was clearly a dude. A dude who had never talked to a girl.) But the most important reason was because currently at practice, I get to stand around in my hot sweat soaked gear while the guys strip down and either walk around half naked to cool off, or change into gloriously dry clothing. I'm jealous. I want to be able to change into dry clothes too! So I designed a wrapping top, probably most accurately called a breast band, that, while I probably won't be comfortable just stripping down to and walking around in, I'm at least comfortable in stripping down to for long enough to change into a dry tunic!
Drafting! lots of rulers! 

The first thing I did was to have someone (Blessings to Olivia who knows how to measure and is willing to help) measure me for a new body block. My last body block is pre babies and will never fit again. I've put off making a new one, because I find drafting patterns for my fluffy self depressing, but for this kind of fitted garment, you just have to have one. What you ask is a body block? A body block is the perfect representation of your 3 dimensional shape, with all your unique bumps and wiggles, rendered flat onto paper. If done properly, when it's made up in muslin it will fit you like a second skin. This provides the foundation for drafting patterns that actually fit with a minimum of fussing. Once I have a body block I can make almost any garment from it and need only one fitting to iron out any small problems with fit. It's the invaluable tool of the custom pattern drafter.

my front and back hip length block. No sleeve on this one.
Since I'm being all technical and stuff here, I'd like to take a moment to clear up some terminology confusion. A body block is a flat representation of a specific person's body, used as a tool to draft patterns for that person. A Sloper is a generic body block, made in standard sizes (not specifically for one person) used in commercial pattern drafting. So if you work in a fashion house, you might go grab the size 8 sloper to make a dress pattern. If you draft from measurements directly to the pattern for say a bodice or a doublet, (which is a fascinating period technique), it is neither a Block, nor a Sloper, it is a Pattern. You have completely skipped the Sloper/Block step of pattern drafting and gone directly to the end goal: a pattern that fits. I prefer, usually, to work from a block, because if I go direct to pattern I have to re-do the drafting process every time: if I have a block I just trace the pattern off and make the appropriate alterations.

Something extremely fitted and supportive like a breast band may require more fiddling than the average garment: even with a good body block, I had to go through two mockups to get the shaping just right. The final product though is super comfortable, very supportive, cool, and un bra like enough that I'm comfortable stripping off to change in the middle of a field full of primarily dudes. (I want to be clear that this is an issue of personal comfort, not of modesty. I applaud any of my sisters in arms who do not feel weird about stripping down and changing, I am not as brave as you!)

 The final garment is made of two layers of linen in the front, and one layer, with an extra strength piece added at the center in the back.  There's a small loop to keep the straps from shifting around at the center back. The tie is  double folded light weight linen. Usually I cut all selvedges off of linen, because they can make your seams bunchy. However here, I used the selvedge in the tie on purpose, because it 100% will NOT stretch.
  I wanted to give the back a little extra strength, but not make it two layers, so I put a small panel at the center back to give support to the fabric where the straps pull and minimize stretching.The straps are cut on the straight of the grain to minimize stretching.

I need to add a small button hole for the under wrapping strap to come out of, because that is showing a tendancy to slip.  All the front edges have three rows of top stitching. This is because they are necessarily cut on the bias, and will be prone to stretching. If this isn't stretch proof I can run a small ribbon through one of the "chanels" formed by the top stitching and sew it in place to firm up the edge.

Wednesday, May 3, 2017

In search of armor. A basic design.

Tourney at War of the Roses, 2015
Photo: Daily Gazette
I have recently started doing SCA Heavy combat, which is something I've been interested in since the first time I saw people doing it, three years ago at Wars of the Roses. I thought, WOW that looks like an amazing amount of fun! But with then 3 kids and another on the way it just didn't seem possible. Well, fast forward two years, and the rest of the family is up to their ears in fencing, so I'm at practice every week, but actually fighting myself seems years away, because someone has to watch the horde. Enter the amazing Olivia Baker, who said something to me like "gee I'd really like to try fencing, but what on earth would I do with the minion while I fight?" And so the fight practice children's play group was born. I watch everyone while Olivia goes off and (safely and carefully) stabs people, then we switch out and I bludgeon people (well, attempt to) while she supervises the horde. It's been amazing, and Heavy is just as fun as I thought it looked the first time I saw it. Probably more!

The biggest problem with heavy fighting is all the armor. It gets expensive pretty quickly if you're not a smith, and I'm no metal worker. While most baronies keep a lot of loaner gear, if you're not standard guy sized you can have trouble finding things that fit. And armor that doesn't fit leaves spectacular bruises. Luckily one of our local households has a large stock of youth sized loaner gear and were able to set me up with a full kit. Less luckily, because it's household armor, they (very reasonably) requested that it be kept by a household member and transported to practice for me. Because the household member also has a life, which doesn't always coordinate with my life, the armor is not reliably at practice when I am. Between that and the "armor bite" bruises I'm scrambling to get as much of my own kit as quickly as possible.

Aside from being a blacksmith, There are other options: lamellar plates  and pickle barrel or kydex are more acessible to the average human, and less expensive. Leather can be expensive, and there is a skillset to working with it, but it's more flexible and breathable than many other options. I've spent a lot of time since I started fighting looking at all the female kits I could find. because  gear that works for girls can be quite different than that which works for guys. I found some options that are more in my own wheelbase: using more garment sewing skills than metal and heavy leather working skills. This also gives me the opportunity to learn a few new skills, particularly working with heavier weights of leather.

For design I wanted to maximize flexibility and breathability without sacrificing much in the way of protection. The official rules state that you have to cover your hands, wrists, elbows, knees, kidneys, and neck with "rigid" material backed by regulation padding. (obviously in addition to a helmet and gender specific groin protection) But most fighters add pieces to this to their own taste. As a new fighter I want a lot of protection because I get hit a lot. As I improve I may dispense with some of these pieces, but for now I'm thankful for all the protection I can get, since I don't like the look of layered bruises . I'm adding to the regulation gear: vambraces, Rerebraces, Spaulders (the smaller cousin of the pauldron) and a chest and back piece. I'm hoping to continue borrowing the full legs I've been using for the time being (leather cuisse with articulated metal poleyn and fan plate) because I quite like them. I may consider adding tassets eventually if I keep getting whacked in the hips, but for now I mostly get very good protection from my shield.

The best way to design and make all this is from the skin out: so that the outer layers would be sure to fit over padding and garments worn underneath.

Layer 1: a wrapped linen supportive top. Thorsbjurg trousers with leg wraps. and a closely fitted gamebeson with grand assiette sleeves for freedom of motion. The gambeson is quilted with padding over key areas, but not all over to facilitate not dying of heat stroke.


Layer 2: Rerebraces attached to couters are pointed (meaning tied) to the shoulders of the gambeson. Couters are purchased from Rough From the Hammer and made of aluminum. Rerebraces are going to be either kydex or leather (still arguing with myself) A tall fitted kidney belt with lacing for adjustment, and buckles to get in and out, covers my kidney area and supports my leg armor while spreading the weight of said leg armor evenly over my hips.  This garter style comes recommended by other female fighters, and I'm looking forward to getting rid of the highly uncomfortable leg belt.


Layer 3: a fighting tunic goes over the whole thing, and is belted on. Over that I put on a shaped leather breastplate with attached spaulders and a back panel of scale mail mounted on leather, and my gorget. Spaulders are stainless steel and also from rough from the hammer, and the gorget is on it's way from the same place we bought husbeasts fencing gorget. in addition I will wear a pair of leather covered vambraces attached to gloves, and leather half gauntlets.


Certainly this mish mash of pieces is nothing even LIKE historically accurate, but, for a viking persona, any armor other than a padded jacket with maybe a chain link shirt is basically not, from anything we can tell, historically accurate. The closest real armor I can find is the Visby coat of plates, in 1361, and of course the questionable birka lamellar scales. But in our particular combat sport, we have rules, and those rules dictate that we use certain amounts of rigid body protection, and good sense dictates a few more. So this is going to be a practical, fun, historical ish project that will hopefully result in a set of armor that I actually like.


Sunday, April 16, 2017

Robe a la Francaise, A Modern Twist.

Jean-François de Troy, The Declaration of Love, 1731
One of my favorite things to do in my own designing (when I'm not obsessed with historical
reacreation) is to use historical garments as the foundation for wearable modern clothes. Whether it be a house robe or a formal gown, there's something enticing and fascinating about blending classical forms with modern sensibilities. Most of the time for my own fashion choices (at least the ones I wear out of the house!) I stick to a very 1940's and early 50's new look vibe. It's suitable for my figure, and I love the look. But for special occasion dresses, it's a lot of fun to just go a little wild, and the girls are the perfect models!

From the collection of the Metripolitan 
I admit to having a weakness for the robe a la francaise, or sack back gown. Even though there's very little about the rococo period that I like (most of it's just too much for me. Music, Interior decorating... even the art) there's something about the fitted tapered front, and elegant sleeves of the robe a la francaise, contrasted against the flowing, voluminous Watteau pleats that I just love. These gowns also showcase some of the most phenomenal use of large prints and particularly striped prints, that I've ever seen. I may be a little obsessed.

I've done one sack backed project before. I have a dressing gown that's a empire waist with a sack back which is both comfortable and elegant. It's been one of my favorites for years, but I've yearned to do a closer approximation of the style. This has been simmering on the back burner for a long time in the "nowhere to wear it and it's not practical for at home" pot. But as I was looking at fabrics for my daughter's Easter dresses inspiration struck. I could do a gown, constructed in the period manner, complete with elbow flounces, with the entire top layer made out of terminally sparkly organze, making a whole modern twist out of a beautiful historical gown. I drew ups some designs and showed them to Ladybug, and she was in love. so away I went.

The original sack back I experimented with for my dressing gown had the pleats gathered into the neckline direct, which had some difficulties inherent to it: all that bulk, the pleats didn't want to turn under into neck seam easily, it wanted to pull at the neckline, etc etc. So for this gown I decided to select the other construction option, which uses a yoke. That way you don't have to turn down all those layers of pleated fabric, but instead just flip the yoke up over them. In some ways the line isn't as clean as pleats falling from the back neckline direct, but the construction is simpler. The yoke also gives you an easy flat space to attache trim, which with planned ruffled ribbon trim, was another plus.

I drafted the gown off of another roccoco inspired gown I had made last year, this one had a faux stomacher and a pollanaise style skirt. It took a standard sleeve pattern that I also have in stock, which made it easier than re-drafting from a block. Super secret: I hate drafting sleeves. If I have something similar I've already drafted I will frequently bastardize the pattern rather than go back and re do sleeve and armscythe drafting. With a few minor alterations, the pattern was a go.

I had a yard and half of super sparkle organza, and about the same of a purple satin. The plan was to use the organza for the entire exterior gown, and the satin for the interior gown and stomacher and then add ruffled trim. The first hurdle showed up as I began laying out pattern pieces This gown uses a LOT of fabric. Yes, those capitals are necessary.  To illustrate the stupid amount of fabric this gown takes: Kitten is 16 months old now and wears 24 month sizes. Her gown used all but scraps of an entire yard of 60" wide organza.  So, when I laid out Ladybug's, it was instantly obvious that I wasn't going to be able to get sleeves, ruffles, and the gown pieces out of the organza unless the back was pitifully narrow.

So back to the stash I went and came out with some embroidered chiffon and an old white silk shirt. There was enough there for the sleeve ruffle and a matching stomacher, and it was a nice compliment. of course it was terrible and slithery to work with, but in for a penny, in for a pound! The only downside was you could see the seam allowances through the chiffon where I made the ruffles. this bothers me but is basically invisible on the finished gown. I may still go back and try to put some trim over it.


The dean of the fashion dept when I was in school, Mrs. Hannan, always said that working with synthetic organza was like trying to sew live spiders together. She's not wrong, but I still do use it occasionally, particularly for little girl dresses. This fabric though? I don't care HOW sparkly it is, I will never EVER use it again. You can't iron it without a pressing cloth. Iron the front? The little plastic jewels melt on the iron. Iron the back? The glue from the jewels seeps through the cloth and onto the iron. It was also a nightmare to sew evenly, you can see how completely crooked my top stitching on these sleeve ruffles is. Every time you hit some of the jewels the fabric jigged, and you might not even see the ones you hit, because they could be in one of the bottom layers. The fabric made what should have been a fun project into rather a nightmare.

Whenever I'm making a gown with a sleeve treatment I like to apply the treatments to the sleeve before I attach the sleeve. This saves wrangling the whole gown around while trying to evenly apply ruffles. I also like to try and cleverly hide all the raw edges. In this case you want to trim the organza as little as possible. because it's evil and ravelly and will slither out of the seams if given half a chance. I flipped the seam allowances to the outside here, and then sewed ribbon trim down over it.

I used a heavy linen underlining to give the bodice some weight. then stay stitched all the satin to it to keep that from slithering off. Then I pinned the pleats, and sewed the yoke down over them. This was a really great way to do the sack back. I wished I'd had more fabric in the back, but it made fairly full pleats.

The bodice came together fairly quickly. The trickiest part of the whole gown was pleating in the side pleats. I was able to cheat a little bit because I was using an attached under skirt instead of the historically accurate petticoat so I just caught the pleats in the waist seam and was done with it. Putting in the sleeves and the lining was a nightmare because of the fabric. Instead of just giving all the seam allowances a good heavy steam pressing to make the edges crisp and keep everything in place while I was sewing in the lining, I had to hand baste all the edges of the sleeve and the neckline to the underlining, which, while it seems like a small thing, added another few hours of labor to the job.

Then I added the under skirt. I pleated it onto the bodice, but gathered a large loop of it directly under the side pleats. This gave it a shadow of the silhouette that would have been given by panniers in the original gowns.


With that sorted and the lining sewed down I put on ruffled organza ribbon trim. Yards. and Yards, and Yards of ruffled organza ribbon trim. Because go big or go home right?


Then the stomacher, which I sewed down to the lining at one side, and applied hook and loop tape to the other of for closure. Again, a historical fudge. Stomachers tended to be pinned into place, but that's just not practical for tiny people. The stomacher has one plastic cable tie down the center to help it keep it's shape and two layers of underlining.

Finished and on to Kitten's dress!

I picked cow print for Kitten's dress. Because of a hilarious family story started by my Aunt, my Cousin, and a ridiculous cow print romper one easter long ago cow print baby clothes have become a thing in my family. I decided to keep it going with my youngest this year, so she got her very own cow print gown.

I love drafting for babies: the pieces are barely shaped so it's super easy to change a pattern you know fits to new lines. I started from her little wool kirtle, and moved stuff around some.

The construction process was exactly the same except I could IRON this fabric. Therefore I managed to make her whole gown in about the same time it took me to make Ladybug's sleeves. Seriously, that's the difference fabric makes. (also it's tiny so it goes faster, but not that much faster!) I did do kitten's watteau pleats straight from the neckline and then hand stitch them down into shape. Partially just because I wanted to try both methods back to back, and partially because the gown is so small, more seams in a small space like that just add bulk.

My Model got tired waiting for me to finish....

I had my major oops for the project with Kitten's gown. Somehow, although I checked it twice both when I put the ruffle on the sleeve and when I put the sleeve on the gown, I managed to put the sleeve ruffles on backwards, so the long part is to the front. Thankfully it wasn't super noticeable. I'll take it off and turn it around later when I have more time!
My sparkle princess! 


I added vintage glass buttons to the bows on Kitten's stomacher for a little extra sparkle

note the backwards sleeve ruffle.... 

The first time Ladybug saw Kitten in her gown, she said "Look mom, she's a tiny cow fairy!"
The sack back does look a little like wings when she runs around! 

Crash and Bang didn't get left out. They got Dapper Dude Vests.