Monday, October 9, 2017

In search of Armor: Breastplate and tunic

With my kidney belt finished I moved onto the last remaining piece of my basic armor (not counting legs and helmet, which I'm still using loaner.) Over the kidney belt and rerebraces, I wanted to wear a plain short sleeved linen tunic. From what we can extrapolate from grave finds and art work, vikings did wear a sort of standard geometric tunic pattern, although they sometimes did shape the sleeves and armholes (as I do in my Serks). For this I decided to just keep the standard roomy "T" shape The loose sleeve is very easy to move in, and the more awkward drape isn't something I'm concerned about all that much when I'm wearing armor anyhow. Since by this time we were on final approach for pennsic, I just needed to get it done so I could get out of what i Had started referring to as the "hedgehog armor."

 I had bought blue and gold linen for this purpose several months ago on an excursion to a fabric warehouse, Indigo for the body, gold from the trim. I trimmed the sleeves, neck, and hem with the gold,  and covered the join to the body with a couched cord. The couched cord is found on smokkr fragments found in birka (1) although not used exactly in this way.

This is the most basic design in historical sewing, very fabric efficient because it's all squares and half rectangle triangles. I did flat fell all the seams for comfort and strength, and I made the under arm gusset much larger than I do on my normal garments, just to give it that little extra ease and make it easier to move in, and easier to get on and off over partial armor.

I also tried a new thing with the bottom trim. It's curved so it's a bit tricky. if you cut it in a long shaped strip, it's wicked inneficient use of fabric. lots of waste. If you cut it in pieces to match the ends of the gores, it's a lot of seams, and hard to get all the seam points matched up. If you make it straight and let it hang down, it hangs super weird and looks funny. So I cut a long straight strip, sewed it onto the edge, flipped it up to the outside of the tunic, and turned the edges under. Now I had an upper edge that was bigger than the garment. So at each seam along the side I took a small dart in by hand, from the edge of the trim to the top, shaping the trim evenly to the garment. The darts look like an extension of the garment seams, and the trim lies flat and smooth. I joined it to the body with a couched cord. The down side is that it makes 2 layers along the bottom of the garment, which is more wasteful. But on the other hand it weights the hem and makes hang very nicely. I think on balance it was a successful experiment, and I will repeat.

For the breastplate, I drafted a pattern from my gambeson, which was already patterned to wear over my breast band, which binds my chest flatter than a modern bra. I cut it out of stiff paper, because I didn't have cereal boxes big enough, and taped it together. Then I cut and shaped until it fit well over gambeson and breast band, leaving a little ease for the tunic. Instead of a seam directly over the shoulder, I used a long flat piece along the shoulder with an extended tab over the top of the arm. This both eliminated a seam at a pressure point where it could potentially cause discomfort, and gave me a place to rivet my spaulders.

I cut the breastplate pieces for medium weight leather for the sides, and heavy leather over the chest. This isn't to protect my chest as much as it is to protect my collar bones, sternum, and upper ribs. In my few months fighting, it's not super common to get hit on the chest, although that may be partially a function of preferring to fight sword and shield to other forms, but most blows seem to come down onto the shoulders, where they get deflected by the spaulders. Why then do I bother with anything past a heavy collar to protect your collarbones and support the spaulders? Aside from the occasional odd ball shot that was meant for your face but landed on your chest instead, a couple of the guys in my practice have a nasty hanging shot that comes in behind your shield and lands thumpingly on your sternum. In addition to that, when I do eventually take up forms that don't involve a shield, my whole upper torso becomes a prime target until I learn to block.

I pre punched small holes all along the edge of the breast plate pieces with my awl, then sewed them together with waxed leather thread (which is actually a sort of very fine braided cord) I then went back over the stitching the other way, making the exposed stitching look like a row of X's. This involved the use of pliers and a hand pad. I didn't want to punch the holes too large, but in hind sight I should have made them a little larger, because I broke two needles gripping them with the pliers to yank them through.

I didn't want to super water harden this piece, because I just didn't think it needed to be rigid, and I wanted some flex in thesides for ease of movement (although the way I patterned it I think I could have made it of kydex and still gotten complete range of motion.) but it did need to be shaped, and stiff. So I put on my gambeson, wrapped myself in saran wrap to protect it, then put on an old t-shirt of my husband's to simulate the bulk of the tunic. I submerged the breastplates in almost boiling water for about 20 seconds, until the edges had JUST started to shrivel a little, Then put it on, and stretched and formed it into shape. I wrapped it on with a giant ace bandage until it had cooled. Then I put it over a pillow so it would hold it's shape while it dried.

I attached a piece of suede for the back and shoulders (This will be covered by my scale mail drape, so it not only doesn't need to be rigid, but it's preferable that it not be) and added ties to one side so I could get in and out. Then I took it to a friend's house so he could help me drill holes in my stainless spaulders and I could rivet them on. I also wanted the advice of a more experienced armorer (I have so little experience it's not funny, he's been making armor for something like 20 years I think.) for the most effective placement of the spaulders. He actually decided I should put them on upside down, they fit my narrower shoulders better that way, and higher up than is totally standard. He also advised me on the best way to pad the inside of the spaulders, so that the ends and edges don't dig in when I get a direct hit. I wouldn't have thought of that until I'd been hit once, so I'm thankful.

And it was done! just in time for a shake down cruise to pennsic. I do NOT advise this course of action. ideally you should try your new armor at a few practices to work out any wrinkles, but I was determined to be rid of the heavy, uncomfortable loaner breastplate for pennsic and it's long days of field battles. So I packed an extensive repair kit, crossed my fingers, and jumped in at the deep end. Thankfully, it had no problems. It survived trial by fire with flying colors! I was deeply thankful for the padding in the spaulders a couple of times. It was light, mobile, and comfortable. The only down side of the shorty breastplate I found in a week of fighting is that in some positions spear to the ribs can miss both belt and breastplate and nail you. That happened once and all the air exited my lungs in a whoosh. Heck of a shot by the spear. I also want to get the drape done before I do another round of melee, because pole arm to the back on padding only kind of sucks (although that wool padding is surprisingly effective. I got pole armed to the back a couple times and I was sure I was going to have big old bruises, and didn't.)
              
Waiting to tag back in at the
allied champions battle. I still
look silly.
Photo by James Pallack
My probationary household member tabard almost
completely covers my armor, which actually improves
the look for early period.
Photo by James Pallack

and a gratoutious shot of me with some of my hopefully someday household brothers, mustering on the field.
 Fighting with these guys is a joy and an honor. I hope to continue doing it for a long time.
Photo Credit: Charla Kinzel


1) Orignal source: Hägg, I. 1974. Kvinnodräkten i Birka: Livplaggens rekonstruktion på grundval av det arkeologiska materialet. Uppsala, Archaeological Institute. ISBN 9150600028
translated in this excellent article about smokkr. 

Friday, August 25, 2017

Post Pennsic Roundup

I'm back from Pennsic! I survived (even unpacking) and I had a great time. I know I've been a little quieter than usual in the months leading up, but I was SO busy I just didn't have the energy for blogging. Before I finish up posts about my armor (which got it's shakedown cruise on the battlefield at Pennsic!) and a few other things I've been working on, I thought I'd do a quick roundup of all the basic sewing I've done to get ready for the summer events this year. Even though the big kids went to camp grandma instead of Pennsic (so they didn't need a weeks worth of clothes), it was a huge amount of work to have enough clothes for me, the Husbeast, and Kitten to survive a week with only one round of laundry. I didn't get everything done I wanted to, but next year I can add to the wardrobe without the pressure. I KNOW we can survive a week with just what we have. We also finished our tents up (finally) complete with sunshade, and the Husbeast made us a bed and sundry other furnishings.

I do spend a lot of time on the interesting and new projects that I usually write up for this blog, but I also spend a lot of time on the very basic sewing that keeps everyone clothed for events, mending, and also mundane sewing (particularly for Ladybug). This year there has been a LOT of that basic,  keep people from going naked, sewing.  Thankfully, the sheer volume I've had to produce this year will not be an annual event. Sooner than later Kitten will start getting Ladybug's old garb, and the same holds true for Crash and Bang. God bless hand me downs. Also, Now that Husbeast has a basic wardrobe, I can add to it in a more seemly and less panicked manner.

So here's what I've accomplished in the last 4 months that hasn't been interesting enough to blog about. (although some of it may show up in later posts!) Everything is Terribly wrinkly because I just got home from pennsic, washed it all, and folded it to put it away, then decided to take pictures, and unfolded it....

Kitten has 5 small back lacing gowns, a hood, a kaftan, a nightgown, and a tiny coif for to keep the sun off her noggin.

 Her Kaftan and hood are wool. The kaftan is upcycled from two old wool skirts, and the hood is a scrap I had leftover from another project. It's edged with blanket stitch, and seamed with van dyke stitch, all in crewel wool. I used the leftovers to make a little tassel. The kaftan has some decorative stitching in silk Perle.
The yoke on this little butterfly gown is upcycled from an vintage doily. This (and all the others this year) is Baby Gown v2.0 It back laces with a fingerloop braided cord and hand eyelets. Much easier to get on, and she can't take it off!
 Crash got two new tunics, a nightshirt, and a new pair of Thorsbjurg trousers.


He also got this upcycled cloak. We were given an old cloak that was made of two layers of heavy wool and had lost it's clasp. I took it apart, let the boys choose lining fabric, and made two new cloaks. In addition he got a new hood since he outgrew his wool one. This is a lighter weight linen one (originally intended as a fencing hood but didn't fit the helmet right.) and edged with satin stitch worked in green wool.


Bang got two new tunics, two new pairs of thorsbjurg trousers, a nightshirt, and his half of the upcycled cloak project. Thankfully Crash's hand me down hood fits him just right.
 Ladybug still had some garments, so she got two new gowns, a nightgown, and some accessories.
She asked for a hennin and veil, but I told her that wasn't really a thing little girls wore in the 14th century, but I'd find something. A little research led me to discover that younger girls did wear chaplets of flowers, sometimes real, sometimes jeweled or enameled. So I made her this little chaplet of enameled flowers. Also she got the silly embroidered purse.
The nice thing about viking is my garb needs are fairly few and simple. (Thankfully because I needed armor.) I made two new Serks of linen, one with silk trim. and a pair of (also linen) Thorsbjurg trousers for fighting in.
Himself on the other hand, has ALL The garb needs. Particularly because he needs body linens in addition to outer clothing. I finished two shirts for wear, and two shirts to fight in, with at least a little embroidery on them.
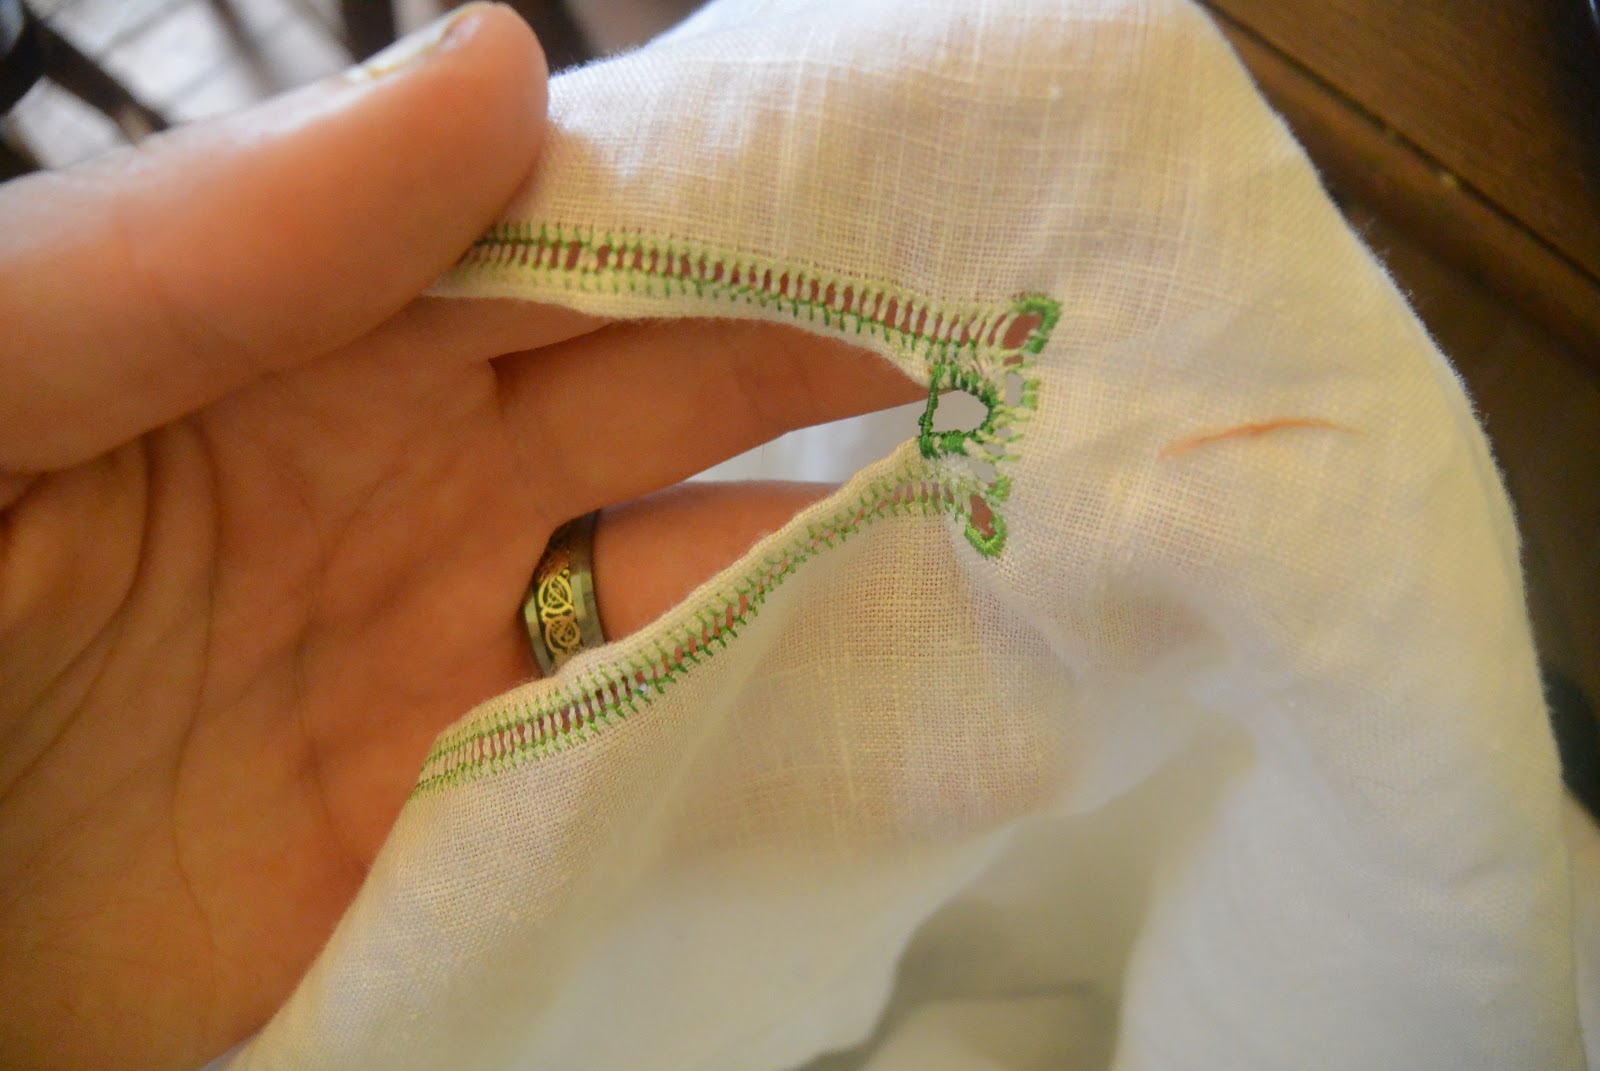
I learned to do pulled work on his shirts, and found it addictive. Here's the neck opening of one of his wearing shirts.  (the collar is worked too)
And the cuff of one of his fighting shirts. The little zig zag was really fun!
 He had no clothes, so He got a half circle wool and velvet cloak, lined in silk, one suit of clothes (brown trunkhose and blue doublet) and one pair of camp pants out of a single layer of linen canvas. He can wear those around camp with just a shirt and be more comfortable and cool. He still wore his viking some too. Hopefully by next year he'll have enough of his own period of clothes he won't have to wear the viking at all.
He also had to have a fighting houpelande to match the rest of our household that we're in the process of joining when he was out on the melee field. This has a hanging sleeve (although you can't see it that well here.) it's two layers of linen in the body to pass the safety tests for SCA rapier fencing, and one layer in the sleeve.

Here he is fencing in it :) on the left with the loud tights and brown hood.
In addition to that I helped Husbeast with the fabric portion of our tents. That was a project and a half. I'm so thankful I have a heavy duty treadle machine to handle the sewing. I also have a new respect for tent makers.
After all that, I'm taking a bit of a break from projects with deadlines. I'm spending some time reading, weaving, working on an embroidered kaftan project, catching up on household duties (you can't see my poor roses for the weeds!) and generally decompressing.

Sneak Peek of the Kaftan project!! 

Thursday, July 20, 2017

My gloveing journey: A pair of armored gauntlets

 When I started loking at women's armor for inspiration, the first thing that I was really attracted to was a set of thigh guards and vambraces made from soft leather with sewn channels for metal strapping. I looked and said: "That looks like boning channels, I can do this!" So I designed these gloves with attached vambraces, based on a pair of Wisby style gauntlets I'd seen on pinterest. Essentially the pattern is like any other cuffed glove, although the cuff is longand fitted. Articulated finger backs for full gauntlets are far beyond my current skill and budget, but it should be theoretically possible to remove the vambraces, attach armor to the gloves, and then reattach the vambraces. Maybe I'll even figure out how to make the articulated fingers myself at some point (or more likely my husband will)

I decided that I'd use up my giant pile of good quality leather scraps on these gloves to save the limited funds for other armoring projects, and because I kind of liked the patchwork look of it (this is one of those "I saw a thing once upon a time and it stuck in my brains" ideas). It certainly makes my style very personalized, if not really Historically accurate. But the historical accuracy of a set of gauntlets for a viking persona is debatable at best, so I decided to go with making something fun for myself.

I started by making a cardboard pattern for the vambrace, and taping it onto my arm until I got a good shape with coverage up to the elbow but the ability to flex my arm. I really like cardboard for patterning things that will be stiff, because you can tape it on and see if it needs to be trimmed because it's bidning/jabbing/etc. Then I traced that onto a piece of butchers paper, and started laying out scraps to fit, and sewing them together. It's a bit tricky, because you don't want to cut a seam, so you can't just sew it all together into a big square then cut your patterns in the traditional way, but I managed to piece the outsides of a pair of vambraces in an evening.


I had a lot of "help" from Kitten. Who wants to be involved with everything.


I drafted a basic glove pattern, and fit it with a
felt mockup. I must finally be getting better at this, because this time around I only had to do one mockup, and only two small changes. I'm still having trouble getting the amount of ease in the fingers right: the thumb was snug and the two middle fingers were about a quarter inch loose, I slimmed down the fouchettes to correct that problem, and traced out a final pattern. I'd also forgotten to center the thumb on the palm side of the first finger again, but that was easily set right. I then proceeded to trace a clean copy, and cut it apart into bits so that I could piece it from scraps without having to either a) cut the seams or b) ending up with a continuous line of stitching across the knuckles, which I thought would be awkward looking. I taped the fouchettes to some of the fingers to give my one piece to cut out instead of two, carefully overlapping the seam allowances so that the pieces would be the right size.

When I was done putting all the pieces together I was left basically with a standard glove that had the
fouchettes put in already. Remaining was the thumb and the final finger seam. Typically I do that final finger seam on the treadle machine to expedite things, but because of the way the fingers were pieced together I decided to just bite the bullet and do it by hand.


with the hands and vambraces all together I was ready to splint the vambraces 


I used metal intended for welding sourced from the hardware store for my splints. My husband cut it and rounded the edges, and then I painted it with 3 layers of rustoleum. Why would I do that? because I'm going to sweat all over these things regularly, and they may not dry out as quickly as I'd like. Rust will ruin these from the inside out in very short order. I wish I could have found aluminum from my splints, as it would have been lighter, and rust proof, but this was what I could easily source locally, and compared to the arms I'm currently wearing, it's light as a feather.
  

With the metal ready, I sewed boning channels into my canvas and lining, and inserted the splints. Awesome lining fabric is leftover from a quilting project. I decided NOT to pad the lining, as I'd originally considered, but rather to pad my gambeson underneath, with the idea that separate layers will dry more quickly. The padding will protect my arm from the splints. If this seems like an aggressive amount of protection, it probably is, but I watched someone get their forearm broken a few years ago, and I'd rather wear something a little heavy than have that happen. Melee is a hot mess, and sticks fly everywhere. With my smaller frame, a misplaced or mistimed chop from a great weapon would be all it would take. Maybe eventually for tourney I will decide on something lighter.  I put the leather on top of the splints, and bound them with suede using my trusty treadle machine. Then I sewed on buckles and straps.

about this time I decided to try and incorporate hardened demi gauntlets into my design to save me from wearing a pair over the gloves. I had already made a cardboard pattern and mockup for these, and I decided to get rid of the cuff, and rivet the hand direct to the glove itself before attaching the vambrace. I felt this would streamline the dressing process and save me from the dread demi gauntlets. I'd been through 3 or 4 different loaned pairs (in varying shades of "doesn't fit") and didn't much care for any of them.

I cut the gauntlet pieces, sewed them together, and water hardened them. To shape them over my hands I put on the gloves with a pair of surgical gloves over top of them, to protect them from the water. Then I slapped the hot wet leather right onto my hand, covered it with a piece of plastic wrap, and taped it to my hand with athletic tape. I left it taped to my hand until it was thoroughly cooled, then took it off very gently, and tied it gently around so that it wouldn't fall out of shape as it dried. Once it was dry, I quick riveted it to the back of the hand. Then I sewed the cuff onto the hand with a stitching awl. This seam can be undone easily should i manage to get articulated hands for these gauntlets.

The bottom of the wrist seam is left un sewn. This allows for better mobility in the joint.  The leather strap across the palm keeps the hardened plate from flapping.

The gentle curve down over the knuckles gives me better coverage without limiting my mobility. You don't want any squishy bits sticking out of your shield boss or hilt basket, and i prefer a smaller hilt basket. so thumb and hand coverage is key. 
With the basic gauntlet done, I needed make a floating piece to cover the space between hand back and splints,  that would help protect my wrist and make sure I passed inspection. I needed to do this without limiting my mobility. which is a pretty tall order. One of the more senior fighters that I was complaining to had the excellent idea of attaching a small wrist plate with elastic to the sides of the glove. I went back to the cardboard for a trial run and found that a blobby crescent sort of shape, if given a little stretch, covered the questionable chink in my armor, and didn't bind up on my wrist. I cut it from leather, wet shaped it, and attached it with elastic tabs. 
the finished right glove. complete with wrist guard. 

elastic tabs mounted on rivets through the hand plate give the wrist guard some flex. the curved up shape keeps it away from my wrist and allows a pretty full range of wrist motion. 

from the top you can see that the floating plate gives complete coverage of the gap between the splinted vambrace and the hand plate. I wore the gloves for several weeks without the wrist plate, and got hit in the wrist a couple times without issue, but this way they will consistently pass inspection. The extra protection for the wrist is no bad thing either I need my wrists for sewing. 

For the record, this is the stupidest way to make a glove EVER, and I could have made 3 pairs of regular gloves, maybe more, in the time it took me to make these. But I love them so much I totally don't care. Sometimes, since I have to be aggressively practical in most of my mundane life, it's just nice to break out in impracticality in some way!


Sunday, July 16, 2017

In Search of Armor: Gambeson

My current gear, I've got my new arms on here,
Although taped on still. Legs, and breastplate are
Loaner, so's my helmet (restingby my feet)
I've been a bit lax with my blog over the last couple months. Not because I've not been sewing, but because with the SCA event season upon us, I've been too busy desperately trying to finish stuff to have time to spend writing it up. We've gotten much more involved this year: started attending camping events, and both of us started fighting, so suddenly I have 6 people in need of complete wardrobes, rather than just one or two outfits, plus an entire encampment to organize. It's been crazy to say the least. But I wanted to take a break from the hurly burly of pennsic prep to share the next step in my quest for armor that doesn't weigh a thousand pounds and fit like it was made for a much larger man....

The next step in my skin out armoring process is the Gambeson. For those of you not familiar with armoring terms, this is a padded (usually by quilting) closely fitted jacket style garment worn under armor to give you some padding. It has varying styles. I chose one popular in the 14th century because I was fascinated by the large circular grande assiette sleeve. It's some of the most interesting patterning I've ever seen, and I wanted to try it! There's a fascinating surviving example of this style in the purpoint of charles de blois (Housed in the Musee Historique des Tissus). Although it has been postulated that this rich silk garment was actually for show, it has the style of the more practical arming coats of the time. The pattern is a variety of crazy partially probably inspired by a desire to conserve fabric, and partially practical. The circular sleeve gives you almost complete mobility in a skin tight garment, which explains why the style was popular for so long. (For a wonderful discussion of the topic with all the applicable sources, see this well done Article).

I started with a body pattern pulled almost direct from my body block, as this is a very fitted garment.  I used a center back gore in the skirts to give me fullness for my hips and rear, and cut the sleeve holes out to the aproximate shape. Then I used The Cotte Simple's directions for Drafting with your good friend, Math which were very clear and simple and resulted in an almost perfect fit at the first go. I fudged the lower arm (there's a seam at the elbow hinge) but came out with a good result there the first time around as well. With a couple very minor alterations, I went straight to the final garment without a second fitting.

I decided, based on the example of other local fighters, that I was only going to pad key areas of my gambeson, for the prevention of heat stroke (Who wants to be wrapped in a quilt under their armor on a hot day? NOT ME) Therefore I cut the complete pattern out of white 4.7 oz linen (Dharma Trading again!) then cut a second layer for the areas that were going to be padded. The padded areas are the high wear areas, so I wanted to have the outer layer be a heavier weight. I didn't have any heavy weight linen I wanted to sacrifice for the cause, but I did have a big bag of scraps from making other garments that I had planned to piece crazy quilt style to make a lining for a  cloak or something, they were all nice quality and heavier weight, so I decided that my gambeson would be crazy quilt style, and got to piecing.

With my outer layer ready, I needed to sandwich some sort of stuffing between the layers of linen. Historically wool, flax, and horse hair were used for armor padding. In the modern day, we have a lot more options. I knew I wanted to avoid synthetics at all costs for this project, because of how hot they are. Although cotton is a popular modern choice, I wanted to avoid it because of it's sponge like qualities and slow drying rate, which I thought might lead to my gambeson growing things and developing a powerful stank. Horsehair and flax are not easily available, so that left me to choose between wool, and bamboo, which is noted for it's anti microbial properties. I consulted the various fighter groups, and finally decided to use, not wool batting, but just washed and carded wool fleece from my own stash. Evidently it will felt itself into the shape of my body after a few uses. That, plus the fact that I already have it, were powerful incentives.

I sandwiched the layers together, body of garment, padding, then outer layer, and pinned it to death. I was originally going to quilt this on my treadle machine, but after looking at the sort of dished shape of the back of the garment, decided it would be less painful in the long run to do it by hand. So I quilted all the padded areas with a large stitch and perle cotton. It turned out looking rather like the carapace of some fantastic beetle.

Then I put the sleeves in, This was a bit tricky because I didn't want to catch all that padding in the seams, making a lump to chafe my poor delicate skin under my armor. After consulting with my mom, whose degree in practical fashion design makes her unusually qualified to deal with these problems, I decided to face the inner seam out, clip the padding back and top stitch it down, then cover the whole mess with a piece of trim.  I treated the elbow and sleeve seams similarly, although much of that was padded meeting linen, so I clipped back the padding, rolled the edge of the top layer under, and used a tiny invisible hand stitch to put it down. There was no way to get the machine down into the arm to top stitch it (at least not easily) The key was to always trim back as much of the bulk as possible before finishing the edges. This was accomplished by by trimming the padding back so it ended about a quarter to an eight of an inch before the seam (leaving room for any turned under edges) and grading the hidden parts of the seam. This was a lot of work, but it avoided any bulky stiff lumpy chafey seams.

I had to finish all the edges of the quilted areas where they met the fabric. The easiest way to do this was to put some bias taped down over the edge. I really wanted to use a linen tape trim, but the price was a little steep, and I ended up going with some cotton bias tape that I already had in a complimentary color of green. I running stitched it down to the linen side, then used a mostly invisible whip stitch to sew it through all three layers of the quilted areas. Sewing through all the layers will keep the quilted edge from pulling free over time and wear.

I finished the cuffs with some silk scraps and a little perle cotton stitching. I don't know how I feel about the stitching. I might do it differently if I did it again. the effect is a little overkill, but then again the whole jacket is a little overkill.  the bottom edges I rolled and hemmed, and the collar I finished with a small bias silk strip.

The front edges had to be hearty enough to take ties. So I finished them off with a wide facing strip of very heavy (canvas weight) linen leftover from Husbeast's latest pair of pants. Then I used my favorite method for shirt ties, scaled up. First I put a hole where I wanted the tie using my handy tailors awl. Then I threaded 4 strands of perle cotton through, and finger loop braided short cords. Husbeast has yet to destroy shirt ties made in this manner, and I hope my gambeson will wear equally well. By going through the fabric itself you eliminate the weakest link of the tie: the place where you sewed it down. I also love how tidy it is without any messy sewn on ends or stitches showing on the outside. A little gentle scraping of the fabric with your fingernail shoves all the threads back into place and closes the hole around the cord completely.

Please excuse the crappy mirror selfies
And it was finished! The range of motion in this thing is strictly incredible. Full 360 degree shoulder rotation, I can wrap my arms as far around myself as they will go without straining the garment. I can lift them over my head and barely budge the bottom hem. There is a little extra fabric at the front of the arm. I'm not sure if that can be done away with. The placement of the sleeve hole on this garment is ideal for range of motion, but not ideal for the more sloping away side bust of the female form. Angling the seam line back away down the side of the bust would eliminate the extra fabric,  but might reduce range of motion. I still think I look rather like some sort of fantastic beetle, but I more like that than not. I'll use buckles or points to attach my rerebraces and elbows to the gambeson, which will keep them from sliding. Right now I'm using points and am dissatisfied with the ease of getting them tied up by myself and, it may just be the paracord I'm using, but they tend to come undone, which is annoying.

Here are some better shots of the whole thing laid out so you can see all the glorious details NOT in a slightly dirty mirror.
The elbow has a LOT of bend built in. surprisingly this is less awkward when your arm is held relaxed than you'd think. The elbows look a little poofy because I doubled the padding there compared to the rest of the forarm. I've been whacked on my vambraces with a polearm and it didn't leave a big mark, so they don't need a lot of padding. Elbows are fragile and pointy and should be padded well. 


with it open you can see the construction, the quilted channels, and also the front facings. there are no interior seams to bother my skin. 

The beetle carapace. the padding on the back is quite heavy. it doesn't limit my motion there, and it will do a good ob of protecting my kidneys. I also went pretty heavy with the padding on the upper back, because that will not be covered by hard material, so I think the extra padding will be welcome. 


Tuesday, June 6, 2017

Ladybug's Aumoniere (Or the stupid embroidered bag)

When I made the boys their viking pouches, I wanted to make something for Ladybug as well, Since she's doing the 14th century princess deal, it seemed like an ideal time to make a stab at one of the delightful little embroidered pouches common to that century, and have a try at opus anglicanum at the same time.

I started my project with a beautiful extant bag, a little research, and a lot of talking to people who'd done recreations. I'll list some sources for good information on these delightful bags at the bottom, other people have done the research far better and more organizedly than I have!

These little bags feature as a group: a foreground worked in split stitch, with a limited color palette, that is, only two shades in each field with which to work the shading. Details are frequently worked in some sort of running or back stitch, and outlines worked in stem stitch. The backgrounds are worked in couching or laid work with metallic threads. The drawstring area typically is couched, and then has eyelets worked over the couching. The bags could be decorated with beads along the edges, bobbles, bells, or tassels. Most commonly these bags depict "scenes of courtly love" or romantic stories. Tristian and Isolde for instance, or patient Griselda.

For Ladybugs bag, I chose to not use a scene of love, but to draw inspiration from the styles of the
bags, and other period artwork, and draw a scene with a princess, which included her badge, the magpie. I drew the tree direct from the romance of alexander, than drew a scene around it trying to stay true to the period artistic feel, which included a unique scaling that enlarges items to make detail visible or give them more importance. I transferred the design with ink to the linen, then put it on my rolling slate frame. This was my first time using a slate frame, and I really loved it, although next time I will take more care with dressing it. I didn't hem the edges of my fabric, and I feel that as a result, the tension across was not as even as I would have liked.

With everything prepared I began to work. Using two colors of DMC cotton floss for each field (yes, cotton. Ladybug is 7. I'm not using silk.), I first outlined with stem stitch, then filled with split, I found that it was helpful to use a colored pencill to  lightly work the shading before I started embroidering an area, that gave me an easily followed guide, but I didn't risk smudging the work by shading it all at once. it was a time consuming process. The stitches are very VERY small, and the back of the work gets quite built up as you go. Each leaf on the tree took more than an hour to work.

When I first started I had some trouble getting the threads started without making an even bigger lump. I found that if I made a couple stitches on the surface, it would temporarily secure the end. after I'd worked a row over it, I could come back and cut it off. When I finished a thread,I just ran it through a little of the backside of the work, then clipped it off short. I discovered in short order that it was really important to have no loose threads on the back of the work, because they cause knots, and knots make the work really difficult. There's enough bulk in the back of the stitch as is without any knots. if I had a little end hanging out for some reason (maybe the thread knotted and I didn't notice, etc) I found I could hold it out of the way with a straight pin until I 'd worked over it, then cut it short.

The face was really difficult to do well. I'm still not 100% happy with the outcome. I had some trouble with the shading in such a small area. it did turn out acceptable,but I think that it would have been better had I used a slightly higher contrast in my flesh tone threads. I used a tight backstitch to make the small details, and to differentiate between fingers, and help the hand stand out from the flesh of the neck. I think if I'd picked a better contrast in the flesh tones I may not have had to do so much of this. This technique does appear in period examples though, so I don't feel too badly about it.

With the face done it was on to the underside couched background. I used Krenik #5 braid for this project. It was a stab in the dark picking thread, because I have no frame of reference for it. Doing the couching was easy enough, although getting the turns nice was very fiddly. But the thread I chose wasn't ideal. Even though I spaced the thread very closely, the springyness of it, along with the relatively small size, meant that I just didn't get good coverage. it's ok. but it's not great. it would work fine for standard front side couching. but it wasn't a good choice for this application. I'm keeping some of it on a card for reference. As I continue to use gold threads I will keep building a little library of these cards, and hopefully in future have a small library to help me make better thread choices.

I worked over the top of the gold with standard couching in purple, then worked eyelets over that to make the drawstring area. Then I applied a silk backing and made it into a pouch, which was somewhat fiddly. it was hard to decide the best way to do it. Original pouches were embroidered on both sides, and then put together with a narrow woven band at the sides, but I decided to embroider only one side of Ladybugs pouch, because the back side would just get destroyed rubbing against her dress. I ended up wrapping the back of the pouch around the front, and hand stitching it down right along the edge of the embroidery. Fiddly but it didn't risk getting the embroidery caught in the bag proper.
I don't know why it won't let me put these pictures right side up.
You can see the failure in coverage for the goldwork here though. 


It was really hard to get photos of this project, the gold was so sparkly it seemed to throw the focus off on my camera.

I did enter this in our local Arts and Sciences competition at a recent event, Wars of the Roses. I didn't win the championship, but I did win the populace vote. I was too busy to get good pictures myself, but the lovely Catherine de la Broderesse took these.


Over all this was a great experience. I'm not 100% happy with the outcome, and I'm sad I didn't win the championship, but Ladybug is over the moon about it, and I learned a lot, so I'm going to call it a win.

Resources:
http://cottesimple.com/articles/aumonieres/
http://thomasguild.blogspot.com/2013/11/aumonieres-and-purses-from-germany.html
http://rosaliegilbert.com/purses.html
http://cottesimple.com/articles/aumoniere-reconstruction/
https://opusanglicanum.wordpress.com/2015/05/06/lovers-purse/