Friday, December 30, 2016

A Pair of Sort of Elizabethan Bodies (The lady in white project)

The why of this particular project is somewhat dubious. I'm making a front laced venetian gown inspired by the titian portrait "A Lady in White" While this is mostly a fairly straightforward operation, it does have it's own pitfalls. Since there aren't any surviving gowns (That I've been able to find) to solve the issue, there's a lively debate on the internet about what layers they were actually wearing, Is it a boned bodice? it is there a stiffened undergarment? What exactly is going on here? The plausible explanations seem to be these: a) a stiffened or boned pair of bodies under the camica, probably with a slip underneath them. b) No bodies, but the gown itself is boned/stiffened c) bodies over camica, and then a pleated stomacher, d) some sort of stiffened pleated undergown. Of these options, I find A and B the most plausible based on the bulk of the pictures that I've seen. They just don't seem to have the stiff front line that a stomacher or undergown would give you, although in most cases SOMETHING is clearly giving the gown a shape.


There has been a lot of discussion about this painting, by Bernardino Licinio "A Woman Combing Her Hair" This woman is clearly wearing some sort of stiffened overgown over her camica which appears to possibly be pleated. This does solve all the construction difficulties quite neatly, like "how do you wear petticoats" and also "What about a bum roll" But I just don't feel like the majority of the portraits and engravings show the distinctive bustline given by this sort of undergown. So while it obviously did exist, I don't think it was necessarily the norm. In the end, without any existing garments or real period descriptions, all we have is paintings and speculation. My final decision to make a pair of bodies was based on two things: First,I thought  it would most closely recreate the shape in the Titian portrait, and second, the fact that I could wear a pair of bodies under other late period gowns. A tertiary consideration was that a friend pointed out to me that boned gowns tend to show the boning after you wear them a few times, no matter how many layers you use, which obviously doesn't match up with the portraits. Which isn't to say that some of those gowns weren't stiffened with something else. More on that later.

There's really only two sources for Elizabethan bodies patterns: The queen elizabeth effigy bodies, which are very late period, and the 1598 pair of bodies (still very late period) belonging to Pfalzgrafin Dorothea Sabina Von Neuburg found in Janet Arnold's patterns of fashion. For my purposes the Neuburg bodies are a better shape, so I drafted them to my measurements and mocked them up. This is where I hit the first snag. I have a very large difference between my rib measurement and bust measurement. Especially since I'm breastfeeding right now. 10 inches to be exact. and the straight cut of these bodies just couldn't handle the curve. There was a large diagonal empty space from my armpit under my bust to my center front. Worser and worser, it was the dreaded "fish eye" space: pointed at both ends, impossible to walk out of the pattern.  Now, when drafting any conical shaped boned garment, stays or bodies, there is going to be some gapping, because the human body is not cone shaped. Some of this works itself out when you lace up: flesh squishes around to fill the voids. Some of it can be solved by small pillows under the bust (particularly this is in either very small chested or larger chested women, where the bust tends to sink into the the body of the garment as wear goes on) But this gap was really not one that could be dealt with by padding, and it didn't go away with lacing. So I was faced with a conundrum: Stick to the absolute period pattern, and be uncomfortable, plus possibly have my boobs migrate down into my bodice over the course of the evening, or alter the pattern out of strictly proveable period boundaries. My decision was to opt for comfort. I borrowed patterning from a later pair of stays, and made them five pieces rather than three, with a diagonal seam along the side front. Since I was already altering the pattern, I just went ahead and made attached tabs that the boning runs down into to keep the boning from stabbing me in the hips.

The next question is one of materials. We know that period women wore colorful undergarments in linen and silk, boned with reed, or whalebone. There's also growing evidence of stiffened undergarments made of layers of glued together linen. It's looking more and more likely that many tudor gowns owed their shape to kirtles stiffened by this method, and that boning was a later invention all together (The folks over at the Tudor Tailor have done some interesting work on this theory). Again, we run into the problem of surviving garments and primary sources. We can't be 100% sure at what point in history the boned bodies showed up, or how universally they were adopted. The venetian gowns could have been stiffened with paste and linen in the gown itself, avoiding the boning showing through the gown. Or they could have been worn over a paste stiffened linen undergown or pair of bodies. It's impossible to know. Certainly some of the portraits show wrinkling of the gown along the sides that wouldn't be typical of a garment worn over a whaleboned or reeded pair of bodies.

With this information in mind, I set about choosing my own materials. Since I was already straying from historical accuracy with the pattern, I did think for about ten minutes about just giving up and using coutil, but decided instead to try and stick as closely as possible to period fabrics. I used an inner layer of heavy linen, and an outer layer of silk underlined with horsehair fabric. What you ask is horsehair fabric? It's a stiff fabric typically made of horsehair and linen used in modern tailoring to give shape to collars and lapels. It is a period fabric, and it's ideal for corsetry because it really doesn't stretch. For the silk, in spite of period women's love for color, I chose white for the front, to keep it from showing through the camica, and pulled some lovely peach from my stash for the rest of it. I used 4 metal bones in the front to simulate a busk, as well as two in the back to firm up the lacing edges. The rest of the bodies is boned with heavy duty cable ties, which seem to be an excellent modern aproximation of whalebone. Unlike the evil flimsy plastic boning, they do not buckle and stab you, and they're easy to use and cheap.

After cutting the pieces and putting them together, clipping the seams where necessary and pressing them open, I stay stitched all around the edges of the silk and horsehair linen to keep them from sliding. Then I sewed the center front and center back and graded the seam to reduce bulk. You can see the single sew on tab in the brown linen here, all the rest of the tabs where cut into the piece. On the sewn in tab it is really important to be SURE that you press the seam allowances down towards the tabs. Resist the temptation to press one layer up and one down to reduce bulk, because if you do that when you try to slide the boning in it will get stuck and there will be a lot of muttering. Judicious grading of the seam reduces bulk greatly without catching your boning.

 With everything flipped right side out, I sewed the edge boning channel (which keeps things flat and still) and then marked all the rest of the boning channels. The original garment has no boning over the bust area, which is something I had never seen before, but decided to try. The original garment also had vertical boning from busk around to the side seams, but that was going to be tricky with the new curved side front seam I had added. I perused my corsetry books, and decided to use the boning pattern from the same (post period) pair of stays I had taken the side front seam from, which has vertical boning in the front, then a piece running along the seam, and the rest sort of fanning from the armpit the side back seam. I then pinned through the seams to make sure everything was really thoroughly lined up before I started sewing the boning channels.

I chose a dark plum 30 weight cotton thread to sew the boning channels on the peach silk: I thought it provided a nice contrast. I sewed the channels in the back side first, moving from the center back towards the front. Then I carefully hand stitched "in the ditch" of the stitching line, through the side front seam, stitching the two seams together so that everything was absolutely lined up, and providing a stop for the boning in the front that ended on the seam. I used a small backstitch for strength and because it's easier to work small through thick fabrics. Then I sewed the front boning chanels.

with all the boning channels sewn, I bound the bottom tabs (which is far easier on an unboned garment: It's easier to wrangle, and there's not the risk of breaking sewing machine needles on bones) This was where I had my big oopsie. I had decided to quilt the unboned bust areas while I was sewing the front boning channels. It occured to me this would be much easier with an unboned garment. I had quilted one bust area when I realized that I had already bound the bottom of the garment, and it would be impossible to put the bones in. At this point I just went to bed.

When I got up and was ready to face the boning, I started with the metal bones, 4 center front, and one on each side of the center back opening. These are spring steel, which I buy by the roll from corsetry supply. After cutting it with my own personal bolt cutters (For corsetry only. Husband get your own!) I wrapped the end in plumbers tape. This brilliant little hack keeps the edges of the metal from rubbing through the fabric. With the metal bones done, I set about boning the rest of it with the cable ties. Although it is possible to cut these with scissors the bolt cutters are easier. I then use a lighter to slightly melt the end and roll them against a heat resistant surface to gently round any sharp edges that might abrade the fabric.

I boned everything possible before I had to face up to the place where I had cleverly closed off both ends of the boning channels. I had to slit the top of each boning channel with a sharp seam ripper, slide the bone in, then sew the top of the channel closed, using very long stitches to keep them from tearing out. I will go back later and put a small patch of linen over the area on the inside to further reinforce it. I muttered a lot.


With the boning done, I only had to quilt the second bust area, bind the top and armpits, and set the grommets. I had originally planned to work hand eyelets over metal rings, but I needed to finish so I could start working on the bodice of my gown, so I just used metal grommets, set with the usual bodkin and grommet setting tool method. The silk did tend to rip rather than spread when i used the bodkin, and has since started to pull away from the grommets. I think it's mostly because this silk is old, and it may be a bit fragile for this usage, but if I set grommets in silk again, I will use fray check after I make the hole with the bodkin.


The only further problem I had was that the first time I laced it up one of the side seams popped. I don't know if I just didn't backtack it enough, or quite what, but the end of that seam is under a lot of pressure when you lace up. I repaired it with a lot of hand satin stitching over the seam, and secured the other side with a little bit of flossing, and it hasn't moved. Next time instead of ironing those seams open I will iron one left, one right, then when I sew the boning channels it will secure through the seam allowances and the pressure won't just be on a single seam end point. 

Over my camica, which I typically wear it under.
A big advantage of the boned tabs is that on me they make
a bumroll unecessary. 

you can see where the silk ripped out of the shoulder seams and around the grommets.
I have a pretty big gap in the back. I am slowly losing baby weight,
and wanted this to still fit in a year or so. You can also see the incredible bend the zip ties make without buckling on my side back tabs.  


Wednesday, December 14, 2016

A Husbeast's Fencing Doublet, Part 2 (construction at last!)

This is Part 2 of a two part series. Part 1, detailing the design and patterning process, can be found Here

With trial construction safely done, I felt ready to finally cut husband's first Proper Doublet, complete with all the bells and whistles. Inspired by Giovanni moroni's fantastic portraits, and an extant fencing doublet, I had patterned, drafted, and tested to death. There was nothing left but to start in earnest. I had decided at some point along the design process that this would be an ideal garment for him to wear to the fancy elizabethan event we were going to for our anniversary, so I was on a bit of a deadline, and with my own gown yet to make. Still, with six weeks to the event I felt comfortable getting everything done.


I had already started making the buttons, so they were well in hand, but I still needed two strips of
eyelets for the sleeves. I made those out of a fold of the the exterior fabric with the ends sewn in. It was my first time making hand eyelets and at first they went very slowly, but it quickly picked up speed as I got the hang of the process. The first strip of 15 eyelets took me three episodes of star trek, the second, half that. Then  I cut the collar and sleeve wings, and padstiched them to a layer of felt.


For the body of the doublet I used a layer of upholstery fabric, a layer of batting (Dream Angel, is a manmade fiber batting that i keep a roll of on hand. It happens to be fire retardant, in case husband ever decides to stand too close to a bonfire) I sewed the side seams of the doublet preparatory to marking the cording out. This is where I first discovered that this was, in fact the devils upholstery fabric. Ironing the seams open (after clipping the batting back to the seam line) had no apparent impact. They had to be ironed open and then whip stitched down to the batting. Once I'd done this I lined the seams up with the seams of the black Kona Cotton lining (dyed black cotton. very nice) and pinned through the seams to keep everything stable.

And started marking..... and marking, and marking.....

With it all marked I sewed the shoulder seams (which have continuous lines of stitching over them), whip stitched the seam allowances down, and started couching down perle cotton with  cording foot.  Although I knotted off the couching threads with the sewing machine, the long ends of perle cotton had to be run into the body of the doublet with a blunt needle. I soon found that it was more effective to double over stitching lines I'd already made than to start and stop continually.

With most of the cording on the body done, I corded the lines on the collar (which had already been padstitched.) that did not continue onto the doublet, then attached the collar to the doublet to finish the cording on the back neck.
Like in a modern tailored jacket, what you do with the seam allowances makes a big difference in the final result. Because I needed this collar to stand up, even though it's wide enough to flop back (large necked husbeast problems) I carefully whip stitched all the seam allowances (after some grading and clipping) down to the inside of the doublet. The mess is all covered by the collar lining later. This is where I discovered feature #2 of the devil's upholstery fabric. If you clip it (you have to clip it unless you want bunchy seams) little bits of it will then proceed to ravel OUT THROUGH THE SEAMS. Yes. Unheard of in my entire sewing life to date. The solution? as soon as I made any clips into the fabric they had to be thoroughly and immediately fraychecked.

With the collar firmly attached I could finish the last of the cording on the body of the doublet, and work all the ends in.
And move onto cording all of the tabs. They're two layers of evil upholstery fabric with a layer of batting between. After they were corded they had to all be bound with the silk dupioni bias tape, and then the bias tape hand stitched to the back. 10 minutes per tab.... 16 tabs.....

This is where I discovered another wrinkle. What looked like an enormous amount of bias tape when I made it up wasn't going to be enough to bind the tabs, the front and around the collar, much less the sleeves and armholes. I had to adapt the plan, because there wasn't any more dupioni. I scrounged enough scraps to make it up to the collar. So that meant I had to just find alternate methods for the wings, armhole, and collar.

I had already cut the collar lining, so I did have that to work with. I installed it schooched up about half an inch, and sewed the bottom edge down to keep it in place.
This gave me enough extra to fold the lining down over the outside of the jacket.
and then very carefully fold the edge under, ease it in, and sew it into place. Thankfully silk dupioni is pretty amenable to being eased, or this would have been rather a nightmare.  With that done I sewed a piece of black bias (cut from the same fabric as the lining) down over the exposed bits of collar on the inside. That had to be done all by hand so no stitching would show on the outside.
Then it was time to deal with the wings. I had sewed and turned them rather than binding them. Of course they wouldn't stay put OR flat but rolled and puffed like crazy (devils upholstery fabric strikes again) so i used some of the perle cotton and ran a line of herringbone stitch through the lining and into the padstitched felt underneath around the seam allowance on the inside. Then I pinned them down, along with the eyelet strips for the sleeves and sewed them down.


With them tacked into place, I sewed a strip of black bias tape around the entire armhole, and (you guessed it) turned the seam allowances to the inside, graded what of it I could to reduce bulk (the felt and batting, and the jacket lining were safe choices) and whipped it down to the inside of the jacket. If you don't do this your wings will have a distressing tendency to not stay that the angle you intended for them, and may even tend to stick UP from the shoulders rather than out.
 Then I turned the bias binding to the inside, and sewed it down all around. Here you can see the finished lacing strips hiding under the wings.


With the wings on it was time to turn to the tabs. They had to be sewn on, the seam allowance turned
up to the body and stitched down, then a wide folded piece of bias tape sewn over that.  If you don't stitch the seam allowance to the body the tabs won't stick down, but instead more out, tending to look like a demented tutu. The wide folded bias tape is left free at the bottom edge, and grommets fitted in it for the points of the trunkhose. Ideally these wouldn't be grommets but more hand bound eyelets worked over metal rings. But by this point in construction I was hugely past my estimated labor time of 50 hours (5x what it took me for the practice doublet), and not even counting the making of the eyelet strips or the buttons I had more than doubled my original time estimate. I was beginning to cut corners out of desperation. I can go back later and work thread over the grommets to make them look better if I decide I care about it that much.

With the tabs on I bound the remaining front edge between the collar and tabs, and began affixing buttons. These are knotted on with the two "tails" left from construction, and then the knot fray checked, and the ends buried in the doublet.

then all that was left of the doublet proper was to work all button loops, alternating sides, all down the front of the doublet.

Then back to square one for the sleeves! The original doublet was missing the sleeves, but there's another padded, corded doublet in Patterns of Fashion that Arnold notes as a close cousin of the one I recreated, and it has sleeves. I drafted these to husband's measurements, mocked them up, pinned them to the lacing strips, and altered them.

Once altered the pattern was so funny looking I almost did a second mockup just to double check. but I decided to trust the process. I mean, none of his other patterns look like things that belong to normal humans, why should his sleeves?


I cut them out from the upholstry fabric of doom. seamed them,
sewed the seam allowances down carefully so as not to have stitches showing on the outside, and then fully lined them from the top, and finished the bottom with a scrap of the silk satin left from cutting his trunkhose out. I added a pair of buttons and button loops to each sleeve, and was finished. Ideally I would have put coordinating lacing eyelets on the top of each sleeve, but by this point I was beginning to feel desperate about getting it done, so I used a large blunt needle to sew the lacing ribbon straight through the sleeve. I'll later enlarge those holes with a bodkin and make proper eyelets.

Then I had to finish off the last details of the doublet, working any leftover threads in, and making up the tiny tassels that decorate the points of the back neck cording on the original. Using a hack I saw some time ago (actually for making miniature bows, but tassels are the same principle)  I made the tiny tassels around the tines of a dessert fork, That way you can tie off the neck between the fork tines, and just slide the whole thing off the end They turned out beautifully fluffy, and perfectly even, although I may have to use a little stitch to make them lie down flat, since they don't seem to want to do that.

And it was finally, finally, done. This thing was a true labor of love. I figure 200+ hours into the doublet once you start counting time spent making  buttons. A lot of that was extra time spent dealing with the devil's upholstery fabric, or flailing because I ran out of bias tape. Still, just the basic labor in creating this kind of extremely tailored garment is nothing to be sneezed at. I will take what I learned from this one to the next one (Which will NOT be corded and quilted) and hopefully improve my time. I have to say though, seeing husband in his suit, it was worth every minute I spent. This makes two suits done, of the four he needs, plus a proposed black velvet and blue silk court outfit.........
Doublet back

for some reason it will only let me load this photo sideways, but here's the doublet front! 
The husbeast, handsome dog that he is.

Monday, December 12, 2016

A Husbeast's fencing doublet, Part 1 (in the beginning)

This is Part 1 of a two part series. Part 2, detailing making the doublet, can be found Here

This has been a project spanning the last almost four months since my husband decided that SCA Rapier was a thing that he wanted to do and there was a sudden urgent need for puncture resistant garments. That set off a flurry of research into rapier regulations, and late period garments, so I could provide him with options of what was possible while he decided on a persona. He finally decided to go the easiest route and use his own heritage, which, as he is slovenian, positions him around the north eastern corner of modern Italy. Because most of the sword techniques and sources used for SCA rapier are later period, he wanted to do later period. Well, first he wanted to be a musketeer. After I told him that a) it was way to far post period to even be stretching the guidlines (1630 anyone?) and b) showed him a lot of really silly looking outfits from that era, he decided that he could go with the later 1500's instead. This set of yet another flurry of research. As I dug around I found two things.


First I tripped over Giovanni Battista Moroni, and his beautiful almost photorealistic portraits. He painted a lot of swordsmen, knights, and soldiers. Their faces are craggy and real, and their clothes are sublime. The fashions more practical and less extreme than what I had associated with mid to late 1500's.  This portrait of  Don Gabriel de la Cueva was the first thing that I saw and thought "this suits" It's restrained by elizabethan standards, but elegant with it's rich fabric and touch of gold embroidery on collars and cuffs. Most importantly it proved to hubby that not everyone in the elizabethan era had to wear a ruff. or "silly pants"


I think that he had a preconceived notion that everyone in the elizabethan era looked like Sir robert dudley here, Or prince Hercule Francios who, while undoubtedly magnificent, would make my husband feel uncomfortable, silly, and self conscious. 
Robert Dudley, Unknown artist, 1575
National portrait gallery
Prince Hercule Francios, 1572
National Gallery of art, Washington
He had the simultaneous (and also erroneous) preconceived notion that musketeers looked more like this:
3 musketeers film, 2011 


and less like this:
The Meagre company, by Frans Hals, 1633
Amsterdam museum 
Which while also magnificent, is extremely post period, involves a lot of lace, and isn't really suited to certain body types. Once we cleared up all the misinformation, we were good.

The second thing I found on my trip down the research rabbit hole, was an Elizabethan era fencing doublet, with removable sleeves (no longer existing, but the lacing holes for attaching them are still there.) Made from padded leather and embroidered stiff, it's a thing of beauty and practicality. I immediately knew that I wanted to recreate it, or at least something like it. Luckily this is one of the pieces that's diagrammed and described in Janet Arnolds "patterns of fashion" So I had a place to start from in recreating it. With a lot of help from the folks in the Elizabethan costuming group on facebook, I made final design decisions about sleeves and construction, and set off.

The first thing I did was to make a fencing doublet for Ladybug. No. Really. She started fencing at the same time as hubby, and also needed puncture resistant garments. Making something for her allowed me to test out the patterning and construction in miniature. I shrunk down a pattern for a ladies doublet from Janet Arnold's book, and I consulted more with the Elizabethan costuming group, as well as my local Elizabethan costuming experts about padstitching collars and other details. I lined her doublet in purple silk, and made a matching shirt and knee breeches. I took everything to be puncture tested, including possible fabrics for Husband's garment.

With that under my belt I finalized the design for husband's garment. I had a bolt of lovely dove grey upolstery fabric, Since it easily passed puncture testing, I decided to use that with scarlet perle cotton couched down to  match the patterns on the original fencing doublet, and matching thread covered buttons. I decided rather sadly, that I'd eliminate the bulk of the embroidery for this go round, in the interest of him actually having clothes in the near future. I dyed some silk I had to match the scarlet perle cotton cording: a piece of dupioni to line the collar and bind the doublet with, and a piece of satin for the inner layer of paned trunkhose to match. I looked up how to make the most basic thread wrapped buttons, and started work on the estimated 30 buttons needed for the doublet.

Finally I drafted the pattern out of Janet Arnold's book, and made a mock up, altered it, and repeated until I had something that fit just right. The biggest challenges of the patterning were the collar, which is difficult on someone with a neck the size of my husband's, and the waistline. The neck required me to slash and spread the collar so that it flared from the base rather than rising straight up. It looks right when it's on him, although it's a pretty funny shape on paper. The waistline was a bit more tricky, Husbeast is built like a linebacker. He has a massive chest, thick waist, and a small gut. His waistline (where he wears his pants) naturally falls well below his natural waist. It was difficult to decide how to fit this in a way that would be both period and flattering to more modern sensibilities. I ended up after consulting with the the elizabethan costuming folks, going midway between the natural waist and his waistline and just finding a fit and line that seemed flattering, which meant gently fitting the front to his silhouette, but not going for the full blown peascod doublet look, which he might have felt awkward in.

At this point I was ready to start sewing, but decided to first make a practice doublet: sort of a more sophisticated mockup. A finished garment that he could wear to fight practice, but also a chance for me to work through the bugs of construction without being super upset if I messed up and it wasn't perfect. I used some brown heavy weight twill, bound it with fabric to match his fencing shirt, and gave it a laced front with a velcro under panel so he didn't have to lace it for every single practice. It looks like a blob without him in it, but it worked out really well. It was also an important learning experience, working with the collar, and the armhole, as well as the tabs and front binding. All of them have their own quirks. The first thing I tried for instance, for continuing the binding from the tabs to the front of the doublet wasn't the best, and left an unsightly lump. Doing the practice doublet allowed me to get an idea of how the techniques I planned to use would really work out in practice. And with a matching fencing hood, it got him out of the loaner gear. Which was a plus!

After all this, I finally felt secure enough to cut out the grey fabric and start work on the corded doublet.

Continued in Part Two

Friday, December 2, 2016

A Venetian hairpiece. (The Lady in White project)

First I'd like to apologize for my prolonged absence! I have still been sewing, a lot in fact, but with the start o the school year, etc etc etc, have fallen behind on writing up the things I'm making! But husband and I are going to a very fancy elizabethan event December 10th, and i'm so excited about the outfits I'm making us that I have to write them up.

I'm making a gown based of this beautiful titian portrait "A lady in white" See that barely visible coil of ribbon woven hair? Isn't it lovely? Isn't it unfortunate that the last four inches of my fashionably light hair is.... Blue..... This is a problem I run into any time I do historical costuming. My hair is blue. Or purple, or some other not period color. My normal solution is to just cover my head, but this wasn't terribly fashionable with venetian women from what I can tell. I was mulling it over when it occurred to me that what I really needed was a hairpiece that I could pin over my own coiled back hair to produce a fashionable hairstyle and disguise my hair color. Basically a small hat, with a coil of ribbon bound hair around the outside that could be pinned down to my own hair.

Luckily for me, I have a victorian sensibility and save all my hair cuttings and a good deal of my hair combings. Typically I use them for spinning, but I've also made a couple of false hairpieces to wear with historical pieces, notably a pair of side braids for my 14th C wimple and veil. Thus I happened to have  large hank of hair lurking about in my fiber bin. You can also go to a beauty supply store and purchase a hank of false hair that closely matches your own. It would be considerably easier to work with, and the ribbons and hairnet would disguise most of the "fake" look of the hair I think.

As a side note, this project could easily be done on a buckram base of your choice. In fact, it would save you time making the base, and make all the later sewing a little easier. However, if like me you don't have easy access to buckram, and don't want to pay a bunch of shipping, this method works surprisingly well with things you can get at any craft supply store, and may have lying around anyhow.

First assemble supplies or making your base: a sheet of the plastic craft grid used for making those yarn covered tissue box holders and things, a coathanger or other firm piece of wire, string or heavy thread, and some tape. You'll also need a heat gun and something as a mold for your hat. I used this small bowl.

The general idea is to cut a square of the craft plastic roughly the right size, heat it with the heat gun, and mold it over the bowl. There's a couple things I discovered about doing this. First, it's easy to melt the plastic. Second, the whole thing works way better with a pair of nesting bowls. Heat the plastic, and then mash the second bowl down and hold it very firmly for a couple minutes until it's cooled. Once I discovered using a second bowl, it only took me a few minutes to make a rough form. With the plastic shaped, I took a piece of coat hanger and shaped it around the bowl to make a circle the same size, overlapped the ends, and taped them down. Ideally for this you would use duct tape or electricians tape, but if you're out of those, your hello Kitty packing tape works just fine. 

With the form done, now to make the base of the hairpiece. Using cotton string and a large needle, I first overcast stitched the wire circle to the plastic. Then I took a piece of fairly coarse brown linen, easy to drape, and not likely to be noticeable if it showed through the hair, and basted it down above the wire edge, easing it smooth as I went. With that done, I took some of my hair that I'd saved from brushing, combed it so it was all going in one direction rather than all wadded up, and spread it over the form. I found it worked to sew it down in several pieces to one side of the form, then spread it over, gather it into a small "tail" at the back, and then stitch that down. I then trimmed the extra hair off. At this stage it looks like a slightly creepy hair covered 40's hat, or possibly a sleeping tribble. 

Now I made a "hair net" over the hat base. I started by laying strips of gold ribbon over in a criss cross pattern, securing ends to the inside of the base with hot glue, and the crosses with pearl beads. I sewed the pearl beads on through the hat base, knotted the threads on the inside, and covered the knots with hot glue. I then worked a fine knotted net of gold thread through the ribbons, working silver glass beads onto the joins. Then I stitched a band of bias tape around the bottom edge of the hat base, covering up all the loose ends and stitching. 
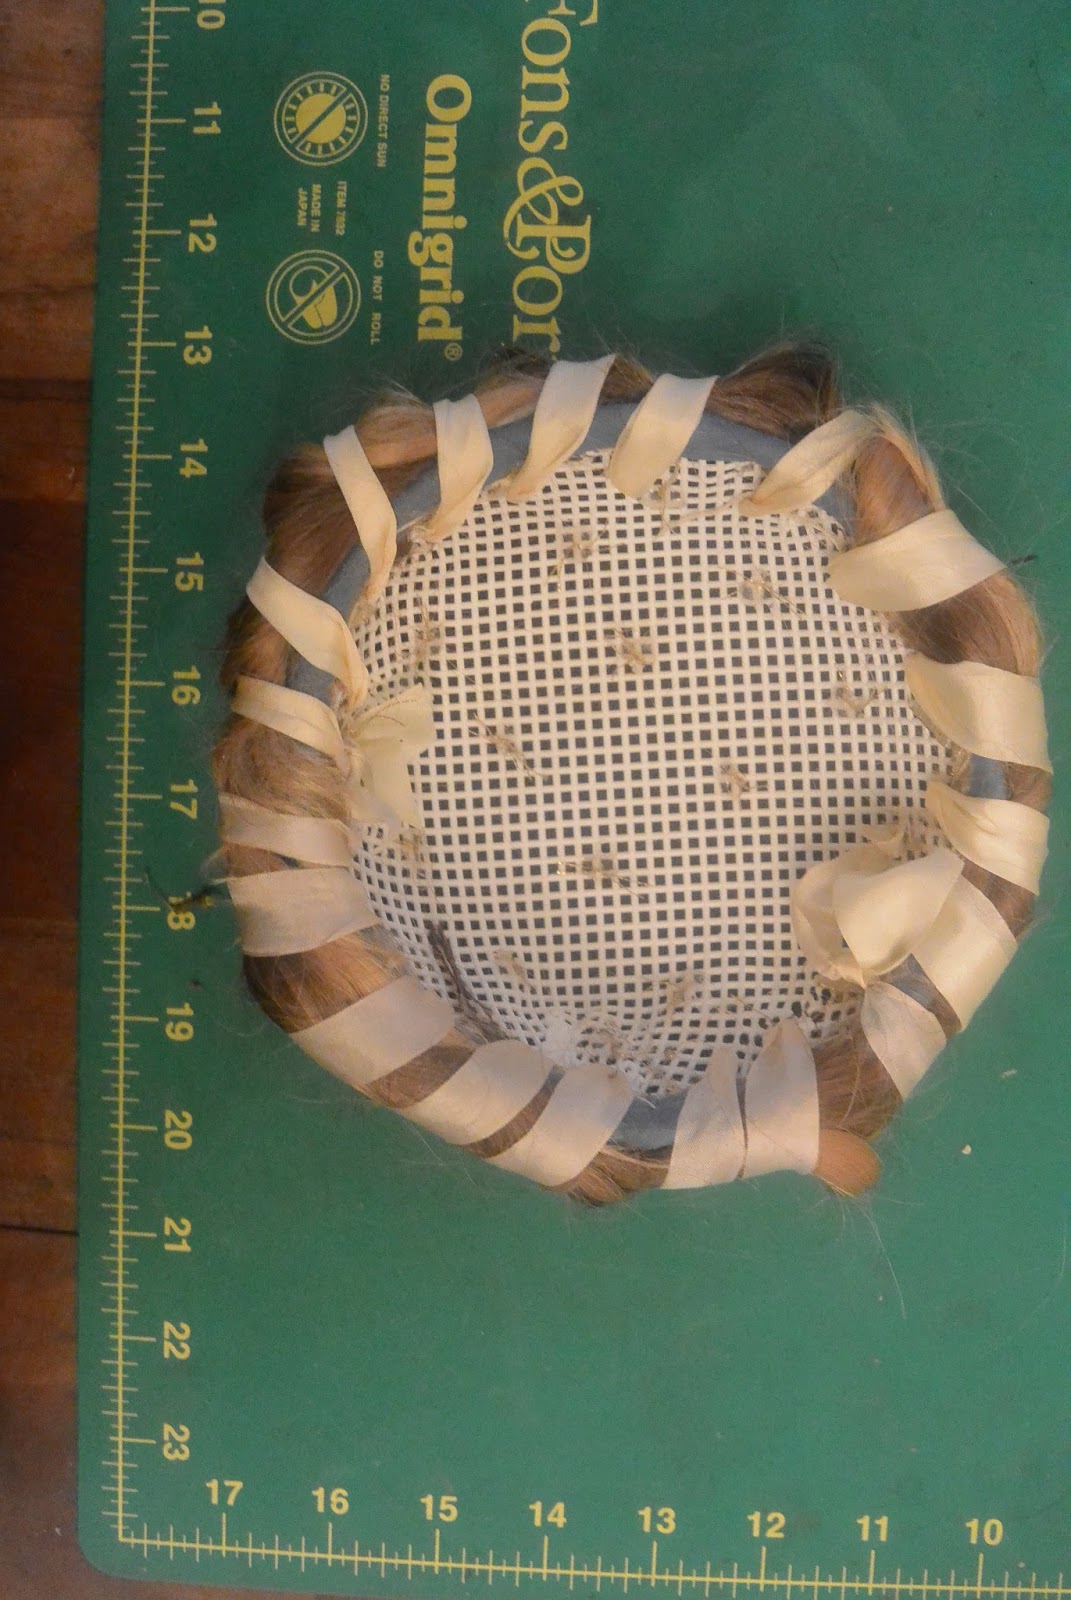
Now if I had been using a hank of false hair this next step would have been easy. I would have made a braid or rope of the false hair, and sewed it on to the edge of the hat with ribbon. However the braid from last time I got annoyed with my real hair (which typically results in my hacking it all off.) was both shorter and slipperier than fake hair. So I ended up sewing locks firmly all around the edge, giving me this medusa look. Then I styled them into a coil, and using a yarn needle and silk ribbon, sewed them right through the mesh of the base, and over the edge. 
Here's the final product: Pinned on it will look as though it is my actual hair styled. If you didn't have the problem that I have with covering your oddly covered hair you could stop after bias binding the edge of the "hairnet" portion, omitting the coronet, pin it on, and make your own hair into a coronet around it to give yourself the look of long period hair. 
His Kittyness approves.

The inside


Held over my bun. pinned on I think it will be impossible to tell it's a hairpiece.