It is perhaps a trifle old fashioned to sew garments for an infant in this day and age of cheap walmart onsies. Old fashioned and possibly a bit eccentric to some, but sometimes it's just practical. There are of course ethical concerns over cheap clothing, and sometimes' there are budgetary constrictions (much of this solveable by shopping at the thrift store, my favorite place!) Also there is the problem when the stores don't carry what you want, because no one has designed it for mass production. Sure, you can get baby nightgowns. They look like this:

I want to love them. I do, but I can't because it's the worlds most terrible design. They're hard to get on, a dreadful combination of elasticated bottom, too narrow body, and narrow sleeves set at right angles to the body that results in much weeping at bedtime. The sleeves are ridiculously long, and the body too short. My two month old's feet poke out, when they're not getting tangled in the elasticated bottom leading to probelm number three: Their feet get stuck in the bottom and pull the overlarge envelope style neck down over their shoulders. Then they pull their arms out the neck and the nightgown has become a skirt. Bah. Humbug. And the elasticated bottom (who's idea was that anyway?) makes it hard to really get the bottom of the gown out of the way when you're changing diapers. With the last three kids I just gave up at about a month old and went to footie PJ's. But I really prefer gowns. it's so much easier at 3AM when I have to change a diaper in the dark not to be wrestling with their garments. So I designed a better one.This is a practical garment with a real neck and button closure, deep raglan sleeves, and a wide body. It's easy to get on, comfortable for baby, and practical for diaper changes in the wee smas of the morning. It doesn't uses much fabric, and is quick to make up. I made the prototye in an afternoon, and the rest took less than four hours each, including trimming and a good deal of hand sewing (I can hand sew around the grumpy infant in my lap, machine sew, not so much.)
The design of this gown was inspired both by some historical examples, and by the "bishop" style gown used for smocking. This is also very similar to the way that I make Ladybug's summer nightgowns. Typically I just measure, cut, and sew together for this kind of thing, but since i was going to make a few all the same time, I decided to make an actual real pattern to expedite the process. You can download and print the pattern
HERE. I made these as nightgowns, but made longer in batiste or handkerchief linen, and decorated with insertion and tucks it would be a very nice christening gown.
 |
Three gowns from two yards of flanelette and one recieving
Blanket. Pretty unpreposessing laid flat, but cute on the baby! |
One gown can be made from 30 inches of 42" wide flanel or flanelette. This is one application where I actually prefer flanelette to true double sided flannel, it is less bulky gathered into the neckline. If you desire to make a gown with a ruffle, a yard should suffice. You can also make one from a flannel recieving blanket, and a scrap of matching flannel (about 10" x 20") for the sleeves, plus a six inch strip for a ruffle if desired. You will also need about a foot of half inch single fold bias binding (I happened to have bunch of this lying around, but you can easily make your own.) a small button, and any trims that you wish to use. Eyelet is pretty. An old pillowcase end trim is perfect to mount on a ruffle. Two yards of fabric and a recieving blanket will make you three gowns, one plain, one ruffled, and one from the recieving blanket with contrasting sleeves and ruffle.

Begin by cutting across the width of your fabric to make a square 30 inches wide by 42 inches (or the width of your fabric) long. Fold this square in half the long way, and cut ten inches off one end for the sleeves. If you are making a gown with a ruffle, also cut a strip the desired width of the ruffle across the width of the fabric. (I liked a ruffle of about 6 inches.) Use the template to cut the sleeves. If you wish to make a ruffled gown, cut sixteen inches from the bottom of this peice instead of the ten pictured. The excess may be used as the sleeves for another gown, if for instance you wished to make one from a recieving blanket.
If you are using a recieving blanket, like this one that was too pretty to make into diapers once outrgrown, fold it in half and cut the curved portions off the ends. Cut your sleeves out of a piece of flannel about 10x20, and cut a strip for a ruffle if desired.
You may either gather your ruffle and add it to the end of the body before you sew up the body, sewing up the back as one seam, or you may make the rest of the gown and then add the ruffle. This is up to personal construction preference. Either way, sew the body of the gown up with a 1/2 inch seam to within about 4 inches of the end, and backtack. Roll the seam allowances back at either side of the slit, and whip stitch them down, starting about a half inch from the top edge so you don't clip the end of your seam off later when adding the neck binding. Then trim and fell the back seam.
With this done, mark the center front with a pin, and line it up with the center back slit. Use the template to cut the corners for the sleeves. (you can see my felled seam here. It's a bit tricky right at the bottom of the slit, but works out fine. I felled the back seams by hand. It just seemed easier at the time, and I could do it with a baby in my lap)
Sew the sleeves up with 1/4 inch french seams.
Pin the sleeve into the dress with wrong sides together. Do not panic if the top edges do not line up! this is going to be a french seam, when you sew the second part of the seam, it will line up fine. Sew it at 1/8th inch, turn to the inside, and sew a 1/4 french seam. Do be careful sewing that first seam up. This is bias to bias (which we generally attempt to avoid) so it's easy to accidentally stretch out as you sew, which will make the finished arm look very strange.

Once the sleeves are in, cut the front neckline down to a slight curve, and the back neckline to an even slighter curve. I trimmed the front neck down about an inch at the center front, and the back only maybe a quarter. Then run a line of basting all around the neck.

next, cut a piece of binding 12 inches long, and fold the ends under a half inch. Fold it in quarters and iron it to mark.
Place the halfway mark at the center front of the gown, and position the two quarter marks at the center of the sleeves. Gather the neck to fit.
sew the neckband down (I found it easiest to do this by hand with a firm backstitch) then flip the binding down to the inside and whipstitch it into place.

Then make a small button loop with complimentary thread, and affix a small flat button. This pearl button is one from the giant stash of buttons we found in the seat of a sewing chair my mom got at an auction.
Lastly turn a very small hem under on each sleeve.
If you haven't added the bottom ruffle now is the time to do it. Gather it to fit, sew it with a half inch seam, trim the ruffled portion of the seam allowance, and turn down and fell the body portion of the seam allowance to the ruffle I did this by hand with a whipstitch. If you are not doing a ruffled gown, hem the bottom to whatever depth seems practical to you. I prefer the gowns to be at least eight inches longer than her feet, so that they stay down over her feet, keeping them warm.

And here's Kitten in one of her new gowns. You can see I've rolled up the sleeves. She has growing room in this nightgown. It should fit until she's standing up in her crib and needs shorter nightclothes. This one is trimmed with an antique knitted pillowcase trim on the ruffle.


 next, cut a piece of binding 12 inches long, and fold the ends under a half inch. Fold it in quarters and iron it to mark.
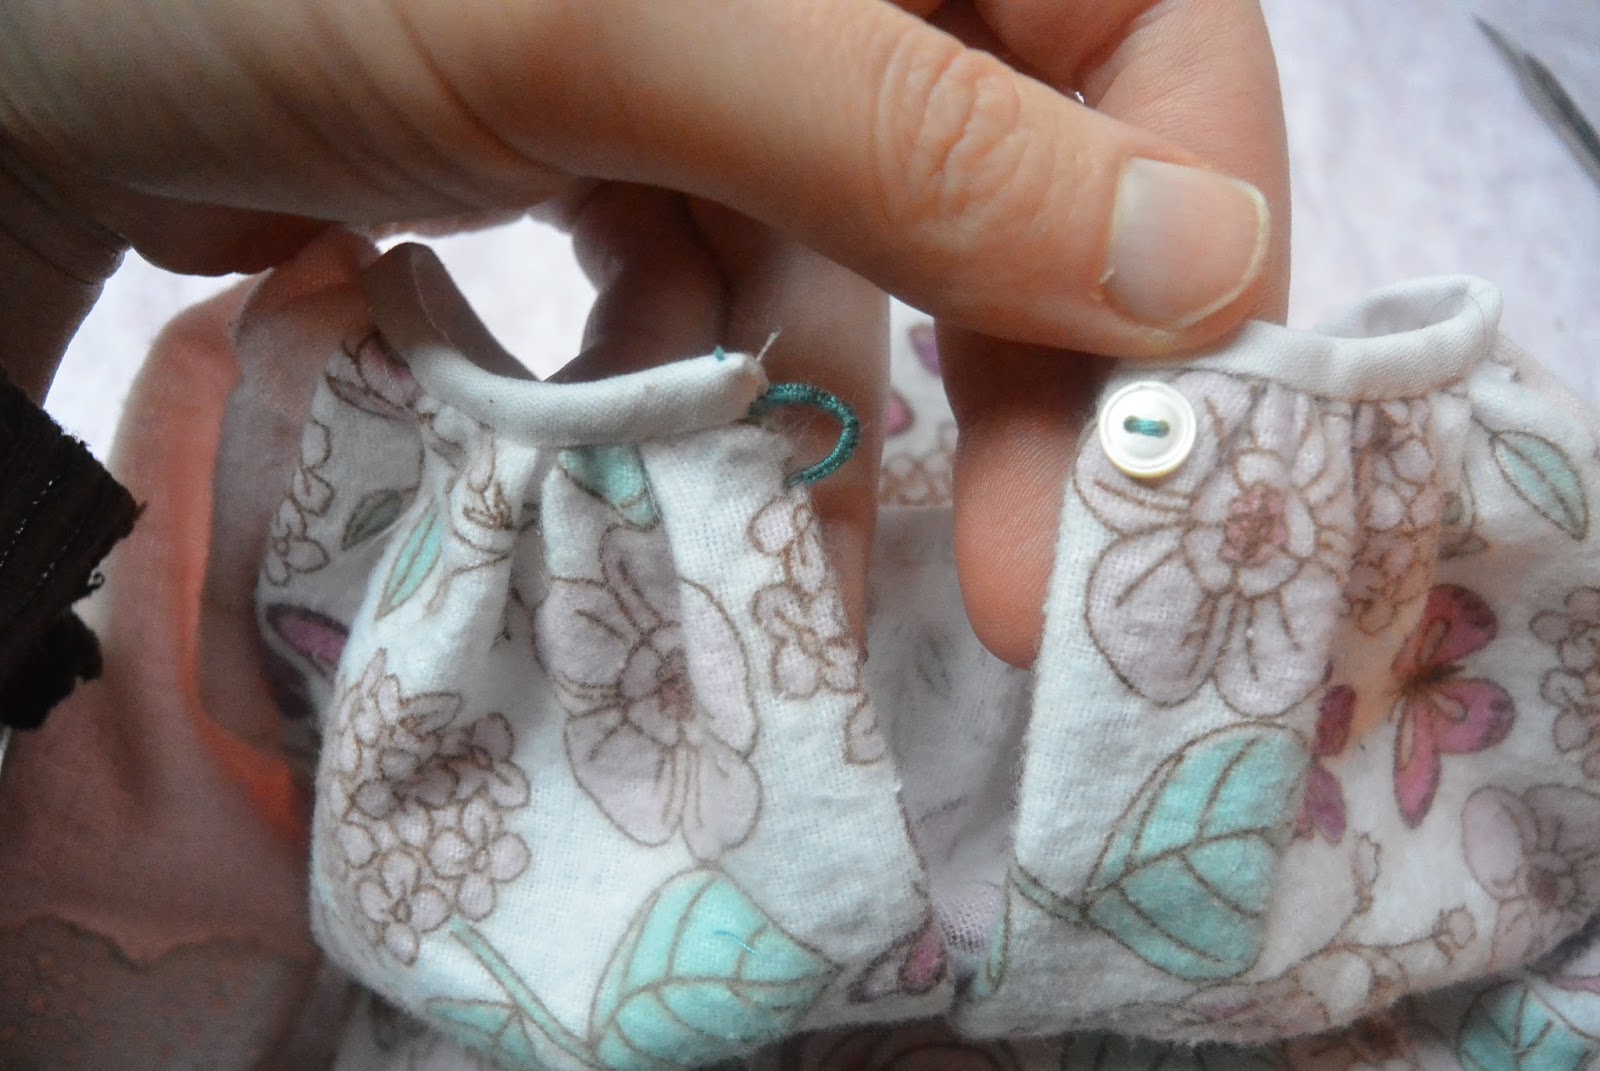 Then make a small button loop with complimentary thread, and affix a small flat button. This pearl button is one from the giant stash of buttons we found in the seat of a sewing chair my mom got at an auction.
 And here's Kitten in one of her new gowns. You can see I've rolled up the sleeves. She has growing room in this nightgown. It should fit until she's standing up in her crib and needs shorter nightclothes. This one is trimmed with an antique knitted pillowcase trim on the ruffle.
No comments:
Post a Comment