 |
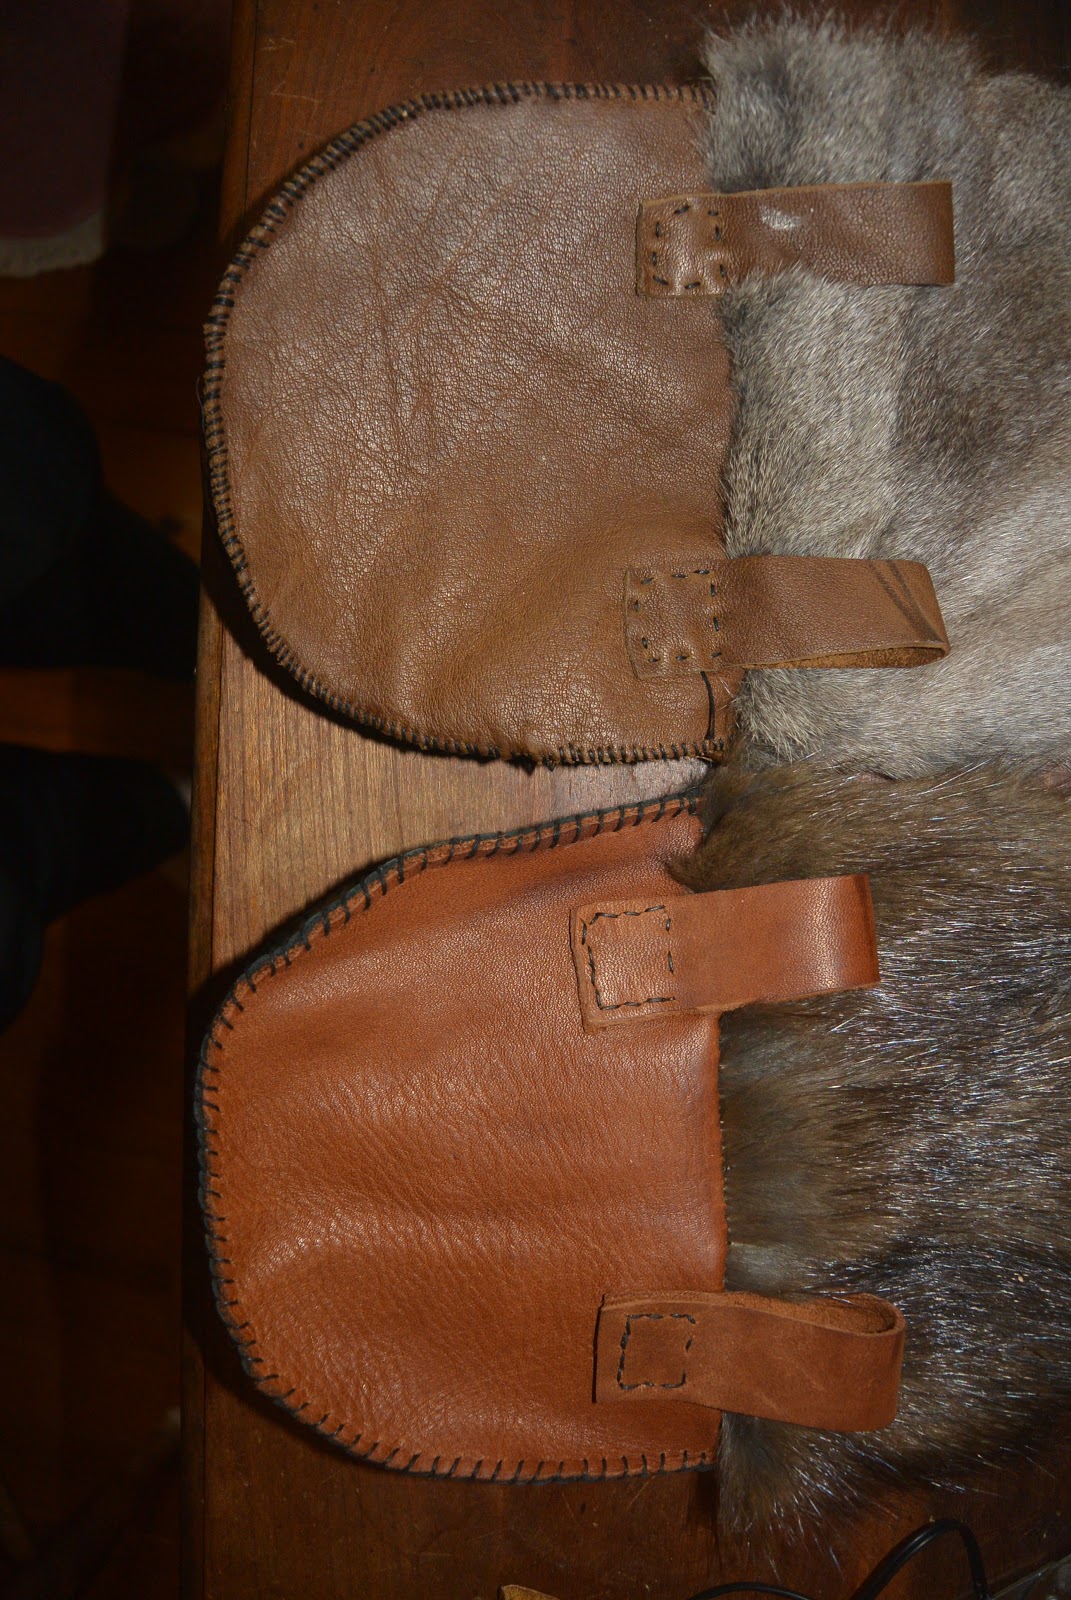
| Pouch from Birka |

I made a pattern out of cereal box, and taped it together for proof of concept. Basically you just cut a shape the size that you want the pouch to be, and a slightly smaller shape for the flap. I traced the bottom of my front and back shape to make a flap that would echo the curve properly. The only slightly tricky bit is getting the side of the pouch. it looks best if it's tapered a bit at both ends, but the edge has to be the same length as the edge of the pouch piece. Taping it all together with some masking tape is an easy way to be sure all the pieces of the puzzle fit properly.
 With the pattern done, I traced it onto some of my scrap leather. I had enough for one of all one color/type of leather, and a second of mixed colors.
 Although the original pouches seemed to all have one central loop to go over the belt, I decided for little folks that it'd be easier, more balanced, and sturdier to have two belt loops. This is a loosely "viking style" pouch not a recreation of a historical item.
 I have a big bag off fur off cuts that I purchased as a lot from a furrier some years back for small projects like this. I scouted through and let the boys pick from the more likely options. Both pieces were a little too small, but that's the beautiful thing about fur, you can seam it in all kinds of funny ways on the back, and as long as the fur is lying in the same direction you can't tell from the front. Most off the off cuts I got in my bag were already seamed. Sometimes you may have to dampen and stretch the piece after applying a patch, but I didn't have to here, just carefully brush the fur over the seam. (I have a wonderful book about working with leather and fur that details how to stretch, seam, and patch furs.) You can use a sharps needle on most fur, but a glovers needle will make it go far faster and easier.
 I haven't done much fur work, I've trimmed a couple garments with strips though, and I've found the easiest way to cut it is very carefully, from the back, with a very sharp razor blade. I find it easiest to make a number of shallower cuts to get through the skin rather than press hard and possibly cut the fur strands on the other side. With the seams on the back, I decided to line the flaps in linen. This required some problem solving, since you don't want to use a big seam allowance on fur but if you use a teeny seam allowance on linen that you've cut on the bias around a corner it's just going to come out of the seam. Fray check was the answer for me. I fray checked the linen pieces before I sewed them on, then over the stitches after I sewed them. I'm fairly certain they will now hold up to most any little boy abuses my sons can think of! The trickiest bit of the operation was keeping all the furry bits out of the seam!
I sewed the pouches together with an whip stitch over the edges. The first one I just did by eye, but the second one I got clever and used my stitching punches for (even though the leather was thin enough to just use the glovers needle.) This made the end result neater and quicker.

Then I dampened the leather with a spray bottle and wet blocked them onto my ironing board, pinning the seams down and pressing them open with my fingers from the inside so the bags had a nice square shape at the bottom. This is also a new step for me, and it made an immense difference in the final product.
The original pouches I had seen (I don't remember where or I'd credit them for the idea) had either wooden or antler toggle style buttons with a little loop of cord. I rally liked this idea, so I looked for antler toggle buttons. They're really expensive. Instead I bought a whole bag of antler tips for a fraction of the cost, Husbeast sanded the rough edges where they'd been sawed, and drilled holes in them.He did this outside and I wore a dust mask because the dust isn't good for you. With a couple thread loops, the project was a wrap!

The kids all received queens tokens at a recent event, of which they are understandably proud. Bang opted to have his mounted on the flap of his purse, while Crash requested his be made into a necklace that he could wear.
 At a large event there is always the possibility that your child could be somehow lost or injured, and it's really good for them to have non visible but easily accessible ID on them just in case. Last year I saw someone with a very clever idea: her daughter had a belt favor embroidered with a lovely little squirrel, and on the back, safe from prying eyes, her full name, and all the pertinent emergency information I thought this was really clever. The little girl was so proud of her favor, and it kept the information secure and with her. I took that idea, and made each of my children a favor with the arms of the group we camp with on it, and an animal. Ladybug with her love of all things shiny got a magpie, Crash, for obvious reasons, a Bear, and Bang picked a hedgehog in a narrow contest against a badger: which is oddly appropriate. I did each of the favors in a slightly different style on different materials: Ladybugs is cotton on linen canvas, done in petit point. Crash's is wool on wool and linen in split and chain stitch. Stephen's is cotton on linen and silk, in split and chain, and Kittens is wool on linen in split and stem stitch. Everyone picked their backing materials from my scrap stash. Kittens is the only one that is different: hers is armed with a pair of safety pins sewn very firmly in place, and can be pinned direct to the back of her gown where she can't reach it.
  On the back of each favor is a standard military dog tag with the child's name, our name, and all the pertinent contact and allergy information. We've also had a few discussions with the horde reinforcing the obvious safety concerns, but also teaching them that in case they SHOULD somehow get lost or separated (it's never happened yet, but better safe than sorry) they should find the nearest person wearing a coronet or driving a golf cart and present them (politely) with their kid tag.
I'm still working on a pouch for Ladybug, my 14th century princess, in the style of a aumoniere, and her belt hasn't come yet, but hopefully I'll have those sorted for her by our second summer event.


