Monday, January 15, 2018

Viking hood and mittens

I attended my first fall outdoors event this year, fighting at 100 minutes war in November with my household, and realized the week before the event that I haven't got warm outerwear for my fighting, thorsbjurg trouser clad self at all. As in ANY. My gear is designed with the 90 degree summer heat in mind, not 45 degrees and raining. In my armor, it's not as big of a deal: I have my gambeson, and can layer under it, and I'm moving, but out of my armor waiting for go? I was going to get COLD, and fast. Now there are a number of very good naalbound finds for vikings in terms of mittens and hats and suchlike, as well as some woven/fur edged caps. But I needed this fast, and didn't want to fiddle with naalbinding, (my understanding of which is rudimentary) and I wanted something a bit warmer than a cap. Headgear was easy enough. A couple years ago I researched and made a Skjoldehamn hood for my toddler, so that was an easy, authentic, warm solution. Something for my hands was more difficult. I resorted to scrolling through google image search hoping to find something I hadn't seen before, and stumbled on these pairs of woven woolen mittens.
 

I managed to track these back to the national museum of Iceland, and confirm that they were from the viking era, but that was, sadly, all the information I was able to find on them. I was unable to locate them through the National Museum of Iceland website, or find more information about them on a reverse image search. I could however copy them roughly from the pictures. The thumb is a standard pattern, exactly like the ones on my gloves. it even looked like it might have a gusset extending into the thumb from the hand, based on the seam lines. There was a gore inserted to the outside hand seam to give extra room. So far, so good. I used my glove pattern for a base, and drafted something that looked like it would work.

I had to decide what fabric to use for these items. The gloves look like tabby weave, and the Skjoldehamn hood was as well. Color is hard to tell without chemical testing. I retreated to the B̶a̶t̶c̶a̶v̶e̶ basement to check the stash for possibilities. I had several likely suspects, all heavily fulled tabby woven wool, in varying shades of brown, and one piece of black. Now I KNOW that black is not even the smallest bit authentic for viking era. But my house's colors are black and red, and I had just acquired several hanks of red crewel wool. I couldn't resist. Besides the black was brushed to the fuzzy delightfullness of fleece on one side, which would be lovely on the interior of the hood and mittens. It was so fleecy that I questioned whether it was 100% wool, and lit a piece on fire. It is, indeed wool. Delightfully warm and beautifully fulled and brushed.

Fabric choice made I traced the mitten pattern onto the fleecy side of the wool with my trusty silver metallic sharpie. (with supervision from Kitten) and cut them out.

The original mitten shows a standard seam at the thumb. I don't like the feeling of that against my hand, even with the seam allowances felled flat, so I overlapped and whip stitched, just like I do on gloves, and the seamed up the finger portion of the seams and felled the sides down flat.

I used the same technique for the rest of the mitten, I overcast the gore on one side, for a decorative touch, then sewed the side seam, opened it flat, and felled it down with a running stitch. I used contrasting thread, and let the running stitch show on the outside. I have mixed feelings about this technique, which is currently quite popular amoung the SCA vikings. I've seen documentable evidence for interior overcast seams with contrasting thread, and herringbone'd hems with contrasting thread that showed on the outside as a double row of running stitch. The seams on the skjoldehamn hood were not felled at all (although the seaming method there tends to let make them lay flat) I tend to think this trend is a reenactorism, but haven't done the research to decide 100% yet. (If anyone has sources to point me at, please do share!) I chose to use it on the gloves because pretty and practical. I hate nubby seams on the insides of things on my hands!

I had to fiddle a little with the shape of the top of the hand, but eventually got something I was happy with. Since I was in a hurry, I just cut the pattern a bit generous, then pinned, seamed, and trimmed to fit. I left the hems unfinished, which is the beauty of fulled wool.

I had decided I wanted to use a decorative seam on the hood. Van dyke stitch is very close to the osenstitch found overworking seams on one of the osberg garments, and it's a relative of the stitch found on the cushion at mammen. It has high plausibility and the advantage of running the seam at the same time as decorating it. (unlike the evils of the decorative members of that family, which is why my kaftan is in time out right now.... ) Van Dyke stitch is easiest if you first hem all the pieces, then work the stitch. So I hemmed all the pieces with a basic overcast stitch, mitering the corners of the front and back squares, and leaving the edges that would make up the hem raw.


Then I pieced it together with van Dyke stitch. Van dyke, with it's cousins, can tend to ease one side of the seam in, causing a lopsidedly bunchy seam when you open and steam it, also ends that do not to line up. So I controlled that with pins. I worked right over the pins, instead of taking them out as I came up to them, forcing the two sides to remain the same length.

I ran out of time, and hemmed in the car, on the way to the event (muttering THIS IS CROOKED the whole way, much to the amusement of the house brother I was riding with) which meant I just got the points hemmed before I wore it, and the face wasn't treated at all. But it worked like a charm, I wasn't exactly TOASTY but neither did I turn into a viking popcicle.

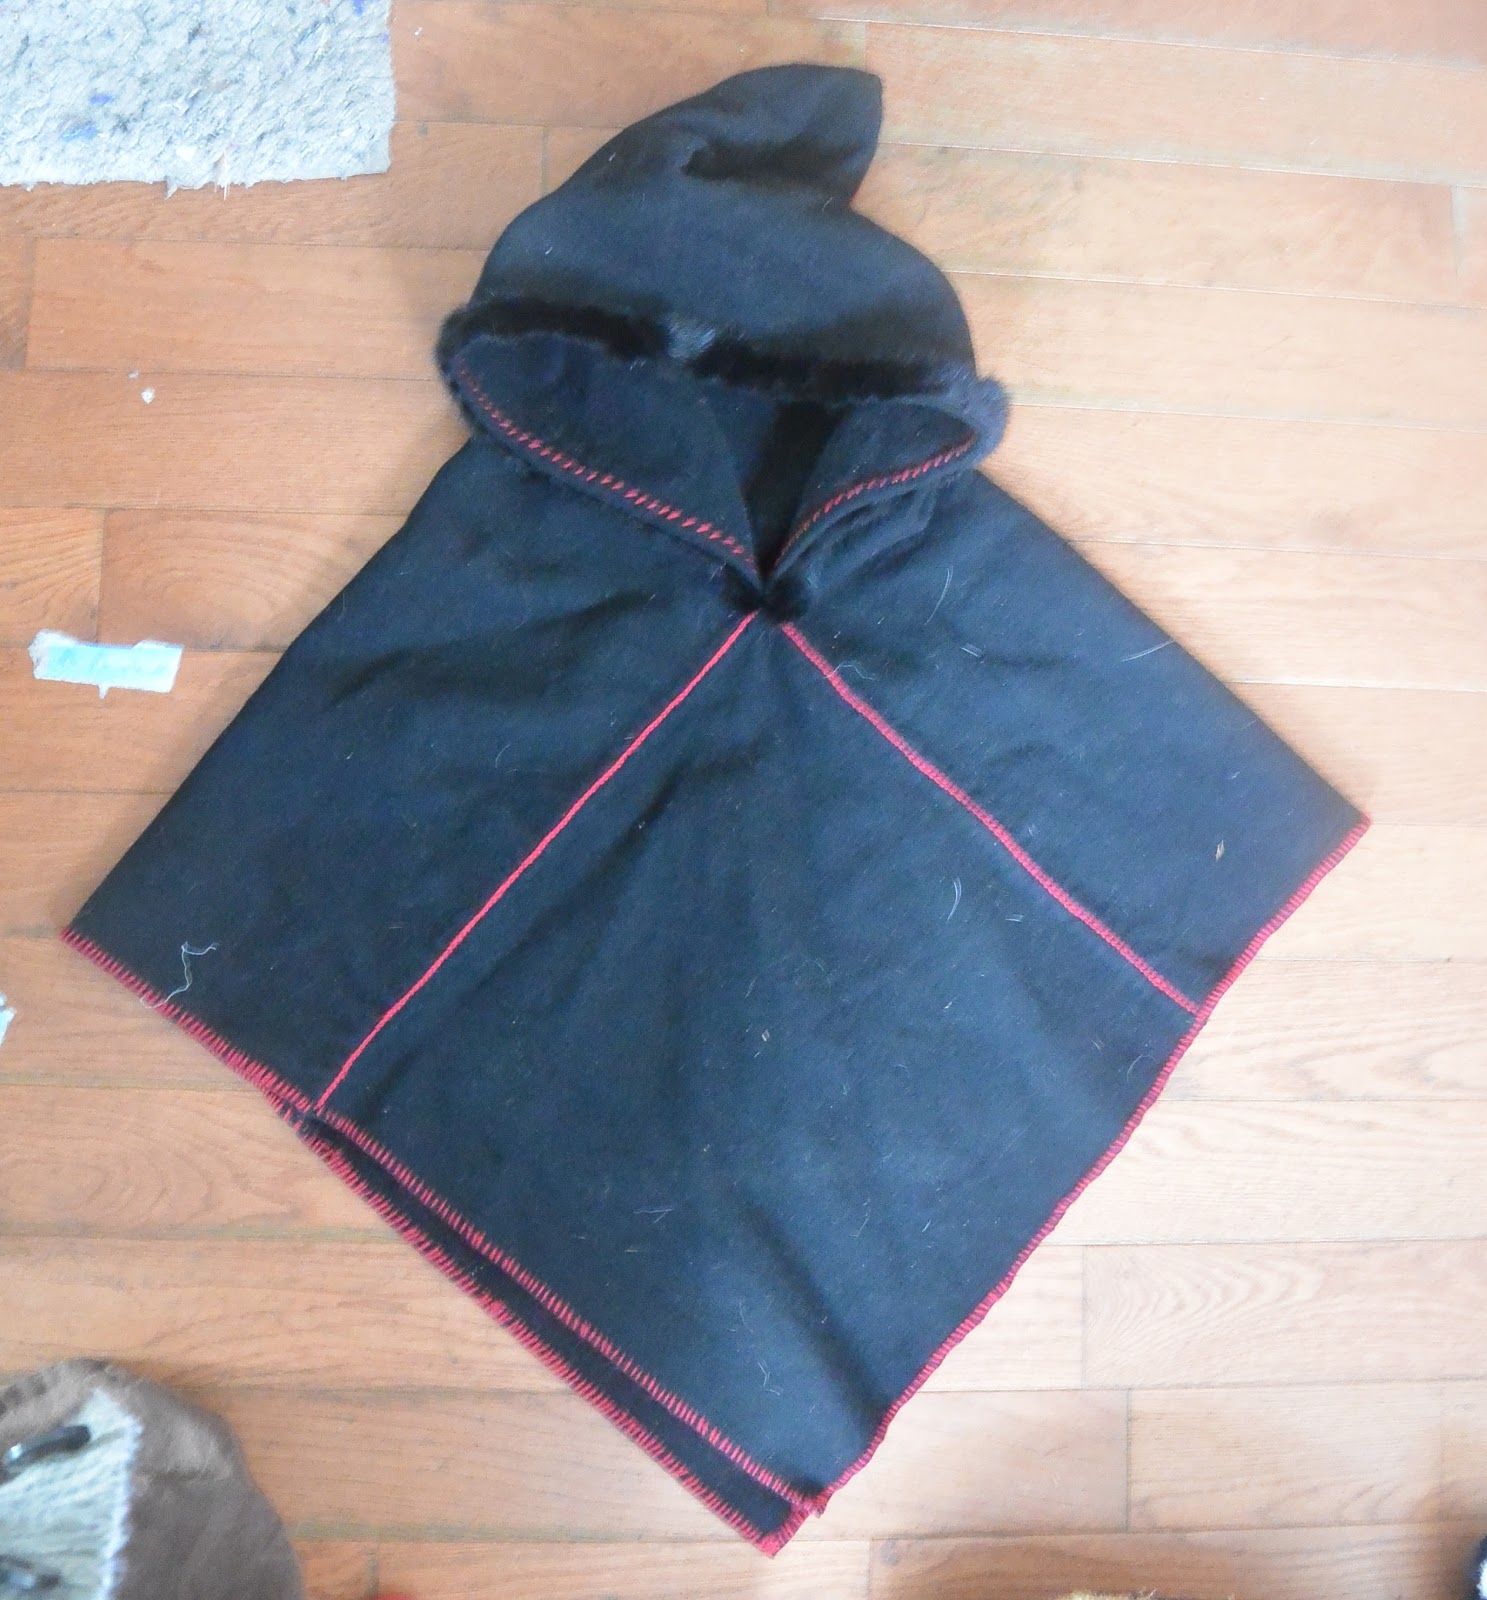
It's hemmed with a overcast stitch, perpendicular  to the edge of the fabric, and paralell with the threads of the weave, as in the extant piece. This is more moderately spaced than my last overcast edging, because this wool is too fulled to fray, and therefor It's much closer to the original. I darned the stitches at the points at the front and back on the reverse side, to keep them from spreading.

I finished the hemming, and the stitching inside the hood opening when I got home. I did not stitch the cockscomb onto it, because I liked the fact that I could drop the hood almost over my face. It kept me warmer. I like this hood the way it is now, but am considering using it as a slate for some further embroidery. I think it would lend itself well to some mammen style work front and back, and maybe a pair of maltese crosses on the shoulders, since this is something I will basically only wear when I've put on my leg wraps and gone to war (to paraphrase the saga). The mittens, I decided to be super fancy and trim with a little grey fur.... because... pretty that's why. Caps were trimmed with fur, so I figure the mittens are plausible at least, although  I fully admit it is a bit of a stretch.

Then that was so fun and pretty I decided to put a little black fur around the face of the hood. In for a penny in for a pound right? The result is pleasingly pretty, although I can't vouch for the strict historical accuracy of it.

The only problem with the hood, is that it doesn't work well at all with a flat folded cloak. AT ALL. so if I want to wear it regularly I'm going to have to make myself something along the lines of a birka coat to wear with it. If  I want to wear a cloak, I'm going to need to make myself a hat.

Wednesday, January 10, 2018

A Soft Parry Cloak for Husbeast (with cutting diagram)

1629 etching from
"Le Jardin de la Noblesse Française..."
I'm not usually effected by "scope creep" the phenomenon where a project starts out simple, and then gains momentum until it's a jaugernot of complexity, for the simple reason that most of my projects start out at "crazy person" and go from there. But this one definitely hit that pitfall. What started as a "make something for the husbeast two days before christmas" project turned into..... Well, you'll see.

For christmas this year, the husbeast got fencing gear. My contribution to the haul was was a small cloak for use as a soft parry. A soft parry can be anything floppy, a piece of leather, a towel, a floppy hat: but typically a small cavalier style cloak is used. Although the cavalier style cloak is very late in our period, and it's heyday seems to have been in the early 1600's, (along with the wide brimmed hat and floppy topped cavalry boots, it's one of the signatures of what we modernly think of as the "Musketeer" look) period fencing manuals do show people using a similarly sized cloth or cloak in defense.

diGrasse's True Art of Defense 
I was, myself, unsure what a good size for this object would be. Husbeast has a small cloak taken from similar patterns in Patterns Of Fashion, made of wool, trimmed with velvet, and lined in silk. It fits him perfectly, but is manifestly too large to be used effectively as a soft parry. My conclusion was that, because of his size relative to normal humans, anything that would fit him as a cloak would be on the large side for use as a parry. So I consulted my rapier fighting house sister, and she measured her fiancee's cloak for me, which is heavier than she likes, but of a size suitable for a bigger guy. It's a wonderful pattern because it makes a very nicely draping cloak from a yard of 60" wide fabric, if you're willing to have a seam at the center back of the collar, or a yard and a quarter if you want the collar in one piece. It makes a very dashing shoulder cloak for a person of medium size, if not for my linebacker sized husband. Originally I did not plan to use the collar, since he won't wear it, but after I cut it and flapped it around a bit, I found the collar stiffens the neckline and makes gripping the cloak easier, as well as making it easier to fan the cloak out when you need to. I suggest using the collar even if you won't be wearing the cloak. 
Cutting Diagram for 1 yard of 60" wide fabric. Half inch seam allowed at center back of collar. if you don't want a seam in the collar, use a yard and a quarter and cut the collar 13.5" long on the fold. 
I won't get into construction here, as this is a pretty simple project (and I didn't take any pictures) I will note that if you plan to wear the cloak you may wish to slightly curve the collar piece so it will lie flatter, up to you. In that case you would want to cut from a yard and a quarter. It is also preferable to cut the lining at the same time as the cloak, with the two layers pinned together, so as to avoid having them be different sizes. 

I am still trying to make things with only items I have on hand, so I used a brown faux suede material for the outside of the cloak, and a burgundy satin for the lining. The faux suede is sturdy, drapey, and slightly grippy, all useful in a soft parry. I added some appropriate trim I had in stash, wrapped it and stuck it under the tree.

And this is when the scope creep happened. I kept thinking about how the trim was the perfect mount for spangles, and how it would sparkle in the light when he flipped it..... so with christmas safely past, I fished out my spangles and started applying them.


It takes a remarkable amount of time to spangle all of the everything, even on a moderately small cloak. I applied the spangles every other bunch on the trim, and knotted each one down with it's own knot, then ran the thread under the lining to the next spangle. This eliminated tails, but if he snags one and pulls it off, it will only be the one that is pulled off. The spangles are put down with Sulky 12 wt cotton, matching the lining, each sewn down with three equally spaced stitches, as seen in my favorite source book for these things: Elizabethan Stitches.

 Then I decided those spangles looked a little lonely, and wouldn't some gold braid set it off. I have a cone of Krenik braid, but I also have a lot of semi worthless DMC metallic floss. Having just learned how to bobbin braid..... Well I separated the floss into strands, wound it onto bobbins, and braided it, two strands of gold, two strands of copper.
and couched it down onto the cloak with the same 12 wt. cotton thread. I couched it fairly closely to prevent snags. Gold elements are seen couched both with matching silk threads, and with contrasting silk threads in period pieces (according to my same favorite source book.)


There was enough braid to edge both sides of the trim and do a little fancy in the corners, I left the collar plain because with the multiple rows of spangled trim, the effect of adding gold braid was a touch frenetic. 
 The only complaint I have, is working along the bias, it was easy to slightly stretch the fabric as you couched the cord down, you can see a few kinks in the cord where that happened. Not the end of the world but a little frustrating.
 Of course ideally this would have all been done before I put the lining on, but it does have the unintended benefit of stabilizing the edges of the lining, although it's not as tidy as it would have been if I had done it all before I lined it.

 All in all a pretty outcome, and the Husbeast loves it. If you were going to wear it, you would add cords at the neck. since he isn't going to, they'd just be an encumbrance.


Friday, January 5, 2018

Dipping my toe in the deep end: My first pewter casting

sneak preview of finished product! I MADE A BUTTON. 
About a year ago, I decided, that even though I'm not that great with 3 dimensional art, it would be really awesome if I could make some of my own viking bling, so I could get exactly what I wanted at a price I could afford. That led to a flurry of research on metal casting, historical and modern, and the decision that Brass/bronze casting,which was the best choice for economical jewelry, was more than I had time to play with, more equipment than I had funds for, and generally that I needed yet another hobby like I needed a hole in the head. So I filed all the links for my research on a pinterest board, and let it sit.

This summer I made the mistake of showing my husband some maltese cross button's I'd found in cast metal. I told him I thought they'd look great on his garb, but they were a little pricey. His response was to make puppy dog eyes and ask me if I could make them. I remained firm. I needed another project like a hole in the head. Husbeast then went online and posted the buttons, and before I knew it I had been elected, by general consensus, to spearhead a button making effort for the household in the fall..... There was some logic in this. I had poured pewter at a baronial workshop in the past, and gotten the feel for it pretty quickly. I had already done most of the research about metal casting, and although I'm not a great 3 dimensional worker, I can carve a wax positive of a button. I caved.

Although in the modern world we're very fond of it, historically Pewter was a lower class metal that was accessible to the masses. I didn't even consider working viking jewelry in it, because for my persona I would have had plated brass or even silver jewelry. The hierarchy of metals for vikings seems to have been: Pewter, brass, plated brass, silver, gold. But in later periods pewter, particularly for buttons and dinner ware, was quite popular. Metal buttons were a status symbol, even made of lower quality metals like pewter.

Pewter was, and is, the easiest of the metals to work: it doesn't require special heating equipment, a simple low heat crucible is useful, but you can melt it right on the stove, and you can pour it with a stainless spoon if you need to. Historically it has been available since at least roman times, and it was cast in soapstone, clay, or even antler molds. Because of the low melting temperature it doesn't destroy the molds as quickly, and it won't explode improperly made molds, spraying everything with molten metal and shrapnel, if you don't do it right (which is one of the major downside to casting other metals).

Because 3 dimensional art is not my first choice, I wanted to work a positive, then cast a mold, rather than carving a negative (like you do in a soapstone mold) I felt more confident in my ability to get a good result this way. That got rid of the #1 choice for molds: soapstone. Historically clay molds were also used, but that requires the right mix of clay. In period vikings mixed clay, sand, and cow dung in precise proportions to make durable clay molds for mass producing jewelry like tortoise brooches. Although some people have made interesting strides down that road, I was just looking to dip my toes here, I needed something easy and accessible for the beginner. A little research led me to the unexpected discovery that bondo makes great pewter molds. You can cast it off a positive, and the result is carveable to add details, and sandable as well. It sounded ideal.

With my idea set, and a little direction from my wonderful baron, who is a metal caster extraordinaire, I ordered my materials and set about carving a positive. This I actually did in the period approved way, starting with beeswax. I used a piece of copper tubing to cast a stick of button blanks, and cut a little tiny maltese cross point out of paper.


I worked on the face of the stick of beeswax, rather than cutting off a chunk, because it was easier to manipulate without hurting myself. I first rounded the top to a dome, then traced my maltese cutout with a pin. I filled that in with black sharpie so I could see what I was doing, then used an exacto to cut out the shape, and texture the background.


The beauty of beeswax is that once you have a rough cut down you can detail with heat. You can even drip a little extra wax onto a spot you messed up and fix it. A fairly large needle, and a candle, and I was able to get all the details just right.
Then I used a sharp knife to cut the button off the wax stick, and flattened the back with the hot needle. A hot wire would have probably worked best for this, but would have taken two sets of hands, one to hold the wax stick, one to cut.

You will note that this button is just a flat disk with no hasp on the back. This isn't just because that would be a fiddly pain to carve out of wax, it's because it's almost impossible to cast a mold around a hasp. it's easier to carve it out in the mold.

Husbeast made me a take apart 2 level wood frame for the mold, and I mixed the bondo. His Excellency had recommended submerging wire mesh around the button, both to stabilize the mold, and more importantly, to help dispense the heat, I had gotten the wire sculpting mesh from amazon, and cut a square and molded it into the half circle. I poured half the mold, smushed the wire down into the goop, and filled the rest of the mold. Then I stuck the button down into the bondo so that the back was even with the surface. So far, so good, I left and waited for the mold to set.

And that's where everything went pear shaped. I didn't know that the chemical reaction that causes bondo to harden is exothermic, but I found out when  I came back to check and found my wax positive a little jiggling puddle. Oops? Luckily the bondo had hardened enough to take a fairly good impression before it melted the button, so I was able to just use a knife and some sanding paper to clean up the edges of the impression,  and come out with a good mold, but it was about 2x the work. Next time I will carve in wax, cast a plaster positive, and then use that to make my molds.

Buttons have to be a 3 part mold if you cast them with a hasp. I cast the back as a solid flat slab, then had my husband cut it in half on the band saw. I marked the hasp on one half with marker, then quickly put the halves back together so the mark transferred. Then I carved out the hasp, and pouring funnel (sprue). Again on recommendation from his excellency, I carved the sprue out as a flattened funnel almost he entire width of the top of the button hasp, giving the pewter as little of a choke point as possible during pouring.

My husband drilled holes in the pieces, and I pounded in pieces of coat hanger wire as pins, and we were ready to pour!

I marked the sides so it would be easy to put it together the right way, the pins only fit one way, but the markings eliminate some fumbling.

The first pours showed I needed to clean up the carving a little. Since bondo can be easily carved with a craft knife, and sands nicely, that was pretty easy, although tedious to get it just right. a couple hours and 4-5 test buttons later, I had a good mold.

Which was good, because I had procrastinated (shocking I know) and was finishing this the night before we were supposed to have a household get together to make buttons! Because I procrastinated and then had some trouble (which is why you don't procrastinate) I only got one mold done, but it worked out ok. Even with a single mold, I could pour fast enough to keep ahead of 5 people trimming, sanding, and polishing the buttons. Which is the very tedious part of casting. Even with a firmly clamped well made mold, there's a lot of tidying up to be done between fresh casting and useable button! The only downside of the single mold was that it occasionally got too hot and had to be put in the freezer to cool down. Two molds I could have rotated in and out to keep them cool. Hot molds didn't cast as clean of a button.

Many hands make light work and we managed to make about a hundred buttons in a day, enough for all of us and some left over. Everyone got to learn to pour, and we had a delightful feast of brisket and ribs provided by Husbeast afterwards.

I actually really enjoyed the process and I have some plans for other pewter casting projects coming up. I'd like to play with false enamel as well perhaps. I might even figure out a token for myself? Which is something I really should do but have dithered over.