Sunday, February 25, 2018

Tips and Tricks: Choosing and Washing Fleece

I'm currently embarked on my first fleece to garment project in a number of years, so it occurred to me that it might be a good time to write up a series of brief how to's on the process, with some of the things I've learned along the way by trial and error. I've been doing this whole spinning thing for a long time now. I think I was maybe less than twelve when I started: My mom caught me picking up little off cuts of fleece in the sheep barn at the fair, twisting them into yarn, and winding the yarn around a stick. I got a drop spindle and spinning lessons for christmas that year. I've been hooked ever since, and although I don't have as much time to devote to my spinning as I used to,  I still get through about a fleece a year most years. While you can purchase prepared fiber, I find I prefer to work from fleeces, unless I happen to stumble over some amazing dyed roving I can't resist! Fleece is more economical, and I find it very rewarding to work with.  I can pick general purpose fleece, or something for a specific project, like the romney fleece I'm working with in this series, which will grow up to be a cloak.

Medium to long staple length, good medium
Crimp. Not super fine, but not coarse. This
Romney is the vanilla of the spinning
world! 
First you have to pick your fleece! You have to kind of know what you're looking for, in terms of fiber weight, crimp, staple length, etc, so If you are newer it is good to take a fiber friend along to help you! Once you've worked with a few different fleeces you'll start to develop a feel for how different kinds of wools spin, and act as yarn when made into a finished object. You'll start to have opinions about what you like and don't like in a fleece too. I, for instance, firmly believe that the only GOOD use for merino is as bird nests. Or felt. It makes lovely felt.
 

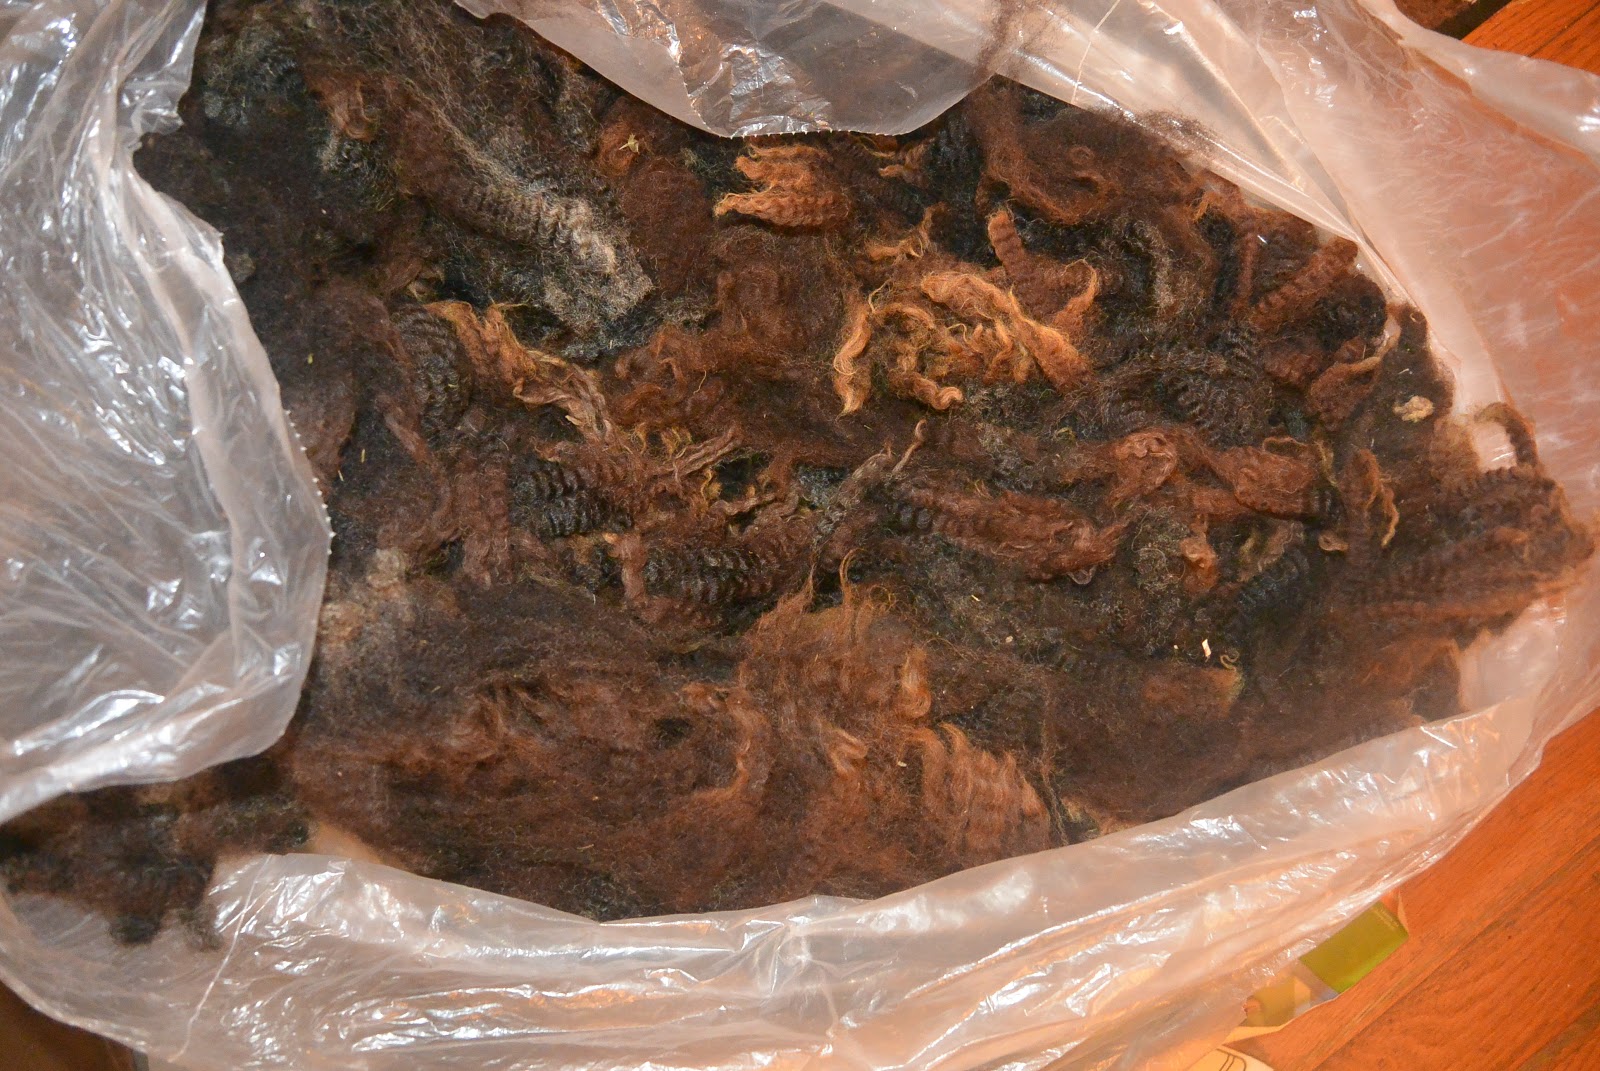
This is my nice Romney fleece. Romney is basic, I don't
love it, but it's easy to work with, and it's suitable for the
Project I am doing. This fleece was not coated, You can see
that the tips are sunburnt because of this. 
Some things stay the same no matter what kind of fleece you're choosing:  Poke around in different parts of the bag to inspect the fleece, or ideally lay the fleece out so you can see all of it. You want to look for a fleece without a lot of Vegetable Material (VM) which is little bits of hay, dirt, weeds, and sometimes poop stuck in the fleece. You want to avoid second cuts, places where the shearer went over the same spot twice and left little short pieces that have to be laboriously picked out. And you want to look at the general condition of the fleece. it should be shiny, fairly uniform in color an  length (although some colored sheep have natural variation across their coats, or you have spotted sheep like jacobs), the ends of the locks shouldn't be matted, brittle, or gross (although they may be slightly darker or lighter in color.) The best fleeces typically come from sheep that have been coated, and it's a good practice ask if it was coated (there are always exceptions to this rule, Icelandic for instance is not typically coated, and there is very little difference in the fleece because of the long guard hairs). This protects the fleece from sun damage, dirt, and VM. Ideally the fleece should have been skirted at least some already, this means that the sections around the tail, and the belly, and parts of the legs have been taken off the fleece and discarded.  If it has not been skirted, you should pay less per pound for it, because you will have to throw some of it away (or leave it out for the birds to make nests.)

When you get your fleece home, lay it out on the floor, cut side down, and give it a good going over. remove any sections that are very short, matted, or have a lot of VM in them. Then flip it cut side up, and have a look for any second cuts that you can pick off. It's much easier to get those off now than when you're trying to card! If you've bought a fleece that hasn't been skirted yet, there may be quite a bit to come off. Don't be afraid to be brutal! You don't want to be trying to work with the crappy bits of the fleece! If you can't bear to throw it away, (do through away and bits really matted with dirt, trust me.) wash it separately and make it into dryer balls or something.

Now you're ready to wash! You need a plastic tote large enough for your fleece, and good quality hand dish soap, like dawn, or palmolive. Stick the tote in the tub, and fill it most of the way full with water that you can JUST stand to submerge your hand in. It should be uncomfortable, but not scalding. Too cold, you won't get enough of the lanolin out, too hot you scour the fleece and it ends up dry, scratchy, and brittle. Mix in a very large squirt of dish soap. More if the fleece is very greasy, less if it's fairly dry, but better a little too much than not enough. I probably squirted around 2-3 tablespoons worth into this wash. Now dump in your fleece.

Here's the tricky part! We need to wash this sucker, but:  Agitation + Soap + Hot = Felt. Felt is bad. The finer your fleece is, the thinner the individual fibers, the more prone it will be to turning into a felty mess (which will make you sad sad sad, ask me how I know.) superfine fleeces like merino or rambuilet felt practically if you look at them. So, pick a nice medium fleece to start with, and be gentle. You NEED to get the water swished through the fibers, but not rub the fibers together, or against your wash tub, so stick your hands flat on top of the fleece, push straight down until you feel resistance, but not till you squish it against the bottom of the tub, and let straight back up. Straight down, straight up. and Slowly and gently. do that all over the fleece until it's all submerged, Then leave it be. You'll want to come back a couple times and push it all down again, other than that, let it sit until the water is tepid. If you are washing a very fine fleece, First do yourself a favor and buy one that is very clean, preferably coated, then GENTLY submerge it, then don't touch it again. Better to decide that you need to wash the yarn because it's still a little oily than to have a felted mess.

Now to rinse! Dump the wool into the tub, if you have a screen to place over your drain, that's helpful, if not, use your hands to keep the wool away from the drain (Wool clogs drains evidently??? Who knew!). Let the wool drain a minute or two, then use your hands to press as much water out of it as possible. Again, you do NOT want to rub the fibers together, so you want to press down hard, release, fold/turn the fleece a little, press down till water stops running out, and repeat till most of the water is out and you have the fleece gathered up into a small mountain. Do NOT wring it, just press it against the bottom of the tub. (For a superfine fleece, you will limit this step as well). Then refill the tub with water about the same temperature as the water you just dumped out, dump the fleece back in, press it under the water, and let it sit five minutes. Repeat this process until the water runs fairly clear. There are two important considerations here: firstly, "shocking" the wool, by taking it from cold to hot or hot to cold WILL lead to felting. so keep the water an even temperature. Secondly, the more times you repeat this step, the more chance your fleece has to felt, so rinse it well, but don't be overly fussy about how "clear" clear water is. Three times was enough for this fleece, which was clean but had not been coated. Another real advantage of a fleece that's been coated (and why you may pay more for it) is that while the fleece still has plenty of lanolin in it, it has less dirt stuck to the lanolin. Less dirt = less rinsing = less chances for your fleece to felt (are you noticing a common refrain here?)
"Clear Enough" this tub has some iron stains, so the water
is a little lighter than it appears. There are no longer little
Sandy particles suspended in the water, which is the most
important sign that it's thoroughly rinsed. 

Dump it out one last time, and squeeze at least so it's not sopping, and then put it in your washing machine (the tub is a handy transport medium) run it through the "spin" cycle, and spread it out onto a rack to dry. I will note here that if you are within reasonable distance of your washing machine, you can spin it after the washing, before the first rinse. the more of that really dirty, soapy water you get out, the less times you have to rinse it. I have to trek across the house to get to the washer, and this isn't a superfine fleece I'm hyper concerned about felting, so I didn't bother. If you do not have a drying rack or screen, you can lay it out on a sheet, preferably outdoors in the sun. but it will dry more slowly, and you will need to turn it several times so it does all dry. Even on a rack, like this, if the fleece is really piled up you may need to turn it so the interior dries.

Now your fleece is all ready to process for spinning! it should be soft, and shiny, and still have some oils in it. you can see that the locks haven't formed little coats of matted fibers over them, that means I've done my job right and it will be easy to pick and card for spinning. It shouldn't be oily, but it shouldn't be dry either. the lingering lanolin aids in the spinning, 

You do NOT want to stuff this back into the plastic bag! Washed fleece needs to breathe! (in fact you really shouldn't store any kind of fleece in a sealed plastic bag. Better to wash it and store it clean even if you're not going to use it right away) Old pillow cases are the best way to store fleece, Stuff it all in there (an amazing amount fits, but you don't want to compact it too much, use two if you need to!) and tie off the top with a string. I always put a tag with a description of the fleece on the tie so  I don't have to open all the bags to find the one I want. Then I store the bags in a plastic bin.

You should stick a moth repellent into the pillow case with your fleece. Cedar chips and lavender tied off in a knee high stocking work just fine, Frequently at fiber fairs you can find people selling herbal moth repellent blends loose in bulk. These are particularly nice typically, and work well. You can make sachets but honestly, a knee high stocking knotted off is easiest and works best, as it lets out the scent, keeps in even very tiny herb fragments, and doesn't stick to the wool and get all tangled.

Any of you have additional tricks/tips? Leave a comment for me! I'm always super curious about other peoples methods!

Monday, February 5, 2018

Purple Smokkr

About a year ago, I aquired a lovely piece of wool twill, in a color I like to refer to as "plausible purple," with the intention of making myself a second smokkr, of the un-pleated variety, to expand my somewhat scant wardrobe. My black pleated smokkr is, at this point, more than three years old, and has made the rounds of many, many events. It's beginning to show some wear, and to be frank, I do get a little tired of wearing the same thing all the time. With the massive rush to get us ready for camping events last year, I did little to expand my own wardrobe, aside from necessary new undergowns and fighting gear. But this winter  I wanted to add a couple nicer pieces to my wardrobe, made properly, not in haste and out of absolute panicked necessity. With a kaftan and a second smokkr, I would be set for any events for the next few years, until my old things started wearing out at least. It would be a relief to just not have to worry about my own garb, and be able to focus on keeping the gremlins in clothing that actually fits.

As far as historical reference, I could go on at great length, but that would be reinventing the wheel, instead I would like to direct your attention to these two fabulous articles by Hilde Thnumen, who has gathered all of the primary source material, translated as necessary, and discusses the conclusions that may be reached at length. I cannot do better.
Viking Apron dress: Smokkr
 haithabu smokkr interpretation

Silver-gilt Viking pendant, Oland, Sweden,
6th century
I am going to be basing my reconstruction on the Haithabu smokkr, which is closest geographically to my persona's residence in what is modern Scotland, and on this wonderful little figurine, usually interpreted as a Valkyrie. I love the surface detail of the braided decorative bands. although this figurine seems to be wearing a separate trained garment over the top of her smokkr (we assume it is a smokkr, although we cannot see the turtle brooches) the slightly trained silhouette seems to be a theme among the figurines, and, as I find it graceful personally, I have maintained it in my recreation.

I started out by pinning the wool around my bust, to a comfortable tightness. that gave me a measurement of 41 inches (without seam allowance) separating half to the front, and half to the back, and adding seam allowance, gave me two panels of 21" Measuring down from where the top of my smokkr sits now, to where I wanted it to start to flare, gave me a measurement of about 8"

Then it's a matter of fitting the pieces onto the available fabric in the most efficient way possible. there are a number of hypothosized layouts for the fitted style smokkr, and you can make one work for almost any size and shape piece of fabric. I made the first cut with the front and back, then unfolded the leftover square to make the side gores. I did not curve the bottoms of the side gores because I wanted a train effect, the longer, diagonal side will go towards the longer train side. This also keeps the front relatively flat while flaring the back out, which matches with the shape of existing figurines.

With the rough seams sewn, I popped it on. I had the usual problem in the back, and had to take a large pinch out. I have an extremely curved lower spine, and it makes for a funny fit for almost all the basic layouts. One of the advantages of the pleated front smokkr is it alleviates this issue. I will probably have some horizontal wrinkling on this dress almost no matter what  I do, although cutting the back top down some helps, as does not trying to fit it tightly through the waist, which would be unflattering on me at present anyhow. with it on inside out I placed pins for the darts at the front, and also for the loops to hang my brooches from.

although I did run the long seams by machine, it was easier to run the very narrow darts (no more than a quarter inch at the widest!) by hand. Although the original piece, the ridge appears to have been set to the outside, then covered by fine braid, I had an oopsie here, and went on autopilot and put them to the inside. This is incorrect, however I plan to cover them with braid, so it will not be obvious.

Then I overcast all the seams by hand with contrasting thread, which is a period approved method of seam finishing.  I used blue DMC floss, since my ball of blue linen has gone walkabout. I'm not... entirely thrilled with the results. it's not as tidy as I'd love it to be, although certainly it's just as tidy as the overcast stitching on the dart of the extant garment.
 A number of the smokkr fragments found have been lined, or faced, with linen. It's impossible to know whether they were fully lined or not, since no full length garments have been found. because I ended up cutting the back of my smokkr down quite fat to make up for my curved spine and prevent unsightly wrinkles, I had a long bias edge from brooch to back. I wanted to stabelize this and keep the weight of the gown and pulling it on and off, from distorting the edge, so I used a partial lining of a natural colored linen. I also used this linen for the bottom brooch loops. Linen is actually more common, particularly for the hidden lower loops, than wool on extant smockkrs, probably because it wore better. I sewed the long hidden seam by machine again, doubling seaming it along the armpit/back portion.  Then flipped it into the inside of the dress, hand top stitched with purple wool, and used threads pulled from the selvedge of the linen to whip stitch the loops, and hem the lining down to the shell of the smokkr.

Fragment from Sarnanger b 10722 showing corded hem
Then remained hemming. I had my imagination caught by a fragment of twill, edged with a cord overcast with woolen thread. this seemed tidy, and like it would give the hem a beautiful shape. According to the article about the find (Thnumen covers it in her paper about smokkrs) it's a braided cord, whip stitched over with a two ply thread. I extrapolated that the cord was probably wool, since it still remained, although it could have equally been linen. I had wool, so I braided a 3 strand cord. The easiest way was to baste it to the edge of the smokkr, which kept it even, then overcast it with 2 ply wool, as seen in the fragment. you can see that the stitches are close, but not crowded. I attempted to recreate that, as well as the scale of cord/fabric. Of course I ran out of thread with an small section left in the center front. I was left with a few options. I could use another color to do the front section of the hem. I could undo the braid for the darts and use that thread to finish the hem, then make different braid, or I could find a way of decorating the front that hid the block of missing hem. Number one would have been the most historically accurate, and in the end, the least time consuming. Of course I chose the less historically accurate, more difficult, and super fancy option, and decided to make the front block purple, and root an appliqued tree into it.

My original plan had been to tablet weave wide trim and apply it in horizontal bands like on the valkyrie figurine. That plan is completely authentic and documentable (by viking standards) The new plan was less historically proveable. We do know that the vikings did use applique, the Osberg ship find included a wool gown with blue animals applied to the hem. Valkyrie figures show bands of decoration on skirts, but there is not real evidence for large scale blocks of decoration of this type. Even so, I liked the idea so much I ran with it. the best tree image I could find, was this one from a church in sedestal (for people with so many trees in their mythology, they sure didn't use tree images that much. Or my google fu for viking stuff has gotten weak), it's 12 century, so later, but the art has the proper shapes. I loved the acanthus like tree leaves. Acanthus shaped embroideries were part of the Mamman find, which is 10th century, so I felt the use of acanthus shapes was not out of context for my persona.

Also at Mamman was a embroidery showing two beasts (perhaps leopards?) facing a tree in the center. This was a common motif in oriental textiles of the period, which we know the vikings had access to, particularly from the pskov find that Thnumen goes over in her articles. It is thought that this motif was a reproduction of that style of artwork. Working from this base, and digging through my wool stash, I decided to use an appliqued tree with two Eastern Tygers facing it. Making my dress both a reference to the extant embroidery finds, and a nod to the east kingdom.

I drew the tree onto some aqua wool, and pinned it onto the gown. and then I started basting. And basting. And MORE basting. Followed by stitching it all down. I used small whip stitches, spaced out slightly. I've seen this technique used on early surviving applique pieces, and it was the most apt for the material I had to work with. The wool was more loosely woven and less fulled than is ideal for applique, so the edges required more stabelization, and I needed to cover more of the edge to keep the applique from just tearing out of the stitches.

That done, I sketched a quick Easter Tyger, slightly simplified to be more in line with the style of the mammen embroideries, and the extent oriental textiles. The extreme detailing of the EK tyger is much more in line with later artistic styles, so I just dialed it back a bit while trying to keep it recognizeable.  I cut that out of a gold wool skirt that I had for upcycling (moth holes) and pinned/basted it down. and by baste I mean overcast the edges with very tiny whip stitches to keep the little points from flying apart when I tried to applique around them.


Then I couched blue cord around the Tygers. Technically the Eastern Kingdom Tyger is blue on a field of yellow, but this looked good, and was still a nice nod at the East.

With the embroidery done, and thoroughly steamed (Even being careful it gets a little lumpy while you're working it) all that remained was to baste the braided trim (six strand braid in two colors like
in the Haithabu fragment) over the darts, and make the shoulder straps. Although there are plenty of examples of Smokkrs with both the upper and lower loops out of linen, I decided that I preferred the look of the matching straps, and made the upper straps/loops out of a remaining scrap of purple wool.  these were whip stitched down to the lining with my newly found blue linen thread, and my new EK Smokkr was done! and in plenty of time to wear to Birka. Of course Birka then didn't go as planned due to car trouble, and I missed the fashion show and only got to wear my new getup for a little bit. I did however, get to wear it with all my other fancy for walking into court at a part of my friend's pelican procession this weekend at dancing fox. I had the privilege of being the person who got to put together all the bits of his regalia cloak (it was a group project which a lot of hands worked on), and they asked me to carry it into court, which was a surprise and an honor! so I was happy that I had my new fancy EK Smokkr to wear. Now I just have to get an eye bleeding gold Serk to wear under it!

Of course there are no actual pictures of me wearing it in which you can see the garb.
Edited 4/19/18 to Add: Someone took a picture of me in it!


A couple final notes: because it's more fitted through the body, it makes my serks shorter! ACK. So I will at least make my fancy court serk to wear with this longer. Also, this lay out doesn't lay as gracefully across my back as I would like, due to the previously noted curvature of my lower spine. I think I need to add a small center back gore to alleviate this problem and make the gown flow gracefully from top to hem. Possibly I could also flip the center back pieces so the angled edge is at the center back, and the straight edge at the side back and get a similar effect, although that would effect the side flare (which I like) some.  As it is cut, there's a little wrinkle lump in the small of the back now, and there's not much I can do about it. I'm going to take the gown to my mom's and put it on inside out and see if with another set of experienced hands I can somewhat sort the problem, but alas, the only real solution is to put at least a small gore into the center back seam. Again, the pleated front smokkr doesn't have this problem. it's actually much more modest in fabric use as well. It's interesting the things you discover about fit while doing this sort of reconstruction work. I wonder if one of the reasons for the pleated fronts was because it provided good fit with less fabric. We'll never know of course, but it sure is fun to speculate!