 I'm making a gown based of this beautiful titian portrait "A lady in white" See that barely visible coil of ribbon woven hair? Isn't it lovely? Isn't it unfortunate that the last four inches of my fashionably light hair is.... Blue..... This is a problem I run into any time I do historical costuming. My hair is blue. Or purple, or some other not period color. My normal solution is to just cover my head, but this wasn't terribly fashionable with venetian women from what I can tell. I was mulling it over when it occurred to me that what I really needed was a hairpiece that I could pin over my own coiled back hair to produce a fashionable hairstyle and disguise my hair color. Basically a small hat, with a coil of ribbon bound hair around the outside that could be pinned down to my own hair.
Luckily for me, I have a victorian sensibility and save all my hair cuttings and a good deal of my hair combings. Typically I use them for spinning, but I've also made a couple of false hairpieces to wear with historical pieces, notably a pair of side braids for my 14th C wimple and veil. Thus I happened to have large hank of hair lurking about in my fiber bin. You can also go to a beauty supply store and purchase a hank of false hair that closely matches your own. It would be considerably easier to work with, and the ribbons and hairnet would disguise most of the "fake" look of the hair I think.
As a side note, this project could easily be done on a buckram base of your choice. In fact, it would save you time making the base, and make all the later sewing a little easier. However, if like me you don't have easy access to buckram, and don't want to pay a bunch of shipping, this method works surprisingly well with things you can get at any craft supply store, and may have lying around anyhow.

 The general idea is to cut a square of the craft plastic roughly the right size, heat it with the heat gun, and mold it over the bowl. There's a couple things I discovered about doing this. First, it's easy to melt the plastic. Second, the whole thing works way better with a pair of nesting bowls. Heat the plastic, and then mash the second bowl down and hold it very firmly for a couple minutes until it's cooled. Once I discovered using a second bowl, it only took me a few minutes to make a rough form. With the plastic shaped, I took a piece of coat hanger and shaped it around the bowl to make a circle the same size, overlapped the ends, and taped them down. Ideally for this you would use duct tape or electricians tape, but if you're out of those, your hello Kitty packing tape works just fine.
With the form done, now to make the base of the hairpiece. Using cotton string and a large needle, I first overcast stitched the wire circle to the plastic. Then I took a piece of fairly coarse brown linen, easy to drape, and not likely to be noticeable if it showed through the hair, and basted it down above the wire edge, easing it smooth as I went. With that done, I took some of my hair that I'd saved from brushing, combed it so it was all going in one direction rather than all wadded up, and spread it over the form. I found it worked to sew it down in several pieces to one side of the form, then spread it over, gather it into a small "tail" at the back, and then stitch that down. I then trimmed the extra hair off. At this stage it looks like a slightly creepy hair covered 40's hat, or possibly a sleeping tribble.
 Now I made a "hair net" over the hat base. I started by laying strips of gold ribbon over in a criss cross pattern, securing ends to the inside of the base with hot glue, and the crosses with pearl beads. I sewed the pearl beads on through the hat base, knotted the threads on the inside, and covered the knots with hot glue. I then worked a fine knotted net of gold thread through the ribbons, working silver glass beads onto the joins. Then I stitched a band of bias tape around the bottom edge of the hat base, covering up all the loose ends and stitching.
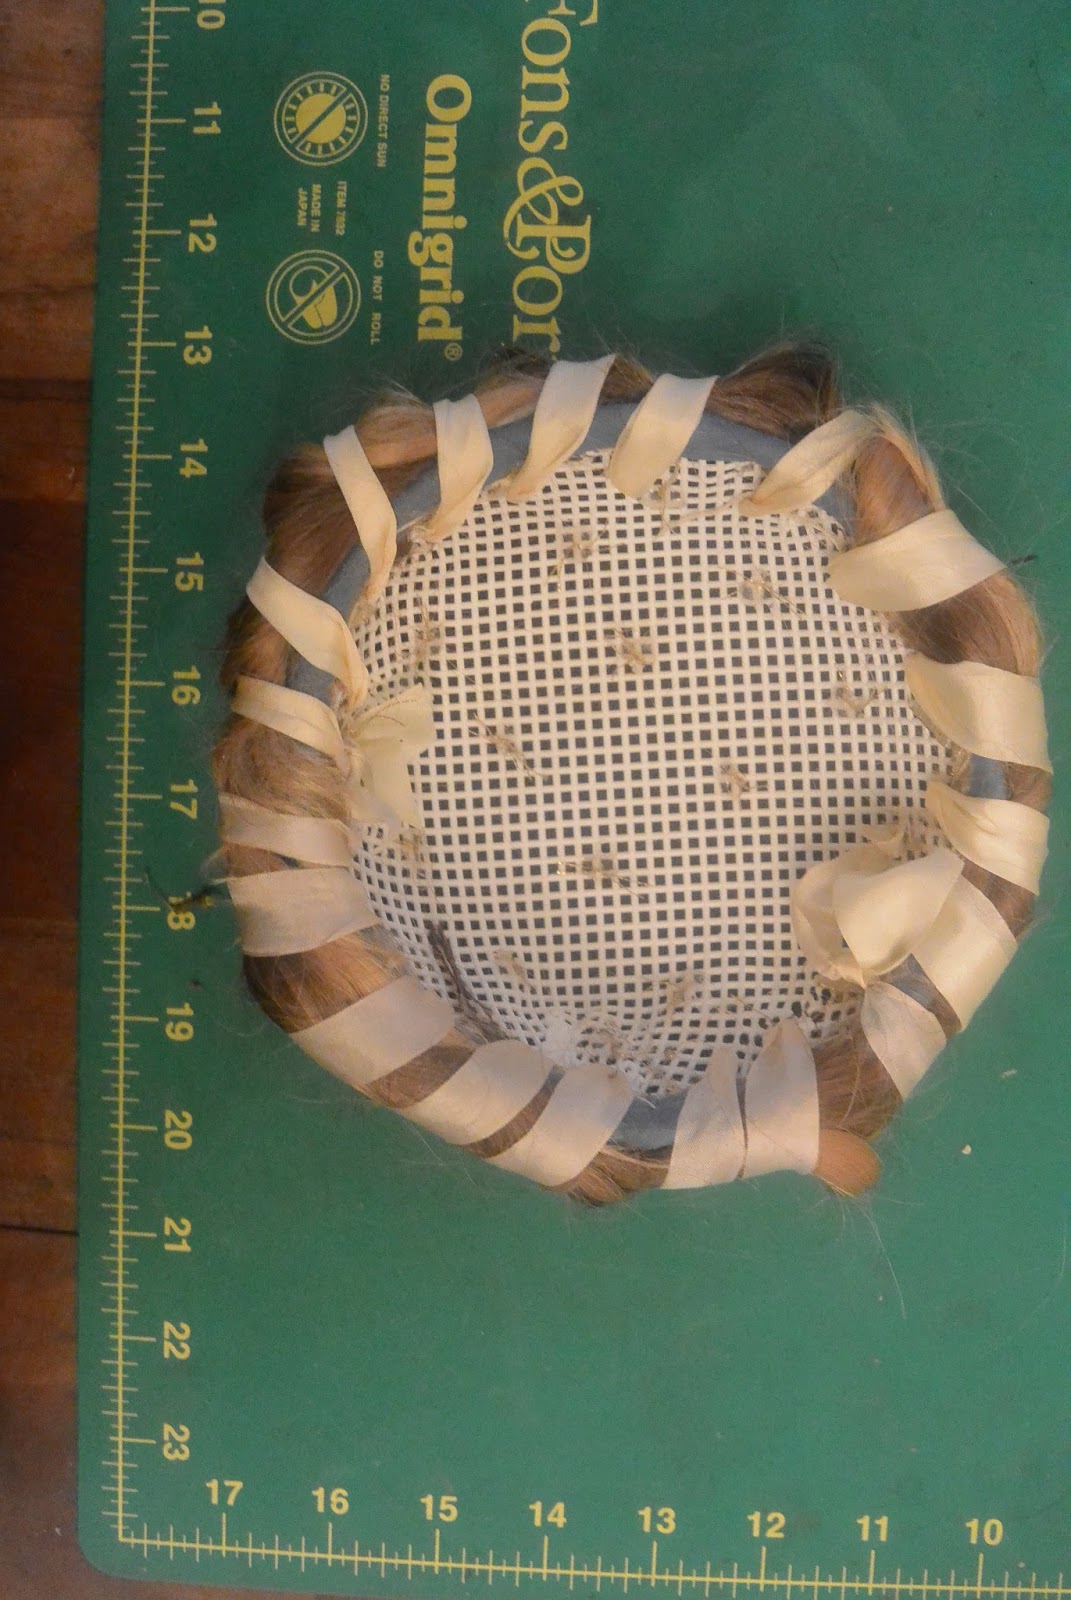
  Now if I had been using a hank of false hair this next step would have been easy. I would have made a braid or rope of the false hair, and sewed it on to the edge of the hat with ribbon. However the braid from last time I got annoyed with my real hair (which typically results in my hacking it all off.) was both shorter and slipperier than fake hair. So I ended up sewing locks firmly all around the edge, giving me this medusa look. Then I styled them into a coil, and using a yarn needle and silk ribbon, sewed them right through the mesh of the base, and over the edge.
Here's the final product: Pinned on it will look as though it is my actual hair styled. If you didn't have the problem that I have with covering your oddly covered hair you could stop after bias binding the edge of the "hairnet" portion, omitting the coronet, pin it on, and make your own hair into a coronet around it to give yourself the look of long period hair.
 |
| His Kittyness approves. |
 |
| The inside |
 |
| Held over my bun. pinned on I think it will be impossible to tell it's a hairpiece. |
I love it! It's beautiful and shows how resourceful you can be when you have to be. Great job!
ReplyDeleteYou are so creative! And I can't wait to see your finished dress on Saturday.
ReplyDeleteI would have never thought to save my own hair to make something like this! What an amazing idea!
ReplyDeleteI lost my hair to chemo and it will be years before I can do a proper hairtaped hairstyle. This is a wonderful project! My hair is almost long enough to pin to.
ReplyDelete